
ODROID-M1: Dockerized Home Assistant
Published by Weisser Zwerg Blog on

Dockerized home automation via Home Assistant, MQTT and remote access via WireGuard VPN and ProxyJump SSH all deployed via Ansible.
You can find the code on GitHub.
Rationale
As mentioned in my article Fuel Save Alerter, I was originally thinking about deploying the application locally to a
Raspberry Pi, but due to the delivery problems I decided to go with an ODROID-M1 with 8GByte
RAM instead. Then I reconsidered this decision and ended up deploying the
fuel-save-alerter-germany application on a netcup
VPS. In my article ODROID-M1: an Experience Report I described the characteristics of the ODROID-M1 and as I had the device already
I was thinking about how to make best use of it.
I finally ended up with the idea to deploy a dockerized version of Home
Assistant on the ODROID-M1, mostly following the excellent guidance given by Docker And Home
Automation by Home Automation
Guy. The main addition from my
side is to deploy everything via Ansible. In addition, I created a sample automation in pure
Python external to Home Assistant that communicates via MQTT with Home Assistant. Furthermore, I
create a WireGuard VPN to connect the ODROID-M1 in my home to
the netcup VPS, so that I can use the netcup VPS as a ssh
ProxyJump jump host to connect to the Home Assistant instance from anywhere I want.
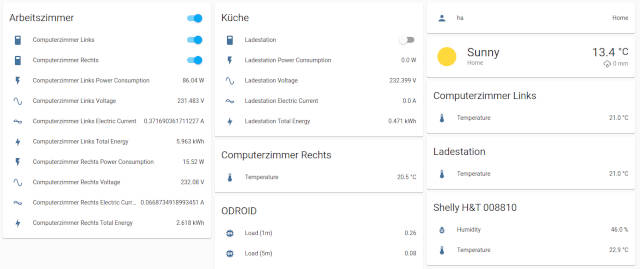
To give you an idea of how the final result will look like, here is a screenshot of one of my dashboards:
There exists also a Mobile App for iOS and Android. The
networking article describes how the app talks to the Home Assistant
instance. In the local network this worked for me out of the box.
As always, you can find the code on GitHub.
Home Assistant
Initially, I had trouble to understand what Home Assistant really is. On their web-site they recommend to install it as a complete image of their Home Assistant Operating System. In that configuration it includes a supervisor and a Home Assistant Add-ons store. Initially, I was uncertain what function each aspect of the overall system fulfils.
In the end I would say now that Home Assistant is a web application that connects to all relevant functionality via
network protocols. You don’t need the Add-ons store, because you can spin up all of these Add-ons via another docker container yourself. Like that
you have even access to many more external services and you have much more control over what is going on! I would even go as far as to recommend
to go with Home Assistant Core rather than the offical recommendation of using their Home Assistant
Operating System.
The services I chose to add in addition to the core Home Assistant web application are:
- portainer: a web interface to manage docker containers on the
ODROID-M1. - PostgreSQL: I simply always use PostgreSQL rather than any other DBMS.
- Actually, I use a version of Timescale to be prepared for further add-ons like Long time state storage (LTSS) custom component for Home Assistant.
- Mosquitto MQTT server: the interface to the outside world for
Home Assistant. - Duplicati: a backup software.
Have a look at the
docker-compose.yml file[1] for
more details. Most of the components I simply set-up according to the description given by Docker And Home
Automation by Home Automation Guy.
The system set-up consists of the following stages:
Home Assistantand services via Ansible, systemd service and docker-compose.Home Assistantcore configuration via rsync copy.- Overall state of all services via Duplicati backup
In stage 1) you install the core services via Ansible, which in turn will set-up a systemd service which will start a docker-compose stack. At this stage all services are running, but they are not connected or configured.
In stage 2) you create a base configuration for Home Assistant via its configuration files. On the ODROID-M1 they will be located at
/opt/homeassistant/data/homeassistant/config. In the GitHub repository the relevant files are located at
homeassistant-backup.
For a fresh install stages 1) and 2) plus some manual actions to set-up the MQTT server are needed. Just follow the instructions from MQTT and Home
Assistant.
For a crash recovery or similar also step 3) is needed. There, you restore all other system state of the overall system via the Duplicati backup
system. See Backing Up Home Assistant Container to Google Drive with
Duplicati for details.
ODROID-M1 basic set-up
The basic set-up of the ODROID-M1 is described in ODROID-M1: an Experience Report. After that you’ll have to set-up ssh so that
Ansible can connect to the device. Ideally you configure sshd in a way that it only allows public key
authentication and does not allow root logins. You will want
to be able to edit Home Assistant configuration files via Visual Studio Code and its Remote
Development extension. You can follow the description at
vscode-remote-ssh-as-root to achieve that. Basically you have to add the following at the bottom of your sshd_config on your ODROID-M1:
Match Address 127.0.0.1
        PermitRootLogin yes
And put something like that in your ~/.ssh/config on your workstation:
Host odroid-root
  HostName 127.0.0.1
  ProxyJump odroid@odroid
  User root
And if you then add in addition your ~/.ssh/id_rsa.pub to the authorized_keys of the root account (/root/.ssh/authorized_keys) on the
ODROID-M1 then you can connect directly via ssh and via the VS Code Remote Development extension to the root account of your ODROID-M1:
> ssh odroid-root
Once that is done you have to adapt the code in the odroid-m1-dockerized-homeassistant
GitHub repository to your situation. I use the user name odroid and the device is accessible via the DNS name odroid in my local network. If your
situation is different then just adapt the settings in ansible.cfg and
hosts to your situation.
Check that everything works as expected:
> ansible all -m ping
Or
> make ansible_ping
Stage 1: ODROID-M1 Home Assistant set-up
If you do not have the ansible requirements installed yet, then execute the following. This will only be required one time:
> ansible-galaxy install -r requirements.yml
The stage 1) base set-up is done via:
> make deploy
This is equivalent to:
> ansible-playbook setup.yml --ask-become-pass
You will have to provide the password for the odroid user on the ODROID-M1. In addition, the odroid user has to be able to execute sudo
commands, which should be the default behaviour.
Stage 2: ODROID-M1 Home Assistant base configuration
I have provided a set of base configuration files in the homeassistant-backup directory that you can use. Either completely or partially.
The location on the ODROID-M1 where to put these configuration files is at /opt/homeassistant/data/homeassistant/config. You can either copy all
the files there via rsync[2]:
> rsync -av --progress --stats ./homeassistant-backup/ odroid-root:/opt/homeassistant/data/homeassistant/config
Or manually edit what you need via for example the VS Code Remote Development extension.
MQTT set-up and restart
For the final touches for the MQTT set-up, please follow the instructions from MQTT and Home
Assistant. After that you’ll have to check the
configuration and restart Home Assistant via its web-interface. Go to the Developer Tools and execute the CHECK CONFIGURATION in the
“Configuration validation” section. There you can also restart Home Assistant once the validation gives you green light to do so.
Stage 3: Duplicati Backup
To set-up a complete backup of all state of all components just follow the instructions at Backing Up Home Assistant Container to Google Drive with
Duplicati. As a slight deviation from the set-up of
Home Automation Guy, I put the configuration at /opt/homeassistant/data rather than at /opt. That way the
ODROID-M1 can be used for other purposes besides Home Assistant and you can deploy those other services besides the Home Assistant service in
the /opt directory.
External Python Automation
I don’t know how that happens, but my first ideas for how to use any new technology I investigate always exceed the capabilities that are provided
easily out of the box. This was also the case for Home Assistant 😀
I have some FRITZ!DECT 200 power plugs that I used so far solely to measure power consumption. I noticed that even when I switch off all devices in the evening like my computer(s) and monitor there remains some power consumption of round about . Now, my idea was to write an automation that looks at the current power consumption and if the power consumption for the last 12 minutes was below then my devices are switched off and it is save to just switch off the power plug itself. This way I avoid wasting when nothing is running.
This use-case is more difficult than it looks like. You have to look into the past and see if the maximum power consumption for the past 12 minutes was below . In addition, if you manually decide to turn the power plug on again, it will still fulfil the condition that for the past 12 minutes the power consumption was below and this would trigger a turn off command for the power plug immediately again, e.g. you could not turn on the plug even if you wanted to. So you have to add a condition that the power plug was not triggered on in the past 12 minutes in addition to the being below in that time period.
The code is in odroid-m1-dockerized-homeassistant/python. I connect
directly to the PostgreSQL database with pandas.read_sql_query() to read
the relevant past states from there. Then I trigger a MQTT[3] message on the automation/{device_name}_trigger_off topic that is picked up by a Home Assistant automation. Look at
automations.yaml at alias: 'Ladestation: trigger power off for standby power consumption'. So what happens is
- Read past states from
PostgreSQL - Check switch off condition
- If switch off condition is given publish on the MQTT topic
- The
Home Assistantautomation listens on that topic and does that actual switching off
You can deploy the script as follows:
> ansible-playbook setup-python.yml --ask-become-pass
This will:
- Set-up Miniconda.
- Install mamba instead of the standard
conda. - Set-up a
py38od(Python 3.8 OdroidD) conda base environment including numpy and pandas. - Install additional python packages via
requirements.txtand install the actual python scripts at/home/odroid/opt/homeassistant-automations. - Install a systemd-service and a systemd-timer that runs the script every 10 minutes.
You can also do partial deploys via any of the following commands:
> ansible-playbook setup-python.yml --tags install-requirements-and-python-scripts
> ansible-playbook setup-python.yml --tags install-systemd-services --ask-become-pass
> ansible-playbook setup-python.yml --tags install-requirements-and-python-scripts --tags install-systemd-services --ask-become-pass
The first command does not require the sudo password and can be used to update the current script plus its dependencies defined in the
requirements.txt file.
Local development
If you execute
> make ssh
in another terminal it will in fact execute
> ssh -L 9000:localhost:9000 -L 5432:localhost:5432 -L 8123:localhost:8123 -L 8200:localhost:8200 -L 1883:localhost:1883 odroid@odroid
This will make available:
- portainer on
localhostport 9000 - PostgreSQL on
localhostport 5432 - Home Assistant on
localhostport 8123 - Duplicati: on
localhostport 8200 - Mosquitto MQTT server on
localhostport 1883
That way you can develop your python scripts in a local Jupyter Notebook and once you’re happy with it deploy the script to the
ODROID-M1. An example for such a local notebook is at
2022-08-02-trigger-power-off-for-standby.ipynb.
WireGuard
The WireGuard VPN set-up is not automated yet as it only has to be done once. See the article: Expose server behind NAT with WireGuard and a VPS[4] for a more detailed explanation.
This set-up will allow you to ssh ProxyJump over the computing instance that is reachable in the internet onto the device behind a router. This
set-up will not enable the devices behind a router to talk directly among each other (I have one Raspberry Pi 3 Model
B in one location behind a first router and the
ODROID-M1 in another location behind a second router, e.g. the Raspid cannot talk to the
ODROID via the VPN). For that to work the devices would need to be able to talk directly to each other on the udp level.
As a side remark: this set-up would also allow you to expose services running on the devices behind a router via the
traefikset-up we created in the Traefik as Reverse Proxy article via thefile providermethod. In such a set-uptraefikwould take care of theSSL/TLSoffloading and the communication betweentraefikon the computing instance that is reachable in the internet and the actual service on the device behind a router can happen viahttpor any other protocol supported bytraefik.traefikcan also take care of authentication and authorization.
On the devices where WireGuard is running you will need a private key and the associated public keys. To generate those keys you can use the following command:
> for i in {1..3}; do prvk=$(wg genkey); echo "$i - priv: $prvk pub: $(echo $prvk | wg pubkey)"; doneThe output will look like this (just a sample output; don’t use!):
1 - priv: YJjibIYFSITIDhRRbqJX2wDNPk5eI4hBqO5fAqdKZ1E= pub: fo/fngmdgkfcPXxWX728xfUQDScH0nt4h38qYzh2Oz8=
2 - priv: ALJESSMpAmkmUQx/txX/GXgO2EuGOtefeZEcdeCYklk= pub: akQsDXIclG5N1pPsDolsStLuDwQmzn+ZrXO76wWlAQo=
3 - priv: YBOb1iiesvG+nZ4bBkphOpFZGdMBCK2oz5fPer8fbVU= pub: Mjwfor1rxEv56il29h8JEsNCujqtNbvg+k7DRYktyEk=
On the computing instance that is reachable in the internet (for me this is the netcup VPS) set-up a file /etc/wireguard/wg0.conf:
[Interface]
Address = 10.0.1.1
PrivateKey = ...
ListenPort = 51820

[Peer]
PublicKey = ...
AllowedIPs = 10.0.1.2/32

[Peer]
PublicKey = ...
AllowedIPs = 10.0.1.3/32
Once that is done start the WireGuard process:
> sudo systemctl start wg-quick@wg0
> sudo systemctl enable wg-quick@wg0
On your devices that operate behind a router, like the ODROID-M1 for me, set-up a file /etc/wireguard/wg0.conf:
[Interface]
Address = 10.0.1.3
PrivateKey = ...

[Peer]
PublicKey = ...
AllowedIPs = 10.0.1.1/32
Endpoint = v2202206177879193164.goodsrv.de:51820
PersistentKeepalive = 25

[Peer]
PublicKey = ...
AllowedIPs = 10.0.1.2/32
And again start the WireGuard process:
> sudo systemctl start wg-quick@wg0
> sudo systemctl enable wg-quick@wg0
If you need to analyse issues with WireGuard looking at the wireguard logs may help.
Finally set-up the ProxyJump configuration in .ssh/config on your workstation.
Host ha-odroid
  HostName 10.0.1.3
  User odroid
  IdentityFile ~/.ssh/id_rsa
  Port 22

  ## sample for ProxyJump
  ProxyJump vagrant@v2202206177879193164.goodsrv.de

  ## sample for ProxyCommand
  ProxyCommand ssh -W %h:%p v2202206177879193164.goodsrv.de
After that you should be able to ssh to your device behind the router via:
> ssh ha-odroid
Footnotes
Pay special attention to
network_mode: hostfor the homeassistant container; this will allow auto discovery of devices in the local network. ↩︎See Rsync copy directory contents but not directory itself. ↩︎
I recommend the MQTT Essentials and MQTT 5 Essentials from the HiveMQ team.
I am using Shelly devices and wanted to connect them via MQTT rather than the default integration. The following video explains how to do that: Adding Shelly Humidity and Temperature sensor to Home Assistant by using the following GitHub project: ha-shellies-discovery. ↩︎Multiple ways to expose a local server behind NAT or firewall ↩︎