
Ecowitt WS2910 weather station via Ecowitt GW2000 (Wittboy) and dockerized WeeWX
Published by Weisser Zwerg Blog on

Setting up WeeWX as a second weather station software besides HomeAssistant.
Rationale
After my failed attempt to set-up a secondary weather station receiver in Ecowitt WS2910 868MHz weather station and Software Defined Radio (SDR) I decided to go the “standard” route and buy an Ecowitt GW2000[1] (Wittboy) gateway and use it to feed a dockerized WeeWX weather station software instance.
This sounds simple enough, but dockerized WeeWX does not seem to be the norm and therefore poses some challenges.
Setting up the Ecowitt GW2000 (Wittboy) Gateway
This was a really simple process. The only slightly negative experience was that the gateway package did include a usb power cable, but not a usb power supply. Most likely due to the fact that all around the world the power plugs are different. But be aware that you will have to buy one in addition.
You can find the whole set-up process instructions in the gateway manual and further supporting material plus the download links to the smart phone apps here and here.
After powering-up the GW2000 gateway, it opens up a Wireless Access Point. Once you connect to it you will have to browse to http://192.168.4.1 to open
the embedded web page. From there the next steps to connect to your standard WLAN network are self-explanatory.
Once the gateway is in your standard WLAN you should use the router to find out the gateway’s IP address and open it in your browser like
http://192.168.178.97. Via my FRITZ!Box I can use the URL http://gw200x-wh268x.fritz.box/. In the Sensors ID section of the web-interface it
detected my weather station as a Temp & Humidity & Solar & Wind & Rain device automatically.
In the Weather Services section of the web-interface you find the device’s MAC address that you can use to integrate the device into
ecowitt.net.
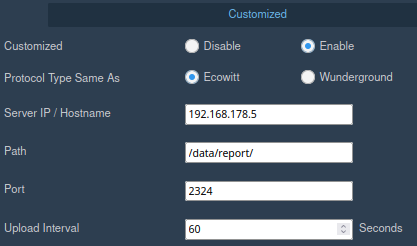
In the same Weather Services section further down you will also find the section Customized that you will need to configure to feed data into the
WeeWX instance. The IP address I used for the WeeWX host is 192.168.178.5 and the port 2324 I configured in the weewx.conf. We will look at
that later, but here is how the configuration of the gateway looks like:
Dockerized WeeWX
By now I expect a seamless experience and a well-documented process to set-up software packages like WeeWX via docker. But here is where the
problems start: the documentation of WeeWX does not mention a dockerized install process at all.
This statement is not completely correct. If you search more extensively you come across the docker page in the
WeeWXwiki, which mentions two repositories that are both outdated: jgoerzen/docker-weewx and MrNonoss/WeewX-Docker.
This is when you
start searching if somebody else has done the job for you. While I found several other starting points the only repo on GitHub, I found that has a
Dockerfile upgraded to the most recent version 4.10.2 (at the moment) was the
weewx-docker repo from felddy. But this repository does not seem to be
maintained in other ways like No module named ‘Cheetah’, and other issues. Anyway, I decided to
stick with it.
This container has the following WeeWX extensions pre-installed:
Patch the Dockerfile
The first step is to clone the weewx-docker repository and then copy and paste the content of the following
diff into a Dockerfile.patch file right beside the Dockerfile in the repository:
*** orig/Dockerfile     2023-04-03 06:14:34.098472924 +0200
--- modified/Dockerfile 2023-04-03 06:20:27.384291437 +0200
***************
*** 47,52 ****
--- 47,58 ----
  ENV PATH="/opt/venv/bin:$PATH"
  RUN pip install --no-cache --requirement requirements.txt

+ RUN pip install --no-cache wheel setuptools
+ RUN pip install --no-cache configobj paho-mqtt pyserial pyusb
+ RUN pip install --no-cache Cheetah3
+ RUN pip install --no-cache Pillow==9.4.0
+ RUN pip install --no-cache ephem
+
  WORKDIR /root

  RUN bin/wee_extension --install /tmp/weewx-mqtt.zip
Then you can apply the changes via the patch tool:
> patch -p1 Dockerfile < Dockerfile.patch
Or you just make the changes by hand.
Just as a side remark: in this
DockerfileI saw for the first time theBUILDPLATFORMvariable and I was curious. You can find more details here:
- https://www.docker.com/blog/faster-multi-platform-builds-dockerfile-cross-compilation-guide :
BUILDPLATFORMis part of a set of automatically defined (global scope) build arguments that you can use.In addition, I wanted to know what this
xxDocker image does: https://github.com/tonistiigi/xx : xx provides tools to support cross-compilation from Dockerfiles that understand the--platformflag …
Once that is done you build the image on the machine where you want to use it:
> docker build . --tag weewx:4.10.2
docker-compose
You would think that once you have the docker image you’re done and can start using it by just providing a few command line arguments to the docker
run command. I was surprised to see that the weewx-docker documentation did not mention any port mappings
for its docker compose file. There has to be some way that my Ecowitt GW2000 can send its data packets to this instance and there has to be some way
via which a web-browser can access the web application, or so I thought. I was expecting at least one port mapping for an integrated webserver that
would receive the gateway data packets at one URL and serve the web application at the root URL.
But this is not how WeeWX works. While WeeWX is a long running process it works by regularly (as far as I can tell every 5 minutes) generating
static HTML pages, but WeeWX does not come with an integrated webserver or similar. This means you need to add something like nginx to the
picture. And while the weewx-docker image has
weewx-interceptor (This is a driver for weewx that receives and parses network traffic) integrated
the documentation does not talk about how to set it up to receive the data-packets from the gateway.
As I had to create a more involved docker-compose.yml file anyway I added Duplicati to the mix to be able to configure
regular backups:
services:
  duplicati:
    image: lscr.io/linuxserver/duplicati
    environment:
      - PUID=0 # 1000
      - PGID=0 # 1000
      - TZ=Europe/Berlin
      - CLI_ARGS= #optional
    volumes:
      - /opt/weewx/data/duplicati/config:/config
      - /opt/weewx/data:/source
      - /opt/weewx/duplicati-backup:/target
    ports:
      - "127.0.0.1:2325:8200/tcp"
  web:
    image: nginx:1.23.0
    networks:
      - wxnet
    ports:
      - "127.0.0.1:2305:80/tcp"
    depends_on:
      - weewx
    environment:
      - TZ=Europe/Berlin
      #- NGINX_HOST=<<YOUR-DOMAIN-NAME>>.com
      #- NGINX_PORT=80
    volumes:
      - /opt/weewx/data/weewx/public_html:/usr/share/nginx/html:ro
      # - /media/docker/volumes/ngnix/templates:/etc/nginx/templates
    restart: unless-stopped
  weewx:
    image: weewx:4.10.2
    networks:
      - wxnet
    ports:
      - "0.0.0.0:2324:2324/tcp"
    init: true
    restart: unless-stopped
    # devices:
    #   - "/dev/ttyUSB0:/dev/ttyUSB0"
    # privileged: true
    volumes:
      - type: bind
        source: /opt/weewx/data/weewx/data
        target: /data
      - type: bind
        source: /opt/weewx/data/weewx/public_html
        target: /home/weewx/public_html
    environment:
      - TZ=Europe/Berlin
      - TIMEZONE=Europe/Berlin
      - WEEWX_UID=weewx
      - WEEWX_GID=dialout

networks:
  wxnet:
    driver: bridge
All ports are only open on localhost except the port 2324, where weewx-interceptor receives its
data packets from the gateway.
You will also need to create the directory structure under /opt/weewx:
root@pi:/opt/weewx# tree
.
├── data
│   ├── duplicati
│   └── weewx
│       ├── data
│       │   ├── weewx.conf
│       │   └── weewx.sdb
│       └── public_html
├── docker-compose.yaml
└── duplicati-backup
> mkdir -p /opt/weewx/data/duplicati
> mkdir -p /opt/weewx/data/weewx/data
> mkdir -p /opt/weewx/data/weewx/public_html
> mkdir -p /opt/weewx/duplicati-backup
And put the above docker-compose.yaml at /opt/weewx/docker-compose.yaml.
You will also need to adapt access rights for the places where the weewx container will write data to. It acts as the user WEEWX_UID=421 (see the
Dockerfile) under the group dialout.
> chown root:dialout /opt/weewx/data/weewx/data
> chown root:dialout /opt/weewx/data/weewx/public_html
> chmod g+w /opt/weewx/data/weewx/data
> chmod g+w /opt/weewx/data/weewx/public_html
Configure WeeWX
The next step is to configure WeeWX. This means to create the weewx.conf and the weewx.sdb files at /opt/weewx/data/weewx/data that you see in
the above tree command output already but won’t be there unless you create them. First start and create dummy files by executing the following:
> cd /opt/weewx
> docker compose run weewx
For all questions just hit enter. This will create 3 files: the above-mentioned weewx.conf and the weewx.sdb and a file like
weewx.conf.20230401170108. This last file seems to be the default file and can be used to patch it. I suggest that you adapt the below patch file
manually to your settings and then copy it to /opt/weewx/data/weewx/data/weewx.conf.patch:
*** orig/weewx.conf      2023-04-01 18:50:56.114928967 +0200
--- modified/weewx.conf  2023-04-03 07:14:53.584095749 +0200
***************
*** 29,48 ****
  [Station]

      # Description of the station location
!     location = "My Little Town, Oregon"

      # Latitude in decimal degrees. Negative for southern hemisphere
!     latitude = 0.00
      # Longitude in decimal degrees. Negative for western hemisphere.
!     longitude = 0.00

      # Altitude of the station, with the unit it is in. This is used only
      # if the hardware cannot supply a value.
!     altitude = 700, foot    # Choose 'foot' or 'meter' for unit

      # Set to type of station hardware. There must be a corresponding stanza
      # in this file, which includes a value for the 'driver' option.
!     station_type = unspecified

      # If you have a website, you may specify an URL. This is required if you
      # intend to register your station.
--- 29,48 ----
  [Station]

      # Description of the station location
!     location = "Berghütte, 85863 Lansing"

      # Latitude in decimal degrees. Negative for southern hemisphere
!     latitude = 48.14
      # Longitude in decimal degrees. Negative for western hemisphere.
!     longitude = 11.57

      # Altitude of the station, with the unit it is in. This is used only
      # if the hardware cannot supply a value.
!     altitude = 520, meter    # Choose 'foot' or 'meter' for unit

      # Set to type of station hardware. There must be a corresponding stanza
      # in this file, which includes a value for the 'driver' option.
!     station_type = Interceptor

      # If you have a website, you may specify an URL. This is required if you
      # intend to register your station.
***************
*** 57,62 ****
--- 57,83 ----

  ##############################################################################

+ [Interceptor]
+     # This section is for the network traffic interceptor driver.
+
+     # The driver to use:
+     driver = user.interceptor
+
+     # Specify the hardware device to capture. Options include:
+     #   acurite-bridge - acurite internet bridge, smarthub, or access
+     #   observer - fine offset WH2600/HP1000/HP1003, ambient WS2902
+     #   lw30x - oregon scientific LW301/LW302
+     #   lacrosse-bridge - lacrosse GW1000U/C84612 internet bridge
+     #   ecowitt-client - any hardware that uses the ecowitt protocol
+     #   wu-client - any hardware that uses the weather underground protocol
+     device_type = ecowitt-client
+     # w = letter 23
+     # e = letter 05
+     # x = letter 24
+     port = 2324
+
+ ##############################################################################
+
  #   This section is for uploading data to Internet sites

  [StdRESTful]
***************
*** 127,133 ****
          # protocol. Not all hardware can support it. See the User's Guide.
          rapidfire = False
      [[MQTT]]
!         server_url = INSERT_SERVER_URL_HERE

  ##############################################################################

--- 148,157 ----
          # protocol. Not all hardware can support it. See the User's Guide.
          rapidfire = False
      [[MQTT]]
!         server_url = mqtt://mqttusr:mqttpwd@192.168.178.5:1883/
!         topic = weather
!         unit_system = METRIC
!

  ##############################################################################

***************
*** 249,255 ****

          # Which unit system to use for all reports. Choices are 'us', 'metric', or 'metricwx'.
          # You can override this for individual reports.
!         unit_system = us

          [[[Units]]]

--- 273,279 ----

          # Which unit system to use for all reports. Choices are 'us', 'metric', or 'metricwx'.
          # You can override this for individual reports.
!         unit_system = metricwx

          [[[Units]]]
Once you have that just do the following:
> cd /opt/weewx/data/weewx/data
> cp weewx.conf.20230401170108 weewx.conf
> patch -p1 weewx.conf < weewx.conf.patch
Mosquitto MQTT
Be aware that I have a separate Mosquitto MQTT server running on 192.168.178.5, which I did not describe how to set it
up in this blog post. The only use of that is so that you can make use of the weather data in other places like other scripts or applications. If you
don’t need that functionality, then just ignore all the MQTT stuff or alternatively just follow any other documentation for how to set-up Mosquitto
like ODROID-M1: Dockerized Home Assistant or directly see
here.
Run WeeWX
Now you have everything in place to be able to run WeeWX:
> cd /opt/weewx
> docker compose up -d
Initially you might want to start without the -d option, so that you have the logs directly on the console. Alternatively, you can use docker compose logs to look at the logs. You will have to wait something like 5 minutes to receive data packets from the gateway and wait until WeeWX runs
its report generation cycle at least once before you can see anything via the web browser. As we configured nginx to only serve its files locally
you either have to be on the machine where we installed WeeWX to browser http://localhost:2305/index.html or you use ssh something like that:
> ssh -D 1234 -L 2325:localhost:2325 -L 2324:localhost:2324 -L 2305:localhost:2305 -L 1883:localhost:1883 your-machine-name
You should now be able to access the files generated by WeeWX via http://localhost:2305/index.html on your local machine.
SOCKS Proxy
The -D option in the SSH command line above might help if you want to access other machines in the remote network (like the router or similar) via
Firefox. It generates a SOCKS proxy on your machine. You would have to change the proxy configuration of your
Firefox browser to something like below:
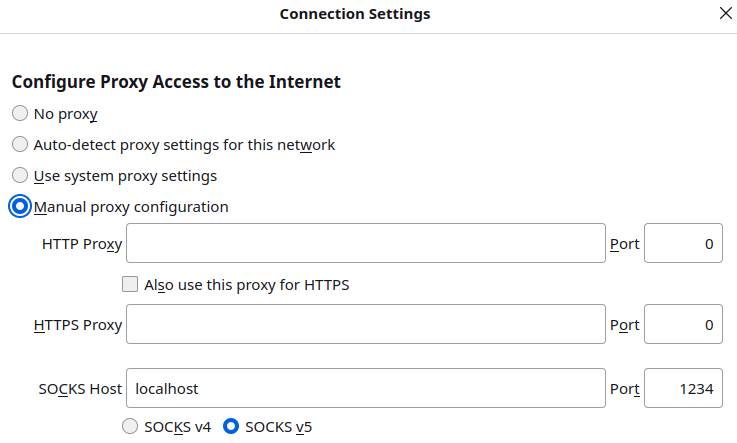
Once you have done that you can browse to other places in your remote network like your router http://192.168.178.1 or similar.
Remaining issues
Every 5 minutes the system will generate the reports and populate the /opt/weewx/data/weewx/public_html folder. I still receive the following error
messages, which prevents the images from being generated:
ERROR weewx.reportengine:         ****  y1 must be greater than or equal to y0
ERROR weewx.reportengine:         ****  Traceback (most recent call last):
ERROR weewx.reportengine:         ****    File "/home/weewx/bin/weewx/reportengine.py", line 197, in run
ERROR weewx.reportengine:         ****      obj.start()
ERROR weewx.reportengine:         ****    File "/home/weewx/bin/weewx/reportengine.py", line 385, in start
ERROR weewx.reportengine:         ****      self.run()
ERROR weewx.reportengine:         ****    File "/home/weewx/bin/weewx/imagegenerator.py", line 42, in run
ERROR weewx.reportengine:         ****      self.gen_images(self.gen_ts)
ERROR weewx.reportengine:         ****    File "/home/weewx/bin/weewx/imagegenerator.py", line 114, in gen_images
ERROR weewx.reportengine:         ****      image = plot.render()
ERROR weewx.reportengine:         ****              ^^^^^^^^^^^^^
ERROR weewx.reportengine:         ****    File "/home/weewx/bin/weeplot/genplot.py", line 222, in render
ERROR weewx.reportengine:         ****      self._renderDayNight(sdraw)
ERROR weewx.reportengine:         ****    File "/home/weewx/bin/weeplot/genplot.py", line 266, in _renderDayNight
ERROR weewx.reportengine:         ****      sdraw.rectangle(((xleft,self.yscale[0]),
ERROR weewx.reportengine:         ****    File "/home/weewx/bin/weeplot/utilities.py", line 442, in rectangle
ERROR weewx.reportengine:         ****      self.draw.rectangle(box_scaled, **options)
ERROR weewx.reportengine:         ****    File "/opt/venv/lib/python3.11/site-packages/PIL/ImageDraw.py", line 294, in rectangle
ERROR weewx.reportengine:         ****      self.draw.draw_rectangle(xy, fill, 1)
ERROR weewx.reportengine:         ****  ValueError: y1 must be greater than or equal to y0
ERROR weewx.reportengine:         ****  Generator terminated
As soon as I know how to fix that I will post an update.
Update 2023-04-05
The short answer to the above mentioned remaining issue is that Pillow 9.5.0 was just posted on 1 April and introduced some incompatible change. The
problem was introduced with this Pillow pull request. Therefore, the quickfix for this problem is
to use Pillow==9.4.0 in the Dockerfile. I’ve already updated the Dockerfile patch above accordingly. The future fix for weewx is
here.
WeeWX: Installation using setup.py
In order to help debug the problem I had to set-up weewx from sources. I followed the instructions outlined here: WeeWX: Installation using
setup.py, but I used a conda environment with pip
installs rather than using the operating system packages. The quick version of it all is the following:
> mamba create -n weewx python=3.9
> conda activate weewx
> pip3 install configobj paho-mqtt pyserial pyusb Cheetah3 Pillow ephem
> wget https://weewx.com/downloads/weewx-4.10.2.tar.gz
> tar -xzvf weewx-4.10.2.tar.gz
> cd weewx-4.10.2
> python3 ./setup.py build
> python3 ./setup.py install
> # create the weewx.conf.patch from here: https://weisser-zwerg.dev/posts/ecowitt-gw2000-weewx-docker/
> patch -p1 weewx.conf < weewx.conf.patch # or make the changes manually
> wget -O weewx-mqtt.zip https://github.com/matthewwall/weewx-mqtt/archive/master.zip
> ./bin/wee_extension --install ./weewx-mqtt.zip
> wget -O weewx-interceptor.zip https://github.com/matthewwall/weewx-interceptor/archive/master.zip
> ./bin/wee_extension --install ./weewx-interceptor.zip
> wget -O weewx-gw1000.tar.gz https://github.com/gjr80/weewx-gw1000/releases/download/v0.5.0b5/gw1000-0.5.0b5.tar.gz
> ./bin/wee_extension --install ./weewx-gw1000.tar.gz
> # optional: PYTHONPATH=/home/wyse/opt/weewx/bin python -m user.gw1000 --test-driver
> # -------------------
> ./bin/weewxd
weewx-gw1000 driver
Along the process I found the weewx-gw1000 driver. I was not aware that the Ecowitt WLAN gateways (not only
the GW1000 or GW2000, but also the WH2910 or WS2910 console) offer their data via port 45000 (see Data Exchange TCP Protocol for
GW1000,1100,1900,2000,2680,2650). Here is a
web version: Telnet Protocol[2].
This means that you could avoid opening up port 2324 to the outside world, which might be a gain from the security side.
You can find out how to configure the weewx-gw1000 driver on its web-site, but the quick version of it is to add something like the following above
the [Interceptor] section of the weewx.conf file:
##############################################################################

[GW1000]
    # This section is for the Ecowitt Gateway driver.

    # How often to poll the API, default is every 20 seconds:
    poll_interval = 20

    # The driver to use:
    driver = user.gw1000
    ip_address = 192.168.178.97
    port = 45000
WeeWX Weather Data Center skin (weewx-wdc)
The WeeWX Weather Data Center skin might be the next thing you might want to look at. You can see a running
example here: https://www.weewx-hbt.de. You can also look at a walk-through (in German) here: WLAN Wetterstation von
ecowitt. The steps to set this up are not difficult. Just look at the sample
Dockerfile provided by the creator of weewx-wdc.
Footnotes
Pay attention to buy the right gateway for your weather station by selecting the correct
MHzvalue in the Ecowitt shop! ↩︎You might want to use packetsender to play with the protocol. ↩︎