
Photovoltaics for Urban Spaces: Shadow Effects on Balcony Power Stations (Balkonkraftwerk)
Published by Weisser Zwerg Blog on

Delve into my journey of designing, constructing, and managing a balcony power station. Discover the significant impact of shadow effects in (urban) photovoltaic solutions.
Rationale
I like to delve into topics from small to large, from simple to complex, and step by step. My exploration into the fascinating world of photovoltaics kicked off in 2022, when I discovered that DIY enthusiasts like myself could set up a small photovoltaic system without the need for professional electricians, as long as the power production on the AC side didn’t exceed 600 W. In Germany, these compact power stations go by various names, but the most common is Balkonkraftwerk, or ‘balcony power station’, even if they’re not necessarily situated on a balcony. This revelation sparked a journey of learning, involving hours of reading, watching YouTube tutorials, engaging with local hobbyist groups, and any other resource that could deepen my understanding of photovoltaics.
The following blog post chronicles this exciting journey.
Click on Images
Should you come across any images in the following content, feel free to click on them for a more detailed, enlarged view.
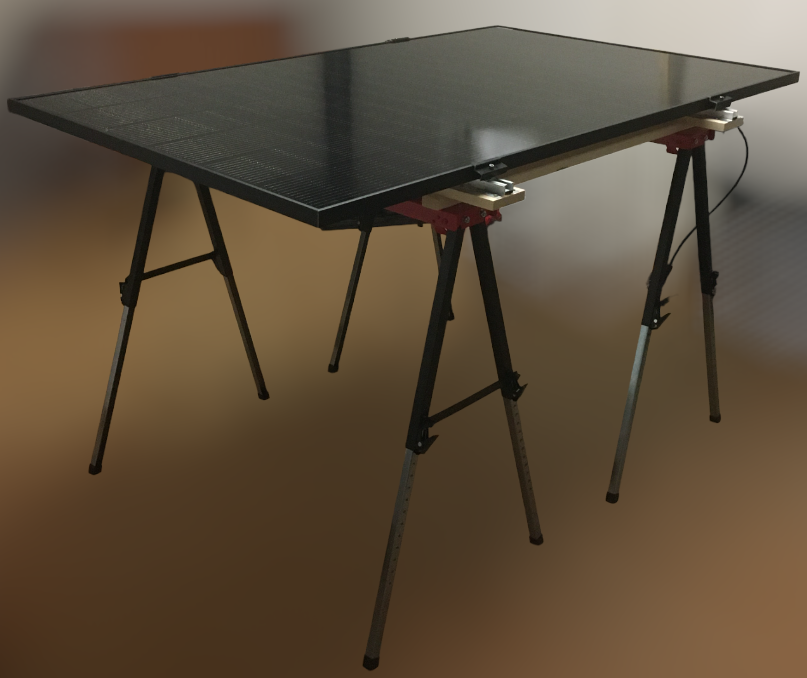
The Solar Table Project (Solartisch)
I reside in a first-floor apartment with a mostly south facing balcony. When I decided to set up a solar power station on my balcony, I quickly learned that mounting solar panels/modules[1] on the exterior requires permission from the community of owners (Eigentümergemeinschaft). Unfortunately, this opportunity only comes once a year during the annual assembly (Eigentümerversammlung), and I had missed my chance for 2022. A helpful resource was the document Balkonkraftwerke in der Eigentumswohnung. With its help, I found a workaround in the form of a solar table, which doesn’t require any permissions as it falls under the category of balcony decor.
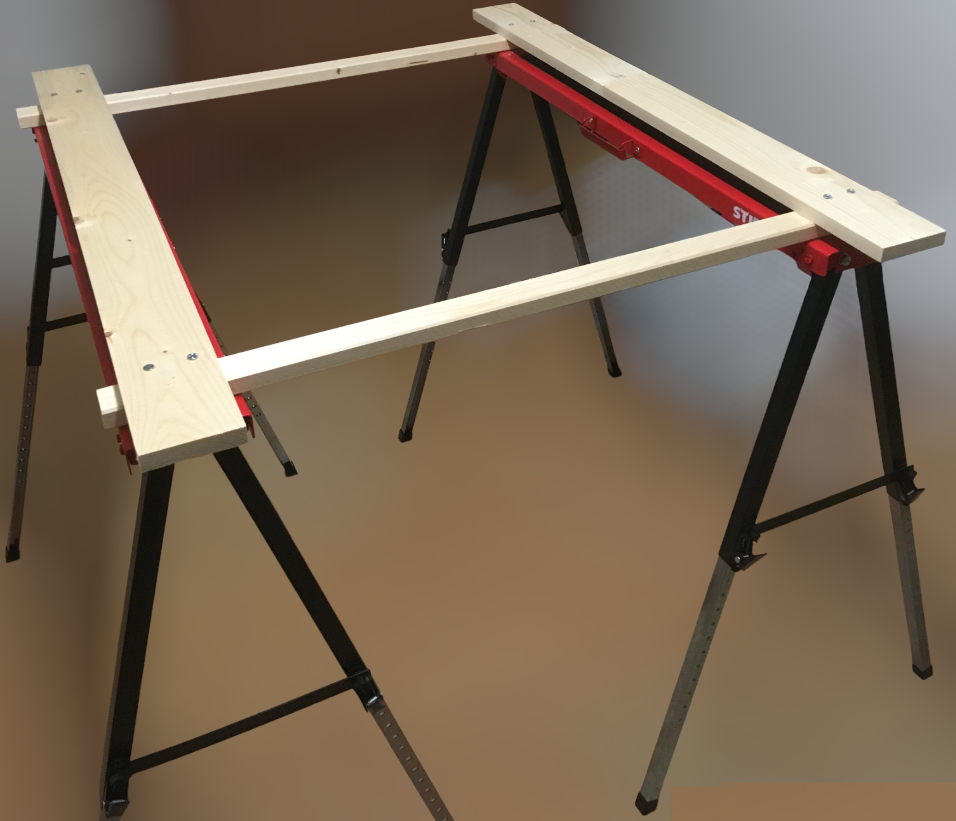
During my research, I stumbled upon an article on Heise titled Strom selbst erzeugen: Wie Sie einen Solartisch bauen[2], which provided a guide on building a solar table. As a novice in woodworking, the process seemed daunting. So, I opted for a simpler solution: two STIER Falt Arbeitsbock for 36,81€ each, with a basic wooden structure on top.
This project also introduced me to an unexpected challenge: the lack of standardization in the photovoltaic industry. I had assumed that after two decades, the solar industry would have established standards, especially for seemingly trivial matters like sizing. But, this was not the case. This lack of standards is prevalent in the solar industry, so take nothing for granted.
The problem arose when I purchased the same mounting rails from eet.energy as mentioned in the Heise article, but used a different panel - a Jinko Solar JKM375N-6TL3-B with size (H x B x T) in mm: 1692 x 1029 x 30. The panel’s depth was only 30mm, while the mounting rails were designed for modules with a depth of 35-40mm. Long story short, the rails didn’t fit my panel. I ended up buying the K2 2004211 MiniRail 2.0 Set and K2 2002559 Clamp EC 30-50mm clamps that were compatible with my panel.
You might wonder why I didn’t simply bolt the panel to the table. That is one of my remaining open questions. I came across several YouTube videos suggesting that the frame of a solar module is not designed to be a “holding structure”. I did not find anything explicit in writing, but for example, in the video Darum nicht anwinkeln am Balkon: Windlast-Gefahr / Achtung: Modulrahmen, Holger Laudeley, warns explicitly against mounting with bolts. Although the Jinko Solar Installation Manuals do mention “2.3.1 Mounting with Bolts”, I decided to err on the side of caution.
Another question that arose was about the torque to apply when mounting the clamps. According to the Jinko Solar Installation Manuals, the reference value of tightening torque for an M8 bolt is 16-20 Nm, and for an M6 bolt, it’s 9-12 Nm.
Bulkiness (Handhabbarkeit) / Handling the Heft
The solar panel in question measures 1692 x 1029 x 30mm and tips the scales at 19kg. Initially, I opted for this module thinking it would fit snugly into our station wagon, with the length being the only potential hiccup. Our car trunk can accommodate items nearly 1.8m long, leaving me with a comfortable 10cm margin with this module. However, the width proved to be a bigger challenge than the length. At its narrowest, our trunk is just 0.95m wide. So, in hindsight, any panel would have been a misfit for our trunk. This might seem trivial until you need to transport or sell the panels, at which point it becomes a significant issue.
Another hurdle posed by the panel’s size comes into play when setting up a balcony power station. If you’re planning to mount the modules on your balcony’s exterior, safety, particularly wind load (Windlast), becomes a critical concern. Holger Laudeley’s video provides an in-depth discussion on these safety issues and their solutions using a specific mounting kit: Darum nicht anwinkeln am Balkon: Windlast-Gefahr.
The primary motivation for choosing a standard panel is its cost-effectiveness. However, it’s essential to remember that the panel alone isn’t sufficient; you’ll also need a mounting kit. Regardless of your approach, if you buy a mounting kit, it will always be around 100€ per panel. The cost of my solar table setup was approximately 100€. Another option I considered was the Profiness mounting kit for balcony railings PV-Montagesystem >>> Aufständerung >>> Geländer/Zaun/Wand-Sets (you have to manually click through the bullet point menu on the left, because direct linking was not possible), which also costs around 100€.
In contrast, specialized panels designed for balcony mounting are smaller, lighter, and far easier to handle. The two I examined are:
From a safety standpoint, I’d feel more at ease mounting a 3kg panel with velcro to the balcony railing than a hefty 20kg panel using a mounting kit. But that’s just my personal preference.
The primary drawback of these specialized panels is their cost. They’re priced around 1€/Wp, compared to 0.25€/Wp (or even less) for a standard panel. However, with growing demand, we can hope for these systems to become more affordable in the future.
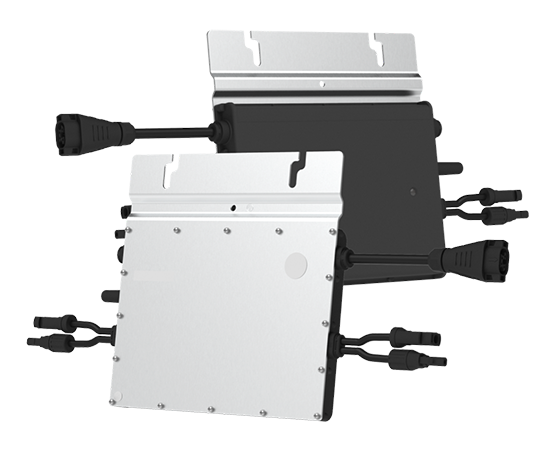
Power Inverter with MPPT Tracker
Solar modules generate DC electricity, but your home runs on AC electricity. This is where a power inverter enters the picture. It’s a device that transforms DC into AC. Power inverters come in various “sizes”. For instance, a large solar power plant would need a different set of devices compared to a small balcony power station. The power inverters for smaller setups, like balcony power stations, are often referred to as “micro inverters”. These usually come with connectors for one or two solar panels, with MC4 connectors being the standard. At least here it seems that vendors have standardized on MC4 connectors. Each connector typically has an MPPT tracker (Maximum Power Point Tracking) whose role is to optimize power extraction from the panel.
As a side note: when dealing with larger solar power generators where multiple panels are connected in series and/or parallel to a single inverter, you might face issues if the panels don't receive uniform sunlight. This could be due to different orientations or shadow differences. It's also advisable not to mix panels from different manufacturers. Even panels from the same manufacturer and type can cause issues if they aren't precisely standardized or if they were produced in different batches. For a deeper dive into this topic, I recommend Photovoltaics: Fundamentals, Technology, and Practice by Konrad Mertens.Fortunately, you won’t face this issue with micro inverters as each panel has a dedicated connection to the inverter.
Moreover, you can connect (micro-)inverters on the AC side. While you can technically do this with a simple multi-outlet power strip, the inverters are designed to be connected on the AC side.
In essence, that’s all there is to it. Connect the panels to the inverter, plug the inverter into the power socket, and you’re good to go.
When I chose the Hoymiles HM-600 micro inverter, I didn’t give it much thought:
However, looking back, I believe it was a wise choice for several reasons:
- It integrates seamlessly with Home Assistant via OpenDTU or
AhoyDTU right out of the box. DTU stands for Data Transfer Unit and acts as a “proxy” between the wireless
protocol that the Hoymiles HM-600 inverters use natively and WLAN/MQTT. Although Hoymiles sells
DTU units, they can be quite pricey.
- For HMS, HMT: DTU-Pro-S or DTU-Lite-S
- For MI, HM: DTU-WLite, DTU-Pro or DTU-W100/G100
- It wasn’t affected by RelaisGate, an issue that plagued some brands of micro inverters due to a missing required relay.
I should note that I use the HM-600. Since then, I’ve noticed that there are also newer HMS-600 inverters available (notice the S in HMS). While Hoymiles has improved several electrical characteristics of these inverters, such as the voltage range and the current limit, they’ve also made other less obvious changes like:
- The wireless protocol and frequency: previously, with the HM-series it was the 2.4 GHz spectrum and now, with the HMS and HMT series, it’s the sub 1-GHz spectrum.
- There’s an updated version of OpenDTU for the HMS and HMT series, but it requires a different RF module that’s more challenging to connect to an ESP32.
- The AC connectivity: previously, with the HM-series it was a Betteri BC01, with the HMS series it’s a Betteri BC05 and with the HMT series, it’s a Betteri BC06.
Shadow
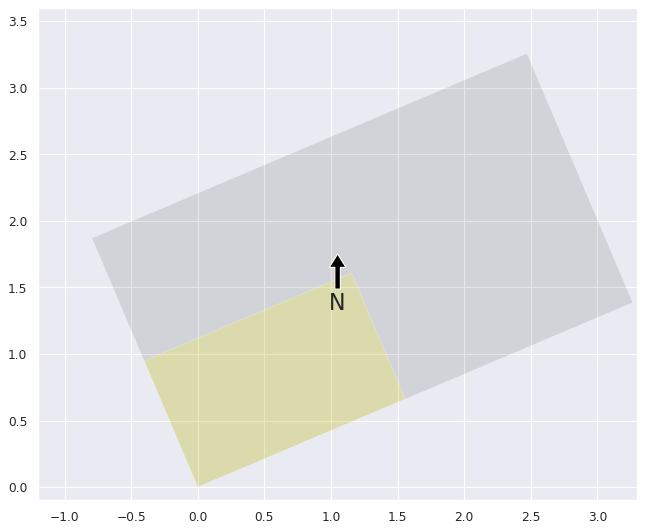
Initially, I set up two solar tables on our balcony, a space measuring approximately 3.5 meters by 2.0 meters and facing roughly south. In the image
below, the balcony area is depicted in gray, the first panel in yellow, and the second panel in green:
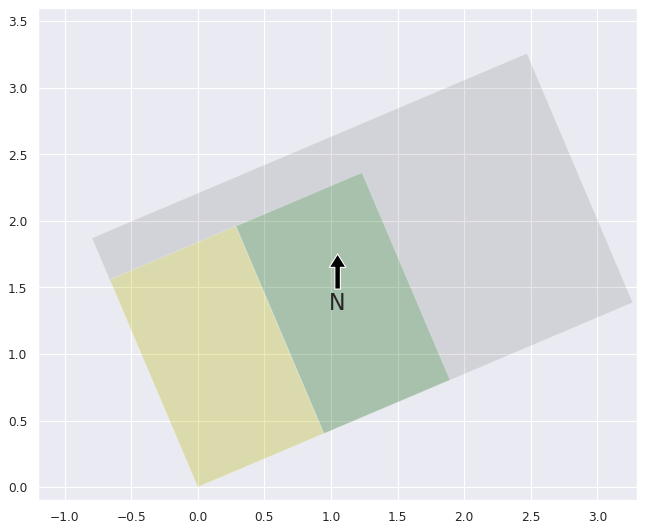
Looking back, it seems a bit naive, but I didn’t initially take into account the shadow cast by our upstairs neighbors’ balcony. Moreover, I didn’t fully grasp the significant, non-linear impact that shadow would have on my solar power production. I’m grateful that I started this project on a small scale on our balcony, where I could closely observe and develop a better intuition of these effects. Imagine if you had a large-scale solar power generator on your roof with long strings of solar panels. If a partial shadow, say from a chimney, fell across your panels, it would be challenging to intuitively understand the impact and attribute any power production drop to that “little bit of shadow”[3].
Since then, I’ve made some adjustments. I’ve positioned one panel vertically on the outside of our balcony[4], while leaving the
other panel as a solar table with a different orientation:
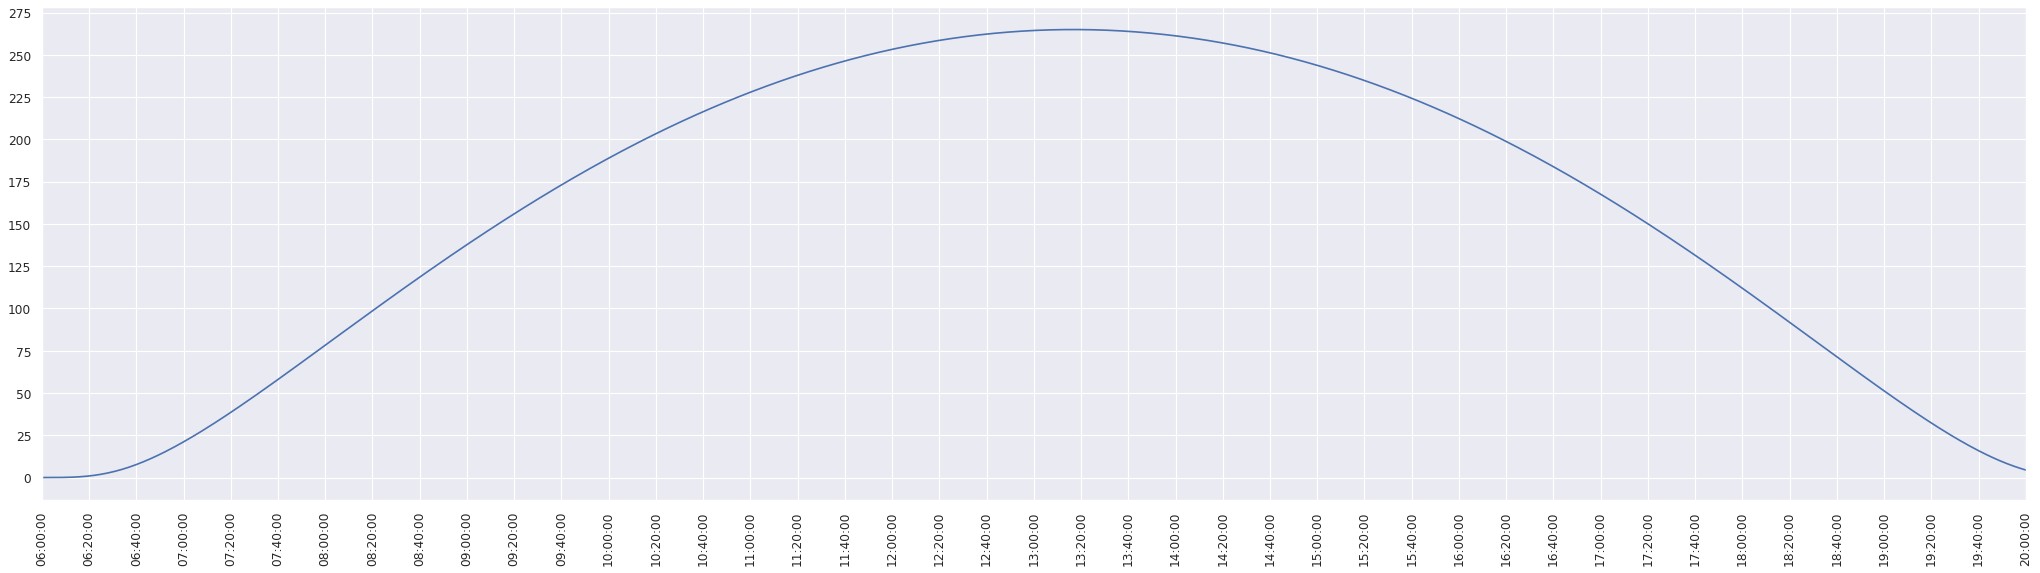
The image below shows the solar power production of this solar table on a particularly sunny day:

For comparison, I’ve also calculated the pvlib clear sky simulation[5]:
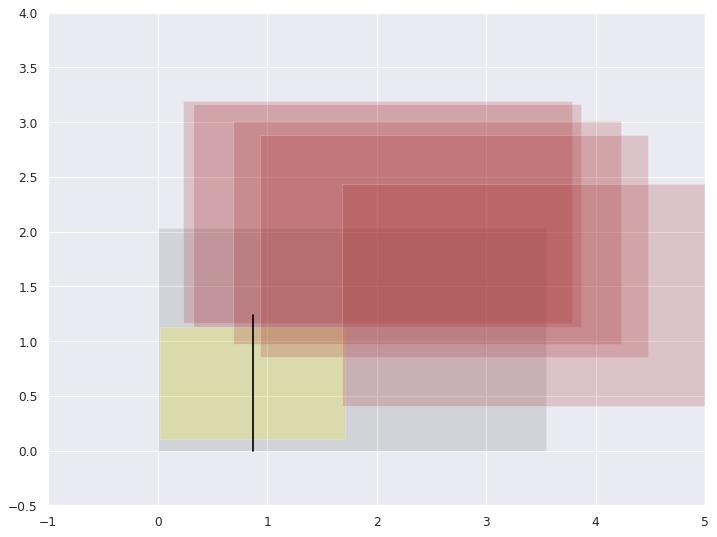
The brown rectangles in the following image represent the shadow at various times (from left to right): 12:50, 13:00, 13:45, 14:20, and 15:40:
You’ll notice that at 12:50, the shadow barely grazes the panel, and the panel produces its “full sun” power level of just over 250 watts. By 13:00, the shadow begins to cover the panel, and the power output starts to decrease. This continues until 13:45, when the shadow effect is at its peak. From the potential 250 W, only 20 W are produced, which is less than 10%! However, by around 14:15/14:20, the shadow effect significantly reduces as the shadow moves across the middle line of the module. Finally, at around 15:40, the shadow completely leaves the panel, and the panel returns to its “full sun” power level[6].
The actual DC power production from this panel that day, as measured by the inverter, was 1566 Wh. The clear sky model would have predicted 2223 Wh. Without the shadow from the balcony above, we could have boosted our yield by a whopping 42%. That’s SIGNIFICANT!
Bypass Diodes
The typical picture for bypass diodes looks as follows:
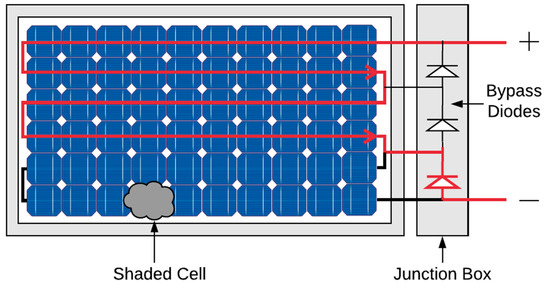
They are supposed to run across the short side of the panel, so that if there is a shadow on one side of the long side, you should only lose 33% of the performance. However, in my case, this doesn’t seem to hold true. Even the slightest shadow on the longer side drastically reduces the performance, plummeting it to below 10%. This leads me to believe that the bypass diodes in my panel might be arranged differently. I attempted to find more details in the datasheet, but to no avail.
Here’s a simple trick to understand your solar panel’s behavior under shadow conditions: use a towel. On a sunny day, place a towel over certain parts of your panel and observe the changes. A towel is perfect for this experiment as it can cover the entire panel, and by folding it, you can mimic smaller shadows.
For those interested in delving deeper into the world of bypass diodes, check out: Bypass-Diode in a Solar Panel explained.
Half Cell Panel Design
Looking back, I realize that a half-cell solar panel could have been a beneficial choice. The standard illustration for bypass diodes in half-cell panels is as follows:

Check out this YouTube video for a detailed comparison between Half Cell VS. Full Cell Solar Panel Design.
And an additonal note: a glass-glass bifacial panel could have been an optimal selection to also harness light from the rear of the panel. Given that the panel is positioned above a light-colored balcony floor, there will be diffused light reflecting onto the panel from the back, aiding in the generation of solar power.
Jupyter Notebook Simulations
For those of you interested in running similar simulations, we’ve got you covered! You can access the Python code and Jupyter notebook right here:
Wrapping Up
I trust that this discussion has provided you with a deeper understanding of the significant impact of shadow effects on solar power generators, especially those installed on balconies. To put it simply, the key takeaway from this blog post could be humorously translated as “Schatten ist Scheiße” (shadow is a nuisance)!
Footnotes
The terms “solar panel” and “solar module” are often used interchangeably. ↩︎
For our German readers, you might find Der Solartisch und die grüne Steckdose interesting. ↩︎
You could use software like PV*SOL premium (English): Webinars and Tutorials to simulate shadow effects. ↩︎
During our 2023 community of owners assembly (Eigentümerversammlung), I seized the opportunity to secure permission to mount solar panels on the exterior of our balcony. ↩︎
If you’re keen on learning pvlib, I highly recommend the video series pvlib python by Sascha Birk. ↩︎
Upon closer inspection, you might notice that we haven’t quite reached the “full sun” level as predicted by the clearsky model. There’s an additional shadow factor that I haven’t delved into in this post. ↩︎