
Nym Mixnet & dVPN: A Node Operator's Guide
Published by Weisser Zwerg Blog on

Support reclaiming our digital civil rights and privacy by running your own Nym node as a node operator.
Deprecated
This post is no longer current and has been superseded by a newer, updated article. Please refer to the latest post for accurate and up-to-date information.
!!DEPRECATED!!
Rationale
The Nym mixnet and its distributed VPN (dVPN) depend on people like you to run nodes, which keep the network robust.
Nym’s blockchain-based incentives reward node operators with cryptocurrency, creating a potential small business opportunity. This guide was originally part of a larger blog post on digital civil rights and privacy tools (like VPNs, Shadowsocks, Tor and I2P). Here, we focus on how to set up and operate a Nym node so you can help defend our digital rights and privacy.
If you want to learn about using the NymVPN as a user, please refer to my earlier blog post: Nym Mixnet: NymVPN.
If you’re eager to dive deeper, I recommend checking out the Nym Docs for more detailed information. Currently, the amount of information and documentation available for the Nym mixnet and its technology is somewhat limited. However, you can find helpful resources and support at the following platforms:
- Nym Forum: A community-driven space to discuss Nym’s technology and get answers to your questions.
- Nym on Discord: Join the conversation and connect with other users and developers in real time.
- operators:nymtech.chat
- Nym on GitHub: Explore the code, report issues, and contribute to the project.
- Governator
Proof of Stake (PoS) and Proof of Work (PoW)
The Nym mixnet combines Proof of Stake (PoS) and Proof of Work (PoW) mechanisms:
- Proof of Stake: You’ll need to hold Nym tokens and bond them to your node. To maximize your node’s financial performance, you’ll also want to encourage others in the community to delegate some of their Nym tokens to your node. This delegation acts as a sign of trust and helps the network prioritize your node. However, the system is designed with balance in mind - nodes that hold too many delegated funds may see reduced rewards. This encourages a healthy, decentralized network. (For more details, check out the Nym Tokenomics documentation page.)
- Proof of Work: Your node must perform useful tasks, like participating in the Nym mixnet to ensure secure and private communication.
Steps to Set Up a Nym-Node:
- Get Nym Tokens: Acquire some Nym tokens to begin.
- Choose a VPS Provider: Research and pick a Virtual Private Server (VPS) provider that fits your needs.
- Install the Node: Set up your
nym-nodeon your VPS. - Bond Tokens: Bond 100 Nym tokens to your node (currently worth around €10).
- Build Trust: Convince others in the community to delegate their tokens to your node.
If running your own Nym node feels like too much of a commitment, you can still contribute to the network by delegating your Nym tokens to an existing node (for example, mine!). Detailed instructions for this will follow below.
Acquire Nym Tokens
To begin, you’ll need to get some Nym tokens. For detailed instructions, check out the Nym Wallet Preparation page.
Step 1: Set Up Your Nym Wallet:
- Download the Nym Wallet: Visit the Nym Wallet website and download the wallet application for your operating system.
- Create Your Wallet Account:
- If you don’t have an account, the wallet will guide you through creating one.
- You’ll receive a BIP 39 Mnemonic Word List — a unique set of 24 words that acts as your account identifier.
- Important: Store these 24 words securely, such as in a password manager. You’ll need them to log in and access your wallet in the future.
Step 2: Fund Your Wallet with NYM Tokens:
- To bond a node, you’ll need at least 100
NYMtokens. However, to cover gas fees, it’s recommended to have some more. I’d suggest a minimum of 200NYMtokens. - The Nym documentation suggests using the Bity broker. Here’s why:
- Simple Payment Options: You can use a credit card or bank transfer to complete your purchase.
- No KYC for Small Amounts: For amounts like 200
NYMtokens, using a bank transfer avoids the Know Your Customer (KYC) verification process.
- How It Works:
- Agree to Terms: On the broker’s website, confirm the transaction conditions.
- Provide Your Wallet Address: Copy your wallet address from the Nym wallet and share it with the broker.
- Transfer Funds: Follow the broker’s instructions to transfer money via your chosen payment method.
- Receive Tokens: Once the broker processes your payment, they’ll transfer the
NYMtokens to your wallet.
Additional Note: NYM tokens are held on the Cosmos blockchain. The Nym project uses this blockchain for payment-related aspects of the mixnet rather than operating a separate blockchain.
Research and Select a Virtual Private Server (VPS) Provider
Choosing the right VPS provider[1] is crucial for running a Nym node effectively. To help you make an informed decision, the Tor Project’s Good Bad ISPs page offers valuable advice that also applies to Nym nodes.
For better anonymity and network resilience, avoid VPS providers and countries that already host a large number of nodes. As of now, it’s recommended to steer clear of the following providers:
- Frantech / Ponynet / BuyVM (AS53667)
- OVH SAS / OVHcloud (AS16276)
- Online S.A.S. / Scaleway (AS12876)
- Hetzner Online GmbH (AS24940)
- IONOS SE (AS8560)
- netcup GmbH (AS197540)
- Psychz Networks (AS40676)
- 1337 Services GmbH / RDP.sh (AS210558)
According to the Nym blog post Nym node Delegation Programme is now open, preference is given to nodes that avoid using popular providers like AWS, Hetzner, Contabo or Google Cloud VPS providers.
You can use the Nym node explorer to identify areas with high node concentration, so you can contribute to a more diverse and balanced network.
One reason for dense node concentration in certain countries is the availability of VPS providers offering excellent value for money. In addition, when planning to operate a Nym exit gateway, you should consider the legal jurisdictions of your provider.
As a side note: If you receive an “Exit Gateways Abuse Report” from your ISP, the Nym project recommends using the Response template for Tor relay operator to ISP:
When you receive an abuse report please use Tor template for a quick response, but modify all “tor” in the text into “proxy server” before you send it as Nym is not Tor and it’s an extra red flag. We are working closely with lawyers to write up Nym specific template.
Secondly, join this matrix channel
!YfoUFsJjsXbWmijbPG:nymtech.chatand share as much as possible (like screen prints, provider, location etc).Last but not least, join community legal counsel - our collective knowledge hub. Read https://nym.com/docs/operators/community-counsel and add your findings by opening a PR: https://nym.com/docs/operators/add-content
After some research, I chose the VPS S plan from Avoro, part of dataforest GmbH in Germany. The plan costs €5.50 per month and includes a 4 vCPU, 8 GB RAM instance with IPv4 and IPv6 support. These specifications align perfectly with the recommendations in the Nym operators guide.
Things to note about avoro: At the moment you’ll need to contact Avoro’s support team to enable an IPv6 address, as their web interface doesn’t currently support self-service for this feature.
The web interface may show a DNS name like v0000000000.v-server.me, but this resolves to a different IP than the one displayed. Avoro’s support clarified that the subdomain or hostname is purely symbolic and not functional.
To handle this, I used No-IP, a free and simple solution for setting up a DNS entry[2].
For the operating system, I selected Ubuntu 24.04 LTS, a stable and widely supported option. Once your VPS instance is configured, you’re ready to proceed with installing the Nym node.
VPS Setup & Configuration
The VPS Setup & Configuration guides you through installing and configuring your VPS, including setting up a firewall using the UFW firewall frontend.
apt update -y && apt --fix-broken install
apt -y install ca-certificates jq curl wget ufw jq tmux pkg-config build-essential libssl-dev git
apt install ufw --fix-missing  # Double check ufw is installed correctly
ufw version                    # Check if you have ufw installed
When enabling the firewall, proceed carefully to avoid locking yourself out of your VPS.
DON’T DISCONNECT your ssh session unless you have executed the ufw allow 22/tcp after the ufw enable or you’re locked out.
If you were to lock yourself out the only solution will be to reinstall your VPS from scratch.
ufw enable
ufw allow 22/tcp    # SSH - you're in control of these ports
ufw allow 80/tcp    # HTTP
ufw allow 443/tcp   # HTTPS
ufw allow 1789/tcp  # Nym specific
ufw allow 1790/tcp  # Nym specific
ufw allow 8080/tcp  # Nym specific - nym-node-api
ufw allow 9000/tcp  # Nym Specific - clients port
ufw allow 9001/tcp  # Nym specific - wss port
ufw allow 51822/udp # WireGuard
ufw status
Initially, I followed the standard VPS Configuration process, including setting up the UFW firewall. However, I later discovered that running network_tunnel_manager.sh (or here) caused the UFW package to be uninstalled. Despite this issue, I recommend sticking to the outlined sequence of steps, as I eventually arrived at a fully functional setup.
Generating the Binaries
With the operating system configuration complete, the next step is to compile the Nym node binaries. Compiling the binaries from source is straightforward. Here’s how to do it:
apt install pkg-config build-essential libssl-dev curl jq git

curl --proto '=https' --tlsv1.2 -sSf https://sh.rustup.rs | sh

rustup update
git clone https://github.com/nymtech/nym.git
cd nym

git reset --hard      # in case you made any changes on your branch
git pull              # in case you've checked it out before

git checkout master   # master branch has the latest release version: `develop` will most likely be incompatible with deployed public networks

cargo build --release # build your binaries with **mainnet** configuration
Once the build process is complete, the compiled binary will be available at: ./target/release/nym-node.
If you prefer not to build from source, you can download Pre-built Binaries. To find the latest release tag on GitHub, use the following command:
curl --silent "https://api.github.com/repos/nymtech/nym/releases" | jq -r '.[] | select(.name | test("Nym Binaries")) | .tag_name' | head -1At the time of writing, the latest release is nym-binaries-v2025.1-reeses. You’ll need the nym-node binary from that release.
wget https://github.com/nymtech/nym/releases/download/nym-binaries-v2025.1-reeses/nym-nodeRegardless of how you obtain the binary - either by building it yourself or downloading it - I chose to place it at /root/nym-node.
Although it is possible to run the Nym node as a non-root user (as detailed in the documentation), I opted to use the root account since I don’t plan to run anything else on this VPS instance.
Initialize the nym-node
The first step in setting up your nym-node is to initialize it. This process sets up the necessary directory structure and configuration files.
/root/nym-node run --init-only --write-changes --mode mixnode --public-ips "$(curl -4 https://ifconfig.me)" --http-bind-address 0.0.0.0:8080 --mixnet-bind-address 0.0.0.0:1789 --verloc-bind-address 0.0.0.0:1790 --location DE --wireguard-enabled true --expose-system-hardware false --expose-system-info falseWhen I first wrote this blog post, I set everything up in
--mode mixnode. However, I now recommend using--mode exit-gatewayinstead. This mode offers the full range of functionality, making it the best starting point. Once you confirm everything is running smoothly, you can switch to a more restricted mode if needed.Keep in mind that
--wireguard-enabled trueonly works in--mode exit-gateway. This is because WireGuard mode (also known as dVPN or2-hopmode) does not differentiate between entry and exit nodes. If you want to participate in the WireGuard-based2-hopdVPN, your node must be configured as an exit-gateway.
If you are planning to run with
--wireguard-enabled trueyou should consider to follow the Wireguard Exit Policy Configuration in the documentation.
This will create the following directory .nym/nym-nodes/default-nym-node. Within this directory, you’ll find subdirectories and files needed for configuration and operation.
I made changes to the config.toml file located at .nym/nym-nodes/default-nym-node/config/config.toml.
Specifically, I updated the announce_port setting in two sections, the mixnet section and the verloc section.
By default, announce_port is set to 0. While I chose to update it, this step might not be necessary.
[mixnet]
announce_port = 1789

[verloc]
announce_port = 1790
Start the nym-node
After initializing your Nym node, the next step is to start it.
For consistency, I replaced dynamic variables like $(curl -4 https://ifconfig.me) with static strings to ensure everything behaves as expected.
/root/nym-node run --mode mixnode --public-ips "94.143.231.195" --hostname "wznymnode.webhop.me" --http-bind-address 0.0.0.0:8080 --mixnet-bind-address 0.0.0.0:1789 --verloc-bind-address 0.0.0.0:1790 --location DE --wireguard-enabled true --expose-system-hardware false --expose-system-info false --accept-operator-terms-and-conditionsI guess that you could alternatively use a simplified command:
/root/nym-node run --accept-operator-terms-and-conditionsSince all the required parameters were configured during the --init-only --write-changes step, this approach should work - but I haven’t tested it personally.
Once the node starts, monitor the log messages on the screen. If most messages don’t indicate any errors, your node is running correctly.
To simplify managing your Nym node, I recommend switching to a systemd unit. Create a file named /etc/systemd/system/nym-node.service:
[Unit]
Description=Nym Node
StartLimitInterval=350
StartLimitBurst=10

[Service]
User=root
LimitNOFILE=65536
ExecStart=/root/nym-node run --mode mixnode --public-ips "94.143.231.195" --hostname "wznymnode.webhop.me" --http-bind-address 0.0.0.0:8080 --mixnet-bind-address 0.0.0.0:1789 --verloc-bind-address 0.0.0.0:1790 --location DE --wireguard-enabled true --expose-system-hardware false --expose-system-info false --accept-operator-terms-and-conditions
KillSignal=SIGINT
Restart=on-failure
RestartSec=30

[Install]
WantedBy=multi-user.target
After creating the file, activate it by running the following commands:
systemctl daemon-reload
systemctl enable nym-node.service
systemctl start nym-node.service
You can then view the log output in real time using: journalctl -u nym-node.service -f -n 100.
Bond your nym-node
The next step is to bond your nym-node.
This process establishes your node’s identity and secures its participation in the mixnet.
To retrieve your node’s identity key run the following command:
/root/nym-node bonding-informationThis will show an Identity Key, which will look something like this: E67dRcrMNsEpNvRAxvFTkvMyqigTYpRWUYYPm25rDuGQ.
To retrieve the correct host address run this command on your VPS:
echo "$(curl -4 https://ifconfig.me)"The bonding process is well-documented on the Bond via the Desktop wallet (recommended) page. It includes detailed instructions and screenshots to guide you through:
- Entering your Identity Key.
- Configuring your host address.
- Finalizing the bonding transaction.
Follow the steps outlined there, then return here to continue.
After completing the bonding process, you can view your bonding transaction here in the block explorer (or here).
Amount, Operating Cost, and Profit Margin
The values you set for the amount, operating cost and profit margin are entirely up to you.
Bonding Amount: The minimum bonding amount is 100 NYM, approximately equivalent to 10€. While it’s unclear to me exactly how much a higher bonding amount impacts outcomes, it generally fosters greater trust among potential delegators. In essence, if you demonstrate confidence in your node by staking more, others are likely to trust and delegate to you. After all, you must trust yourself first before earning the trust of others.
Operating Cost: Operating cost is straightforward. For instance, my node costs 5.50€/month, which translates to about 55 NYM tokens at current exchange rates. Since exchange rates can fluctuate, I’d recommend budgeting slightly higher - say 80 to 100 NYM tokens - to cover variations.
Profit Margin: Profit margin (PM) is crucial to both your revenue and your ability to attract delegators. In essence, Nym nodes operate similarly to blockchains that incentivize transaction verification or proof-of-work systems. Nodes earn revenue by routing and mixing user traffic through the Nym mixnet, a process called mixmining. In the blog post Nym nodes approve min. profit margin you can read:
Like blockchains which incentivize transaction verifications, or proof-of-work, Nym nodes can earn revenue by routing and mixing user traffic through the Nym mixnet, effectively mixmining.
Nym nodes are rewarded from a mixmining pool based on their performance and stake. The rewards cover, first, an operator’s operational cost, then the operator gets a profit margin and finally, the remaining rewards are shared with people who have staked on their node. In short: the profit margin (PM) is the operator’s revenue after their costs have been covered, with the remaining rewards going to their stakers.
For potential delegators, a lower profit margin is appealing because it means more rewards are shared with them. However, the blog post notes an important balance:
Besides being a main source of revenue, PM is also how node operators compete with one another to attract delegations from the community. Nodes with lower PMs are thus more attractive to delegators because they offer a higher delegator annual percentage yield (APY). Left unchecked, this competition can lead to a race to the bottom in which node operators cannot remain competitive by setting a PM that yields adequate operator rewards.
Recent Updates to Profit Margin: As of 2024-09-11, the Nym community has voted to set a minimum profit margin of 20% for all nodes. This ensures operators maintain fair earnings while staying competitive. For most operators, setting the PM at 20% is now considered a standard and balanced approach.
Changing Amount, Operating Cost, and Profit Margin / Unbonding and Rebonding
When I first bonded my node, I didn’t pay much attention to the values I set, assuming I could adjust them later once everything was up and running. However, I discovered it’s more challenging than expected because the current version of the Nym wallet doesn’t support this functionality via its GUI.
Here’s an excerpt from a conversation with operators on operators:nymtech.chat:
Question:
One more question: If I want to change the profit margin of my node, do I have to unbond and rebond? Or is there another way how to set this parameter?
Answer:
NEVER UNBOND AND REBOND unless you must. Good that you asking first.
For a new node like yours there is no problem, but it’s bad once you have delegations and also it’s no bueno for the network.
However, right now we have an issue that the GUI wallet is not having that option. There was a problem with implementation.
So to change it, you will need to wait for a new wallet version coming out in something like 2 weeks.
May be also possible with Nym CLI, I never tried this action, can have a look later on.
Another person added:
I was using older version of nym-wallet for this but it might not work anymore as we have new API URLs. Never tried nym-cli too but could be an option.
Using the Nym CLI: The nym-cli is part of the Nym GitHub project and is located in ./tools/nym-cli. According to the documentation:
It provides a convenient wrapper around the
nyxdclient with similar functionality to thenyxdbinary for querying the chain or executing smart contract methods.
Just for reference, documentation for the mentioned
nyxdbinary can be found here:You can use the nyxd as a minimal CLI wallet if you want to set up an account (or multiple accounts). Just compile the binary as per the documentation, stopping after the building your validator step is complete. You can then run
nyxd keys --helpto see how you can set up and store different keypairs with which to interact with the Nyx blockchain.
You can build the nym-cli by:
cd ./tools/nym-cli
make
After building the nym-cli, the binary will be generated in ./target/release/nym-cli.
Running the Command: After exploring the documentation (./documentation/docs) and the source code (./tools/nym-cli), I constructed the following command line:
nym-cli mixnet operators nymnode settings update-cost-parameters --mnemonic 'xxx' --profit-margin-percent 20 --interval-operating-cost 80000000You’ll need to provide your 24-word mnemonic as the --mnemonic parameter. This unique set of words identifies the Nym account you used to bond your node.
Command Output: Running the command produced the following output:
 2025-01-21T15:45:01.704Z INFO  nym_cli_commands::validator::mixnet::operators::nymnode::settings::update_cost_params > Starting cost params updating using NodeCostParams { profit_margin_percent: Percent(Decimal(0.2)), interval_operating_cost: Coin { 80000000 "unym" } } !
 2025-01-21T15:45:09.850Z INFO  nym_cli_commands::validator::mixnet::operators::nymnode::settings::update_cost_params > Cost params result: ExecuteResult { logs: [Log { msg_index: 0, events: [Event { ty: "message", attributes: [Attribute { key: "action", value: "/cosmwasm.wasm.v1.MsgExecuteContract" }, Attribute { key: "sender", value: "n127c69pasr35p76amfczemusnutr8mtw78s8xl7" }, Attribute { key: "module", value: "wasm" }] }, Event { ty: "execute", attributes: [Attribute { key: "_contract_address", value: "n17srjznxl9dvzdkpwpw24gg668wc73val88a6m5ajg6ankwvz9wtst0cznr" }] }, Event { ty: "wasm-v2_pending_cost_params_update", attributes: [Attribute { key: "_contract_address", value: "n17srjznxl9dvzdkpwpw24gg668wc73val88a6m5ajg6ankwvz9wtst0cznr" }, Attribute { key: "node_id", value: "2196" }, Attribute { key: "updated_mixnode_cost_params", value: "{\"profit_margin_percent\":\"0.2\",\"interval_operating_cost\":{\"denom\":\"unym\",\"amount\":\"80000000\"}}" }] }] }], msg_responses: [MsgResponse { type_url: "/cosmwasm.wasm.v1.MsgExecuteContractResponse", value: [] }], events: [Event { kind: "coin_spent", attributes: [V037(EventAttribute { key: "spender", value: "n127c69pasr35p76amfczemusnutr8mtw78s8xl7", index: true }), V037(EventAttribute { key: "amount", value: "4695unym", index: true })] }, Event { kind: "coin_received", attributes: [V037(EventAttribute { key: "receiver", value: "n17xpfvakm2amg962yls6f84z3kell8c5lza5z5c", index: true }), V037(EventAttribute { key: "amount", value: "4695unym", index: true })] }, Event { kind: "transfer", attributes: [V037(EventAttribute { key: "recipient", value: "n17xpfvakm2amg962yls6f84z3kell8c5lza5z5c", index: true }), V037(EventAttribute { key: "sender", value: "n127c69pasr35p76amfczemusnutr8mtw78s8xl7", index: true }), V037(EventAttribute { key: "amount", value: "4695unym", index: true })] }, Event { kind: "message", attributes: [V037(EventAttribute { key: "sender", value: "n127c69pasr35p76amfczemusnutr8mtw78s8xl7", index: true })] }, Event { kind: "tx", attributes: [V037(EventAttribute { key: "fee", value: "4695unym", index: true }), V037(EventAttribute { key: "fee_payer", value: "n127c69pasr35p76amfczemusnutr8mtw78s8xl7", index: true })] }, Event { kind: "tx", attributes: [V037(EventAttribute { key: "acc_seq", value: "n127c69pasr35p76amfczemusnutr8mtw78s8xl7/2", index: true })] }, Event { kind: "tx", attributes: [V037(EventAttribute { key: "signature", value: "5QTLaEMkRiM3THBZQ/zbSAHI3ENqLsdZuKCnnWm0YMAaAQmQLTXKzg1StgrDReqZ+nwqMAhRzBg5yYuj37vjPw==", index: true })] }, Event { kind: "message", attributes: [V037(EventAttribute { key: "action", value: "/cosmwasm.wasm.v1.MsgExecuteContract", index: true }), V037(EventAttribute { key: "sender", value: "n127c69pasr35p76amfczemusnutr8mtw78s8xl7", index: true }), V037(EventAttribute { key: "module", value: "wasm", index: true })] }, Event { kind: "execute", attributes: [V037(EventAttribute { key: "_contract_address", value: "n17srjznxl9dvzdkpwpw24gg668wc73val88a6m5ajg6ankwvz9wtst0cznr", index: true })] }, Event { kind: "wasm-v2_pending_cost_params_update", attributes: [V037(EventAttribute { key: "_contract_address", value: "n17srjznxl9dvzdkpwpw24gg668wc73val88a6m5ajg6ankwvz9wtst0cznr", index: true }), V037(EventAttribute { key: "node_id", value: "2196", index: true }), V037(EventAttribute { key: "updated_mixnode_cost_params", value: "{\"profit_margin_percent\":\"0.2\",\"interval_operating_cost\":{\"denom\":\"unym\",\"amount\":\"80000000\"}}", index: true })] }], transaction_hash: Hash::Sha256(7BC1BE7C3EE1CB434DB8AF6B1852A5106D43C440191B6D3D8118ED3AAD33F06C), gas_info: GasInfo { gas_wanted: 187794, gas_used: 143679 } }
Verifying the Update: To confirm the change, you can:
- Use the block explorer to check the transaction.
- Verify via the command line:
curl -X 'GET' 'https://api.nymtech.net/cosmos/tx/v1beta1/txs/7BC1BE7C3EE1CB434DB8AF6B1852A5106D43C440191B6D3D8118ED3AAD33F06C' -H 'accept: application/json' | jq '.tx.body.messages'
[
  {
    "@type": "/cosmwasm.wasm.v1.MsgExecuteContract",
    "sender": "n127c69pasr35p76amfczemusnutr8mtw78s8xl7",
    "contract": "n17srjznxl9dvzdkpwpw24gg668wc73val88a6m5ajg6ankwvz9wtst0cznr",
    "msg": {
      "update_cost_params": {
        "new_costs": {
          "profit_margin_percent": "0.2",
          "interval_operating_cost": {
            "denom": "unym",
            "amount": "80000000"
          }
        }
      }
    },
    "funds": []
  }
]
However, after some time, querying the bonded API endpoint (https://validator.nymtech.net/api/v1/nym-nodes/bonded) still showed my old parameters:
curl -X 'GET' 'https://validator.nymtech.net/api/v1/nym-nodes/bonded' -H 'accept: application/json' | jq '.data[] | select(.bond_information.node.identity_key=="E67dRcrMNsEpNvRAxvFTkvMyqigTYpRWUYYPm25rDuGQ") | .rewarding_details.cost_params'
{
  "profit_margin_percent": "0.4",
  "interval_operating_cost": {
    "denom": "unym",
    "amount": "550000000"
  }
}
You can also view this on the Spectre Explorer page for my node: E67dRcrMNsEpNvRAxvFTkvMyqigTYpRWUYYPm25rDuGQ.
In the meantime, I discovered that Nym uses two key time intervals: Epoch and Interval.
You can see these intervals displayed at the top-right corner of the Spectre Explorer Dashboard.
For instance, it shows for the current Interval: Ends ~Feb 2, 18:26:19.
It appears that reconfigurations only take effect during Interval switches - like the one happening at the beginning of February.
According to the Reward Sharing for Mixnets paper, Epochs last roughly 1 hour, while Intervals span about 1 month (30 days × 24 hours = 720 hours).
Reverse Proxy & Web Secure Socket
In the Nym Operator’s guide, there is a section called Reverse Proxy & Web Secure Socket that covers how to set up a reverse proxy for Nym node HTTP requests and create a custom landing page for your node.
I chose a slightly different approach by using the Traefik reverse proxy in a Docker-based setup. Traefik will also handle the Web Secure Socket.
I will use a combination of offline and online templating so that the configuration can be adapted to your own setup. You can find the necessary files in this GitHub Gist.
In this example, the complete configuration will be placed in /root/docker-traefik-web-landing-page-assets_. However, you can change this directory if needed (instructions are provided later).
First, download the files from the Gist and set up the following directory structure:
~/docker-traefik-web-landing-page-assets_# tree .
.
├── .env
├── Makefile
├── docker-compose.yaml
├── dynamic.yml
├── index.html.in
└── traefik.yml.in
The first step will be to adapt the variables defined in .env to your situation:
HOST_IP=94.143.231.195
HOST_NAME=wznymnode.webhop.me
OPERATOR_EMAIL=operator@mail.here
CERTIFICATE_EMAIL=operator@mail.here
NODE_WS_PORT=9000
NODE_HTTP_PORT=8080
WSS_PORT=9001
Next, run make install (or make install TARGET_DIR=/your/dir), which performs the offline templating step and generates the following structure:
~/docker-traefik-web-landing-page-assets_# tree -a .
.
├── docker
│   ├── .env
│   ├── config
│   │   └── traefik
│   │       ├── certs
│   │       │   └── acme.json
│   │       ├── dynamic
│   │       │   └── dynamic.yml
│   │       └── traefik.yml
│   └── docker-compose.yaml
└── www
    └── index.html
At this stage, edit the Nym node’s config.toml located at /root/.nym/nym-nodes/default-nym-node/config/config.toml and make the following two changes:
landing_page_assets_path = '/root/docker-traefik-web-landing-page-assets_/www'
announce_wss_port =  9001
Both settings must match your environment - for example, the TARGET_DIR you used and the WSS_PORT from your .env file. After making these changes, restart the node:
systemctl restart nym-node.serviceChange into the docker directory and run docker compose config to check the online templating that will occur when you run docker compose up.
The Traefik documentation on the file configuration provider includes a section on Go templating that states:
Go Templating:
Warning: Go Templating only works with dedicated dynamic configuration files. Templating does not work in the Traefik main static configuration file.
Traefik supports using Go templating to automatically generate repetitive sections of configuration files. These sections must be a valid Go template, and can use sprig template functions.
Because online templating is not supported in the main traefik.yml file, we must rely on both offline and online templating in this setup.
Unfortunately, Traefik does not provide a direct way to verify its online templating (like docker compose config does). The only way is to enable log-level: DEBUG, start the Docker container, and check the logs.
traefik-1 | 2025-02-26T12:59:10Z DBG github.com/traefik/traefik/v3/pkg/server/configurationwatcher.go:227 > Configuration received config={"http":{"middlewares":{"cors-headers":{"headers":{"accessControlAllowCredentials":true,"accessControlAllowHeaders":["*"],"accessControlAllowMethods":["GET","POST","OPTIONS","HEAD"],"accessControlAllowOriginList":["*"]}}},"routers":{"nym-node-http":{"entryPoints":["web"],"rule":"Host(`wznymnode.webhop.me`)","service":"nym-node-web"},"nym-node-https":{"entryPoints":["web-secure"],"rule":"Host(`wznymnode.webhop.me`)","service":"nym-node-web","tls":{"certResolver":"default"}},"nym-node-wss-router":{"entryPoints":["wss"],"middlewares":["cors-headers"],"rule":"Host(`wznymnode.webhop.me`)","service":"nym-node-ws","tls":{"certResolver":"default"}}},"services":{"nym-node-web":{"loadBalancer":{"passHostHeader":true,"responseForwarding":{"flushInterval":"100ms"},"servers":[{"url":"http://94.143.231.195:8080"}]}},"nym-node-ws":{"loadBalancer":{"passHostHeader":true,"responseForwarding":{"flushInterval":"100ms"},"servers":[{"url":"http://94.143.231.195:9000"}]}}}},"tcp":{},"tls":{},"udp":{}} providerName=fileTo make this output more readable, you can pipe it through jq:
echo '{"http":{"middlewares":{"cors-headers":{"headers":{"accessControlAllowCredentials":true,"accessControlAllowHeaders":["*"],"accessControlAllowMethods":["GET","POST","OPTIONS","HEAD"],"accessControlAllowOriginList":["*"]}}},"routers":{"nym-node-http":{"entryPoints":["web"],"rule":"Host(`wznymnode.webhop.me`)","service":"nym-node-web"},"nym-node-https":{"entryPoints":["web-secure"],"rule":"Host(`wznymnode.webhop.me`)","service":"nym-node-web","tls":{"certResolver":"default"}},"nym-node-wss-router":{"entryPoints":["wss"],"middlewares":["cors-headers"],"rule":"Host(`wznymnode.webhop.me`)","service":"nym-node-ws","tls":{"certResolver":"default"}}},"services":{"nym-node-web":{"loadBalancer":{"passHostHeader":true,"responseForwarding":{"flushInterval":"100ms"},"servers":[{"url":"http://94.143.231.195:8080"}]}},"nym-node-ws":{"loadBalancer":{"passHostHeader":true,"responseForwarding":{"flushInterval":"100ms"},"servers":[{"url":"http://94.143.231.195:9000"}]}}}},"tcp":{},"tls":{},"udp":{}}' | jq .If the logs look good, you can check your landing page to confirm that everything is working.
The landing page I use is a slightly modified version of the one provided in the Nym Operators Guide. You can find the original template by clicking on:
An example template for
index.htmlpage
Before configuring the Web Secure Socket, I couldn’t see my node in the Nym Harbour Master.
Once I completed this setup, my node became visible there as well (for example: E67dRcrMNsEpNvRAxvFTkvMyqigTYpRWUYYPm25rDuGQ).
Routing Configuration
The next step is to go through the Routing Configuration of your Nym node.
If you built the project from source, you’ll find the network_tunnel_manager.sh script at ./scripts/network_tunnel_manager.sh.
Alternatively, you can download it from this link.
As far as I understand the nymtun0 interface is only present if you opearte an exit-gateway:
The
nymtun0interface is dynamically managed by theexit-gatewayservice. When the service is stopped,nymtun0disappears, and when started,nymtun0is recreated.
Fruthermore, the VPS Configuration explains that the nym-node is making use of a wireguard VPN tunnel:
The
nymwginterface is used for creating a secure wireguard tunnel as part of the Nym Network configuration. Similar tonymtun0, the script manages iptables rules specific tonymwgto ensure proper routing and forwarding through the wireguard tunnel.
The first time you execute the network_tunnel_manager.sh script, it will modify some system-installed packages. I noted above already that:
Initially, I followed the standard VPS Configuration process, including setting up the UFW firewall. However, I later discovered that running network_tunnel_manager.sh (or here) caused the UFW package to be uninstalled.
You may also be prompted on the first run of the network_tunnel_manager.sh script to save your current IPv4 and IPv6 rules — select “Yes” to preserve them.
# Delete IP tables rules for IPv4 and IPv6 and apply new ones:
./network_tunnel_manager.sh remove_duplicate_rules nymtun0   # ; may only be required if you have a nymtun, e.g. you're operating an exit-gateway
./network_tunnel_manager.sh apply_iptables_rules

# At this point you should see a global ipv6 address.
./network_tunnel_manager.sh fetch_and_display_ipv6

# Check nymtun IP tables                                       ; may only be required if you have a nymtun, e.g. you're operating an exit-gateway
./network_tunnel_manager.sh check_nymtun_iptables

# Remove old and apply new rules for wireguad routing
./network_tunnel_manager.sh remove_duplicate_rules nymwg
./network_tunnel_manager.sh apply_iptables_rules_wg

# Apply rules to configure DNS routing and allow ICMP piung test for node probing (network testing)
./network_tunnel_manager.sh configure_dns_and_icmp_wg

# Adjust and validate IP forwarding
./network_tunnel_manager.sh adjust_ip_forwarding
./network_tunnel_manager.sh check_ipv6_ipv4_forwarding

# Check nymtun0 interface and test routing configuration       ; may only be required if you have a nymtun, e.g. you're operating an exit-gateway
ip addr show nymtun0

# Validate your IPv6 and IPv4 networking by running a joke test via Mixnet:
./network_tunnel_manager.sh joke_through_the_mixnet          # ; may only be required if you have a nymtun, e.g. you're operating an exit-gateway

# Validate your tunneling by running a joke test via WG:
./network_tunnel_manager.sh joke_through_wg_tunnel
We already started the nym-node above with the --wireguard-enabled true flag and added it to our systemd service configuration, but only now the network configuration is complete. Therefore we have to restart our nym-node via our systemd service:
systemctl daemon-reload && service nym-node restartTo ensure the node is running correctly, monitor the service logs:
journalctl -u nym-node.service -f -n 100 joke_through_the_mixnet and joke_through_wg_tunnel
Just for reference purposes I document here the output of the joke_through_the_mixnet and joke_through_wg_tunnel commands:
# ./network_tunnel_manager.sh joke_through_the_mixnet
iptables-persistent is already installed.

checking tunnel connectivity and fetching a joke for nymtun0...
if these test succeeds, it confirms your machine can reach the outside world via IPv4 and IPv6.
however, probes and external clients may experience different connectivity to your nym-node.

------------------------------------
detected IPv4 address: 10.0.0.1
testing IPv4 connectivity...

IPv4 connectivity is working. fetching a joke...
IPv4 joke: Why can't your nose be 12 inches long? Because then it'd be a foot!

------------------------------------
detected IPv6 address: fc00::1
testing IPv6 connectivity...

IPv6 connectivity is working. fetching a joke...
IPv6 joke: Two satellites decided to get married. The wedding wasn't much, but the reception was incredible.
joke fetching processes completed for nymtun0.
------------------------------------


### connectivity testing recommendations ###
- use the following command to test WebSocket connectivity from an external client:
  wscat -c wss://<your-ip-address/ hostname>:9001
- test UDP connectivity on port 51822 (commonly used for nym wireguard)
  from another machine, use tools like nc or socat to send UDP packets
  echo 'test message' | nc -u <your-ip-address> 51822
if connectivity issues persist, ensure port forwarding and firewall rules are correctly configured

operation joke_through_the_mixnet completed successfully.
# ./network_tunnel_manager.sh joke_through_wg_tunnel
iptables-persistent is already installed.
checking tunnel connectivity and fetching a joke for nymwg...
if these test succeeds, it confirms your machine can reach the outside world via IPv4 and IPv6.
however, probes and external clients may experience different connectivity to your nym-node.
------------------------------------
detected IPv4 address: 10.1.0.1
testing IPv4 connectivity...
IPv4 connectivity is working. fetching a joke...
IPv4 joke: Where do you take someone who’s been injured in a peek-a-boo accident? To the I.C.U.
------------------------------------
detected IPv6 address: fc01::1
testing IPv6 connectivity...
IPv6 connectivity is working. fetching a joke...
IPv6 joke: How do you get two whales in a car? Start in England and drive West.
joke fetching processes completed for nymwg.
------------------------------------
### connectivity testing recommendations ###
- use the following command to test WebSocket connectivity from an external client:
  wscat -c wss://<your-ip-address/ hostname>:9001
- test UDP connectivity on port 51822 (commonly used for nym wireguard)
  from another machine, use tools like nc or socat to send UDP packets
  echo 'test message' | nc -u <your-ip-address> 51822
if connectivity issues persist, ensure port forwarding and firewall rules are correctly configured
operation joke_through_wg_tunnel completed successfully. wscat and UDP Connectivity Test
At the end of the ./network_tunnel_manager.sh joke_through_wg_tunnel script, you will see these instructions:
### connectivity testing recommendations ###
- use the following command to test WebSocket connectivity from an external client:
wscat -c wss://<your-ip-address/ hostname>:9001
- test UDP connectivity on port 51822 (commonly used for nym wireguard)
from another machine, use tools like nc or socat to send UDP packets
echo 'test message' | nc -u <your-ip-address> 51822
if connectivity issues persist, ensure port forwarding and firewall rules are correctly configured About the WebSocket Connectivity Test: A wss:// test will only work when you use a fully qualified domain name (FQDN), for example:
wscat -c wss://wznymnode.webhop.me:9001This is because SSL/TLS certificates are recognized only if you connect to the exact hostname in the certificate. If you try using an IP address, you may see a self-signed certificate error, for example:
wscat -c wss://94.143.231.195:9001
error: self-signed certificate
Or here via openssl:
openssl s_client -connect 94.143.231.195:9001 -showcerts
Can't use SSL_get_servername
If you really need to connect by IP, you must explicitly provide the -servername option:
openssl s_client -connect 94.143.231.195:9001 -servername wznymnode.webhop.me -showcertsAbout the UDP Connectivity Test: The command echo 'test message' | nc -u <your-ip-address> 51822 by itself will not show errors even if UDP packets are lost or ignored, because UDP is a connectionless protocol.
To confirm packets are actually arriving, run a tool like tcpdump on the server side while sending UDP traffic from another machine.
First, identify which interface (e.g., eth0) is linked to your IP address by using a command like ifconfig -a.
Then, in a separate terminal on your server:
tcpdump -i eth0 -n -l -X udp port 51822When you send the test message from another machine, you should see a line that includes the UDP packet details, similar to:
# the follwing will be the output of tcpdump when you execute `echo 'test message' | nc -u 94.143.231.195 51822` from another machine:
tcpdump: verbose output suppressed, use -v[v]... for full protocol decode
listening on eth0, link-type EN10MB (Ethernet), snapshot length 262144 bytes
07:37:45.158882 IP 194.182.191.207.23785 > 94.143.231.195.51822: UDP, length 13
        0x0000:  4528 0029 dd30 4000 3111 5dfd d537 f2e3  E(.).0@.1.]..7..
        0x0010:  5e8f e7c3 5ce9 ca6e 0015 777c 7465 7374  ^...\..n..w|test
        0x0020:  206d 6573 7361 6765 0a00 0000 0000       .message......
This confirms that the server is receiving UDP packets on port 51822.
Fund nym-node Client Nyx Account
At this point, you might notice one remaining Error message in your logs:
2025-01-19T12:42:32.150873Z ERROR gateway/src/node/mod.rs:197: this gateway (n1t37ajkn703defjhh569r6ey6xhjk3txv29l4vg) has insufficient balance for possible zk-nym redemption transaction fees. it only has 0unym available.
I reached out to the Nym support team for clarification, and they explained:
You don’t have to worry about it as the balance needed is only for gateway modes.
This means that for a node running in --mode mixnode, this error can be safely ignored. However, if you prefer to resolve the issue, here’s how to do it.
Your node has a second Nym account, the nym-node client Nyx account (note: it’s Nyx, not Nym). To eliminate the error, you need to fund this account.
I transferred 25 NYM to my Nyx account, and the error message was cleared.
For more detailed instructions, you can refer to the Fund nym-node Client Nyx Account documentation.
Monitoring
You can explore my NymNode API through its Swagger/OpenAPI interface.
You can also gather some basic details about my node:
curl -X 'GET' 'http://94.143.231.195:8080/api/v1/build-information' -H 'accept: application/json' | jq
{
  "binary_name": "nym-node",
  "build_timestamp": "2025-01-20T14:00:32.024551064Z",
  "build_version": "1.3.1",
  "commit_sha": "b163dba2d46fb70d37c76f85cb9d6844d233dd29",
  "commit_timestamp": "2025-01-20T09:35:09.000000000+01:00",
  "commit_branch": "master",
  "rustc_version": "1.84.0",
  "rustc_channel": "stable",
  "cargo_profile": "release",
  "cargo_triple": "x86_64-unknown-linux-gnu"
}

curl -X 'GET' 'http://94.143.231.195:8080/api/v1/auxiliary-details' -H 'accept: application/json' | jq
{
  "location": "DE",
  "announce_ports": {
    "verloc_port": 1790,
    "mix_port": 1789
  },
  "accepted_operator_terms_and_conditions": true
}

curl -X 'GET' 'http://94.143.231.195:8080/api/v1/load' -H 'accept: application/json' | jq
{
  "total": "low",
  "machine": "negligible",
  "network": "negligible"
}
To locate my node in the overall Nym mixnet, use its Identity Key, such as E67dRcrMNsEpNvRAxvFTkvMyqigTYpRWUYYPm25rDuGQ.
curl -X 'GET' 'https://validator.nymtech.net/api/v1/nym-nodes/described' -H 'accept: application/json' | jq | grep E67dRcrMNsEpNvRAxvFTkvMyqigTYpRWUYYPm25rDuGQ
curl -X 'GET' 'https://validator.nymtech.net/api/v1/nym-nodes/bonded' -H 'accept: application/json' | jq | grep E67dRcrMNsEpNvRAxvFTkvMyqigTYpRWUYYPm25rDuGQ
You can track my node using the Spectre Explorer with the same Identity Key: E67dRcrMNsEpNvRAxvFTkvMyqigTYpRWUYYPm25rDuGQ.
Additionally, my node is visible in the Mainnet Network Explorer. If you did set-up the Web Secure Socket earlier your node should also be visible in the Nym Harbour Master with the same Identity Key: E67dRcrMNsEpNvRAxvFTkvMyqigTYpRWUYYPm25rDuGQ.
There’s also a Mixnet Explorer, but please note that it’s currently at its “End of Support.”
Node Modes: mixnode, entry-gateway, exit-gateway, wireguard-enabled (aka dVPN, aka 2-hop)
In this section, I’ll walk through my attempts to run a Nym node that allows a “2‑hop Wireguard” (sometimes called dVPN) connection - covering what I tried, what did (and didn’t) work, and what surprised me.
Node Modes and How They Affect Roles: According to Nym’s Essential Parameters & Variables documentation, your node can run in one of several modes:
mixnodeentry-gatewayexit-gateway--wireguard-enabled(whether Wireguard / 2-hop / dVPN service is enabled)
Changing the --mode flag changes the “roles” that your node exposes.
Below are the outputs from my node’s /roles endpoint illustrating this:
When running as entry-gateway
curl -X 'GET' 'http://94.143.231.195:8080/api/v1/roles' -H 'accept: application/json' | jq
{
  "mixnode_enabled": false,
  "gateway_enabled": true,
  "network_requester_enabled": false,
  "ip_packet_router_enabled": false
}
When running as exit-gateway
curl -X 'GET' 'http://94.143.231.195:8080/api/v1/roles' -H 'accept: application/json' | jq
{
  "mixnode_enabled": false,
  "gateway_enabled": true,
  "network_requester_enabled": true,
  "ip_packet_router_enabled": true
}
From these logs, it appears that network_requester_enabled and ip_packet_router_enabled only become true if you run your node as exit-gateway. To me it seems that you cannot control the variables network_requester_enabled and ip_packet_router_enabled independently.
Running as exit-gateway also seems to be the only way to participate in the 2‑hop Wireguard (dVPN) network.
If I tried to run my node as entry-gateway I was not able to connect to it via the NymVPN client with --enable-two-hop with my node, neither as --entry-gateway-id nor as --exit-gateway-id.
Comparison of Entry vs. Exit Gateway: Below is a quick comparison of results when my node runs in these two modes:
| Entry Gateway | Exit Gateway | |
|---|---|---|
| Can connect via 2‑hop Wireguard NymVPN | No | Yes |
| Errors in Nym node logs | None (all “green”) | None (all “green”) |
| Errors in NymVPN client logs | Yes (cannot connect) | Yes (but can connect despite errors) |
| Status in Nym Harbour Master | “Greener” status, fewer alarms/errors | More red flags and “errors,” but actually works |
Surprisingly, running as exit-gateway produces more “alarms” in the Nym Harbour Master interface and in the VPN client logs, yet it actually allows me to connect via the NymVPN client.
Conversely, the “cleaner” entry‑gateway mode does not permit any 2‑hop connections at all.
Detailed Observations and Logs:
A. NymVPN Client Output: When configured to use my node (id = E67dRcrMNsEpNvRAxvFTkvMyqigTYpRWUYYPm25rDuGQ; mode = exit-gateway):
/usr/bin/nym-vpnc connect --enable-two-hop --entry-gateway-id E67dRcrMNsEpNvRAxvFTkvMyqigTYpRWUYYPm25rDuGQ --exit-gateway-id 2BuMSfMW3zpeAjKXyKLhmY4QW1DXurrtSPEJ6CjX3SEh
tail -f /var/log/vpnd.log
Here are some of the log outputs of the NymVPN client:
 INFO nym_vpn_lib::tunnel_state_machine::tunnel::gateway_selector: Found 144 entry gateways
 INFO nym_vpn_lib::tunnel_state_machine::tunnel::gateway_selector: Found 144 exit gateways
 INFO nym_vpn_lib::tunnel_state_machine::tunnel::gateway_selector: Using entry gateway: E67dRcrMNsEpNvRAxvFTkvMyqigTYpRWUYYPm25rDuGQ, location: DE, performance: 50%
 INFO nym_vpn_lib::tunnel_state_machine::tunnel::gateway_selector: Using exit gateway: 2BuMSfMW3zpeAjKXyKLhmY4QW1DXurrtSPEJ6CjX3SEh, location: CH, performance: 99%
...
 INFO nym_vpn_lib::tunnel_state_machine::tunnel_monitor: Created entry tun device: tun0
 INFO nym_vpn_lib::tunnel_state_machine::tunnel_monitor: Created exit tun device: tun1
 INFO nym_dns: Setting DNS servers: Tunnel DNS: {1.1.1.1, 1.0.0.1, 2606:4700:4700::1111, 2606:4700:4700::1001} Non-tunnel DNS: {}
 INFO nym_wg_gateway_client: Remaining wireguard bandwidth with gateway E67dRcrMNsEpNvRAxvFTkvMyqigTYpRWUYYPm25rDuGQ for today: 476.84 MB
 INFO nym_wg_gateway_client: Remaining wireguard bandwidth with gateway 2BuMSfMW3zpeAjKXyKLhmY4QW1DXurrtSPEJ6CjX3SEh for today: 421.33 MB
...
 ERROR nym_authenticator_client: Timed out waiting for reply to connect request
  WARN nym_vpn_lib::bandwidth_controller: Error querying remaining bandwidth AuthenticatorClientError(TimeoutWaitingForConnectResponse)
  WARN nym_client_core::client::real_messages_control::message_handler: Could not process the packet - the network topology is invalid - no node with identity E67dRcrMNsEpNvRAxvFTkvMyqigTYpRWUYYPm25rDuGQ is known
  WARN nym_client_core::client::real_messages_control::acknowledgement_control::input_message_listener: failed to send a plain message - no node with identity E67dRcrMNsEpNvRAxvFTkvMyqigTYpRWUYYPm25rDuGQ is known
Even though I see these ERROR and WARN messages, the client does successfully tunnel traffic, and I can browse the web.
B. Nym Node Logs: In both modes (entry and exit), the node logs look relatively clean - no obvious errors, just standard INFO entries.
C. Nym Harbour Master:
- As
exit-gateway, the Harbour Master page indicates connection or routing errors (e.g., “ERROR nym_gateway_probe: Failed to connect to mixnet: the current network topology seem to be insufficient to route any packets through”). - As
entry-gateway, the Harbour Master page is mostly “green,” yet no2‑hopVPN connection is possible.
Harbour Master screenshots comparing these statuses:
As exit-gateway (click on the link to see details):
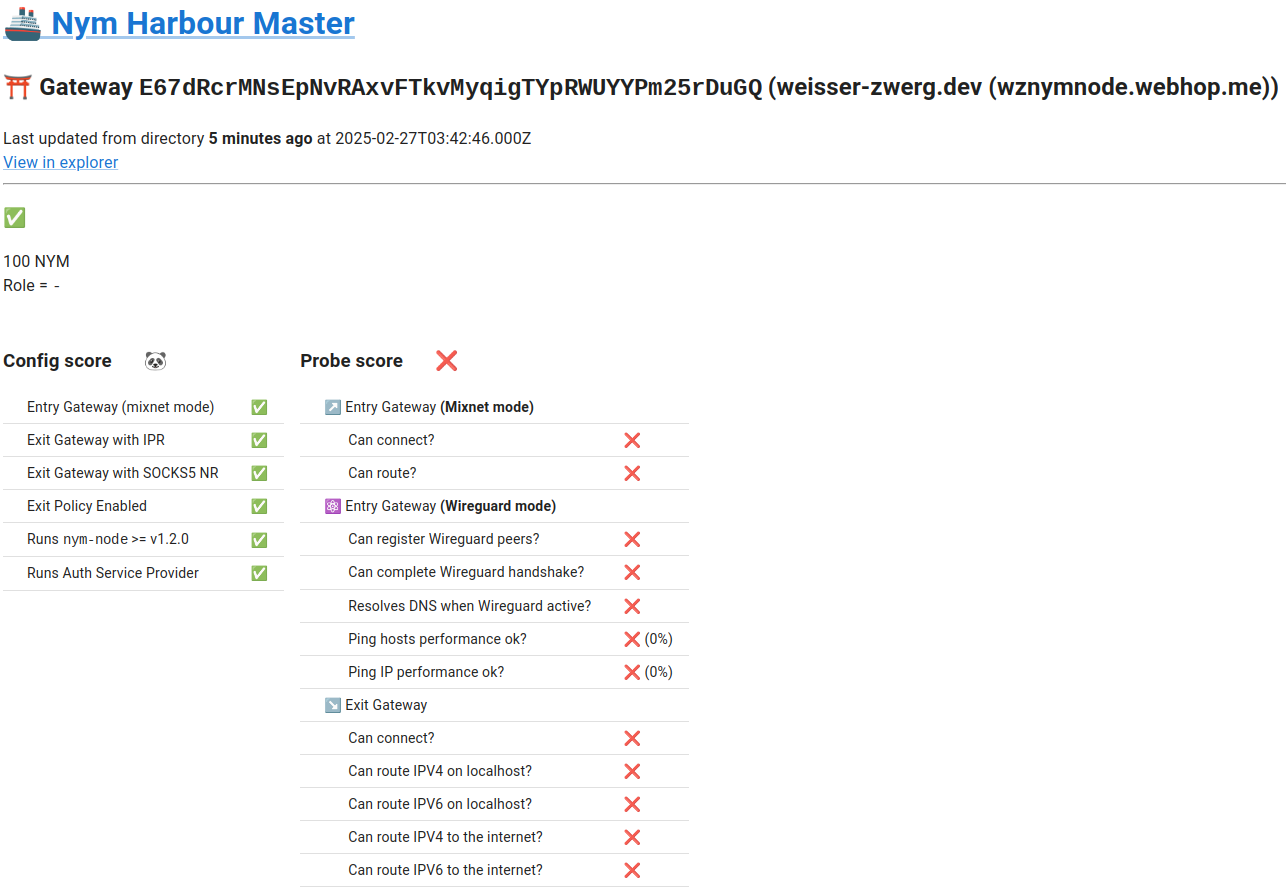
As entry-gateway:
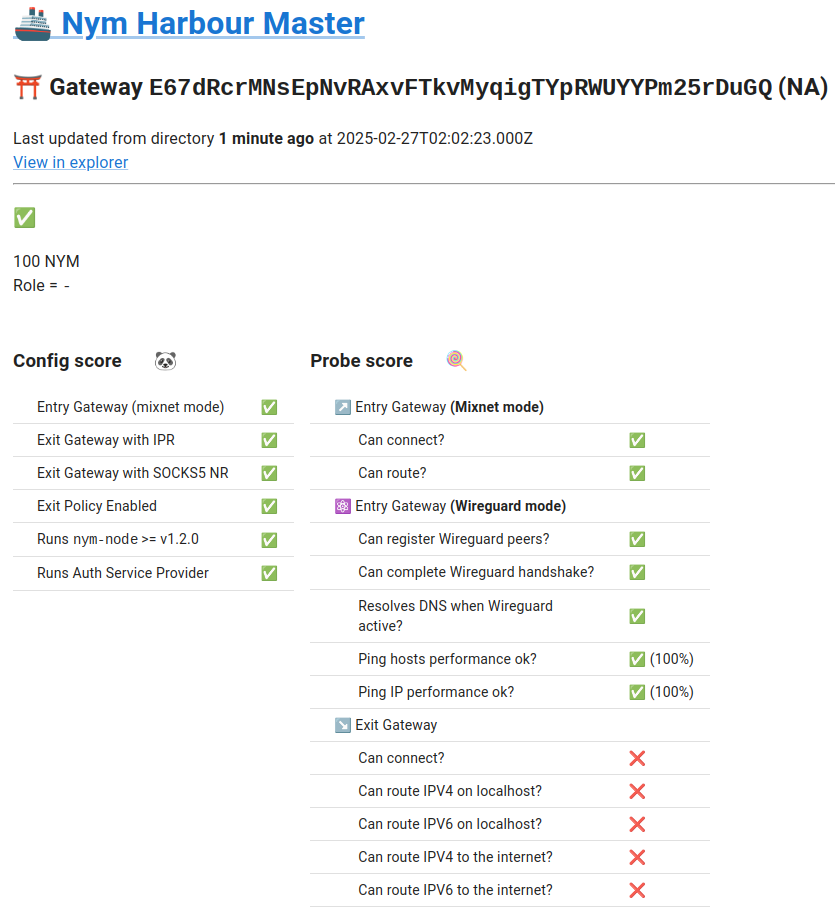
Please click on the exit-gateway or entry-gateway links to look at complete Nym Harbour Master pages for my node running in these modes.
The Core Puzzle (and My Questions):
- Why does
exit-gatewaymode “look worse” in the Harbour Master logs but actually work better for2‑hopconnectivity? - Why does the NymVPN client display error messages when connecting through my
exit-gateway, even though the connection ultimately succeeds? - Why doesn’t my node ever appear in the Android NymVPN client’s drop-down list of
2‑hopgateways, even though it’s connectable via the command line?
When I run my Nym node as an entry-gateway, the Nym Harbour Master status page looks “greener” than when I run it in exit-gateway mode.
In both cases, the Nym node’s own logs stay “green” and show no errors.
However, if I run my node as an entry-gateway, I cannot connect to it through the NymVPN 2‑hop WireGuard mode at all.
If I switch to exit-gateway mode, I can connect via the NymVPN client, but the client logs still show error messages.
Meanwhile, the Android NymVPN client can display all available 2‑hop WireGuard gateways in a drop-down box, yet my node does not appear there - even though I can connect to it directly with the nym-vpnc command line VPN client.
I find it odd that just switching from entry-gateway to exit-gateway makes the Nym Harbour Master page report more issues, while in practice my node finally becomes accessible in 2‑hop mode.
My main goal is to configure my Nym node so it can be used as both an --entry-gateway-id and an --exit-gateway-id with the nym-vpnc command line VPN client in --enable-two-hop mode.
I also want it to appear in the Android NymVPN client’s drop-down list of available 2‑hop WireGuard gateways.
In addition, I’d like the pages in the Spectre Explorer and Nym Harbour Master for my node to look similar to the ones operated by the Nymtech team:
| weisser-zwerg.dev (wznymnode.webhop.me) | nymtech (mainnet-gateway2.nymte.ch) | |
|---|---|---|
| Spectre Explorer | E67dRcrMNsEpNvRAxvFTkvMyqigTYpRWUYYPm25rDuGQ | 2BuMSfMW3zpeAjKXyKLhmY4QW1DXurrtSPEJ6CjX3SEh |
| Nym Harbour Master | E67dRcrMNsEpNvRAxvFTkvMyqigTYpRWUYYPm25rDuGQ | 2BuMSfMW3zpeAjKXyKLhmY4QW1DXurrtSPEJ6CjX3SEh |
| Nymesis | E67dRcrMNsEpNvRAxvFTkvMyqigTYpRWUYYPm25rDuGQ | 2BuMSfMW3zpeAjKXyKLhmY4QW1DXurrtSPEJ6CjX3SEh |
| Nym Explorer V2 | E67dRcrMNsEpNvRAxvFTkvMyqigTYpRWUYYPm25rDuGQ | 2BuMSfMW3zpeAjKXyKLhmY4QW1DXurrtSPEJ6CjX3SEh |
Right now, the Spectre Explorer data for my node seems close enough to the Nymtech team node, although my uptime statistics may be affected by the times I’ve shut it down for testing.
However, the data in Nym Harbour Master looks very different from what appears for the Nymtech-operated node, which suggests there might be some misconfiguration on my end.
For reference, here’s the command line I use to start my Nym node:
/root/nym-node run --mode exit-gateway
                   --public-ips 94.143.231.195
                   --hostname wznymnode.webhop.me
                   --http-bind-address 0.0.0.0:8080
                   --mixnet-bind-address 0.0.0.0:1789
                   --verloc-bind-address 0.0.0.0:1790
                   --location DE
                   --wireguard-enabled true
                   --expose-system-hardware false
                   --expose-system-info false
                   --accept-operator-terms-and-conditions
And here is the first line of the logs after start-up:
 INFO nym-node/src/node/mod.rs:1008: starting Nym Node E67dRcrMNsEpNvRAxvFTkvMyqigTYpRWUYYPm25rDuGQ with the following modes:
  mixnode: false,
  entry: true,
  exit: true,
  wireguard: true
You can also check out the Nym Harbour Master page I archived when the node was running in
entry-gatewaymode instead of exit-gateway mode: wznymnode.webhop.me as entry-gateway.The only change in that case was using
--mode entry-gatewayin place of--mode exit-gateway. All other command-line arguments and theconfig.tomlstayed the same.
Request for Assistance: I hope this breakdown helps fellow Nym node operators who want to set up a dVPN (two-hop Wireguard) gateway. If any of this looks familiar - or if you have insight into why “exit-gateway” mode triggers so many error messages despite working - I’d love to hear it.
Questions for the Nym Team:
- Are these Harbour Master “Failed to connect to mixnet” messages expected?
- What do the client log errors mean?
- Are there additional diagnostics or configuration steps I should check?
Please feel free to reach out with any advice, tips, or clarifications. I’ll keep the post updated as I learn more.
Additional Note: The Nym Node Troubleshooting guide mentions to check the blacklist, which you can do as follows:
curl -X 'GET' --silent https://validator.nymtech.net/api/v1/gateways/blacklisted | jq | grep E67My node does not seem to be on the blacklist.
Complete Nym Harbour Master Logs for exit-gateway Mode
I include here the Nym Harbour Master logs showing the errors for my node: E67dRcrMNsEpNvRAxvFTkvMyqigTYpRWUYYPm25rDuGQ, so that search engines can pick them up.
Probe Log
2025-02-27T03:52:43.698417Z  INFO nym_gateway_probe: nym-api: https://validator.nymtech.net/api/
2025-02-27T03:52:43.698444Z  INFO nym_gateway_probe: nym-vpn-api: https://nymvpn.com/api/
2025-02-27T03:52:43.698526Z  INFO nym_gateway_directory::gateway_client: Fetching all described nodes from nym-api...
2025-02-27T03:52:43.840567Z  INFO nym_gateway_directory::gateway_client: Fetching skimmed entry assigned nodes from nym-api...
2025-02-27T03:52:43.856320Z  INFO nym_gateway_directory::gateway_client: Appending mixnet_performance to gateways
2025-02-27T03:52:43.856483Z  INFO nym_gateway_probe: Probing gateway: Gateway { identity: "E67dRcrMNsEpNvRAxvFTkvMyqigTYpRWUYYPm25rDuGQ", location: Some(Location { two_letter_iso_country_code: "DE", latitude: 0.0, longitude: 0.0 }), ipr_address: Some(IpPacketRouterAddress(DnxDpj42exX1RL8gFTxWDGYpkgjcutWNhymHBsXEk4NW.6TpNuDFu9AWpifneH3n7qz29VdoiDPh8id9T6Fr8mubn@E67dRcrMNsEpNvRAxvFTkvMyqigTYpRWUYYPm25rDuGQ)), authenticator_address: Some(AuthAddress(Some(9JKctbXTSaAzcRok3bG8ns3jvr5h2UzKFhuweQuEmFYz.DgvesE5mw2V4dpBTLrz71LpAvddycXuzPYvwAwYTuUBB@E67dRcrMNsEpNvRAxvFTkvMyqigTYpRWUYYPm25rDuGQ))), last_probe: None, host: Some(Hostname("wznymnode.webhop.me")), clients_ws_port: Some(9000), clients_wss_port: Some(9001), mixnet_performance: Some(Percent(Decimal(0.49))) }
2025-02-27T03:52:43.936720Z  INFO nym_client_core::init::helpers: nym-api reports 234 valid gateways
2025-02-27T03:52:44.428082Z  INFO nym_client_core::client::base_client: Starting nym client
2025-02-27T03:52:44.428143Z  INFO nym_client_core::client::base_client: Starting statistics control...
2025-02-27T03:52:44.428205Z  INFO nym_client_core::client::base_client: Obtaining initial network topology
2025-02-27T03:52:44.516188Z ERROR nym_client_core::client::base_client: the gateway we're supposedly connected to does not exist. We'll not be able to send any packets to ourselves: Gateway with identity key E67dRcrMNsEpNvRAxvFTkvMyqigTYpRWUYYPm25rDuGQ doesn't exist
2025-02-27T03:52:44.516246Z ERROR nym_gateway_probe: Failed to connect to mixnet: the current network topology seem to be insufficient to route any packets through
{
  "gateway": "E67dRcrMNsEpNvRAxvFTkvMyqigTYpRWUYYPm25rDuGQ",
  "outcome": {
    "as_entry": {
      "can_connect": false,
      "can_route": false
    },
    "as_exit": null,
    "wg": null
  }
}
2025-02-27T03:52:44.516354Z ERROR TaskClient-BaseNymClient-statistics_control-controller: [TaskClient-BaseNymClient-statistics_control-controller] Polling shutdown failed: channel closed
2025-02-27T03:52:44.516371Z ERROR TaskClient-BaseNymClient-statistics_control-controller: [TaskClient-BaseNymClient-statistics_control-controller] Assuming this means we should shutdown...
Description
{
  "moniker": "weisser-zwerg.dev (wznymnode.webhop.me)",
  "website": "https://weisser-zwerg.dev/posts/digital-civil-rights-networking-i/#nym-mixnet%3A-operating-your-own-nym-node",
  "security_contact": "operator@weisser-zwerg.dev",
  "details": "weisser-zwerg.dev operated nym-node"
}
Self Described
{
  "authenticator": {
    "address": "9JKctbXTSaAzcRok3bG8ns3jvr5h2UzKFhuweQuEmFYz.DgvesE5mw2V4dpBTLrz71LpAvddycXuzPYvwAwYTuUBB@E67dRcrMNsEpNvRAxvFTkvMyqigTYpRWUYYPm25rDuGQ"
  },
  "auxiliary_details": {
    "accepted_operator_terms_and_conditions": true,
    "announce_ports": {
      "mix_port": 1789,
      "verloc_port": 1790
    },
    "location": "DE"
  },
  "build_information": {
    "binary_name": "nym-node",
    "build_timestamp": "2025-02-13T11:49:34.670488195Z",
    "build_version": "1.5.0",
    "cargo_profile": "release",
    "cargo_triple": "x86_64-unknown-linux-gnu",
    "commit_branch": "HEAD",
    "commit_sha": "a3e19b4563843055b305ea9a397eb1ad84b5c378",
    "commit_timestamp": "2025-02-10T18:14:47.000000000+01:00",
    "rustc_channel": "stable",
    "rustc_version": "1.84.1"
  },
  "declared_role": {
    "entry": true,
    "exit_ipr": true,
    "exit_nr": true,
    "mixnode": false
  },
  "host_information": {
    "hostname": "wznymnode.webhop.me",
    "ip_address": [
      "94.143.231.195"
    ],
    "keys": {
      "ed25519": "E67dRcrMNsEpNvRAxvFTkvMyqigTYpRWUYYPm25rDuGQ",
      "x25519": "8PDvfnym8jxQGDwk6H1xoDcBttWscD1GezB1mAuVSfa4",
      "x25519_noise": null
    }
  },
  "ip_packet_router": {
    "address": "DnxDpj42exX1RL8gFTxWDGYpkgjcutWNhymHBsXEk4NW.6TpNuDFu9AWpifneH3n7qz29VdoiDPh8id9T6Fr8mubn@E67dRcrMNsEpNvRAxvFTkvMyqigTYpRWUYYPm25rDuGQ"
  },
  "last_polled": "2025-02-27 03:12:58.366326938 +00:00:00",
  "mixnet_websockets": {
    "ws_port": 9000,
    "wss_port": 9001
  },
  "network_requester": {
    "address": "43kSZTm2V7Y6u5So57gLTLdhmjfpWj5RzsmM9mvBhxF9.DGS2HPGAvHko6V3ixcGfSwJWEAkLsvvxA8TV7HmnuodH@E67dRcrMNsEpNvRAxvFTkvMyqigTYpRWUYYPm25rDuGQ",
    "uses_exit_policy": true
  },
  "wireguard": {
    "port": 51822,
    "public_key": "HLnpRvFCcUq3xmUZZPGcyZ8QMST7woJCZdQwCvGgM1QZ"
  }
}
Explorer API
{
  "block_height": 16380988,
  "gateway": {
    "clients_port": 9000,
    "host": "94.143.231.195",
    "identity_key": "E67dRcrMNsEpNvRAxvFTkvMyqigTYpRWUYYPm25rDuGQ",
    "location": "Germany",
    "mix_port": 1789,
    "sphinx_key": "8PDvfnym8jxQGDwk6H1xoDcBttWscD1GezB1mAuVSfa4",
    "version": "1.5.0"
  },
  "location": {
    "country_name": "Germany",
    "latitude": 51.2993,
    "longitude": 9.491,
    "three_letter_iso_country_code": "DEU",
    "two_letter_iso_country_code": "DE"
  },
  "owner": "n127c69pasr35p76amfczemusnutr8mtw78s8xl7",
  "pledge_amount": {
    "amount": "100000000",
    "denom": "unym"
  },
  "proxy": null
}
Optional
Nym Node Description
Your Nym node’s main configuration file, located at ~/.nym/nym-nodes/default-nym-node/config/config.toml, contains a line like this:
description = '/root/.nym/nym-nodes/default-nym-node/data/description.toml'By default, this file includes the following empty fields:
moniker = ""
website = ""
security_contact = ""
details = ""
I customized mine with the following content:
moniker = "weisser-zwerg.dev (wznymnode.webhop.me)"
website = "https://weisser-zwerg.dev/posts/digital-civil-rights-networking-i/#nym-mixnet%3A-operating-your-own-nym-node"
security_contact = "operator@@weisser-zwerg.dev"
details = "weisser-zwerg.dev operated nym-node"
This information will appear when you run: ./nym-node node-details or when you query the node API’s description endpoint:
curl -X 'GET' 'http://94.143.231.195:8080/api/v1/description' -H 'accept: application/json' | jq
{
  "moniker": "weisser-zwerg.dev (wznymnode.webhop.me)",
  "website": "https://weisser-zwerg.dev/posts/digital-civil-rights-networking-i/#nym-mixnet%3A-operating-your-own-nym-node",
  "security_contact": "operator@weisser-zwerg.dev",
  "details": "weisser-zwerg.dev operated nym-node"
}
Additionally, this information is publicly visible on the Spectre Explorer. You can check my node here: E67dRcrMNsEpNvRAxvFTkvMyqigTYpRWUYYPm25rDuGQ.
There will be also a Description section displayed in the Nym Harbour Master. You can check my node in the Nym Harbour Master here: E67dRcrMNsEpNvRAxvFTkvMyqigTYpRWUYYPm25rDuGQ.
Automatic Upgrades
The official Nym Operators guide has a section on Automatic Node Upgrade: Nymvisor Setup & Usage.
It references this endpoint: https://nymtech.net/.wellknown/nym-node/upgrade-info.json, which unfortunately no longer appears to work.
When I looked at the nymvisor source code, I noticed it still tries to use that endpoint.
So I asked in the Node Operators Matrix room if nymvisor was still supposed to work.
The response was that nymvisor is no longer up-to-date with the latest changes.
Because of that, I created my own approach using a nightly systemd.timer job plus a Python CLI script (built with Click).
This script checks the GitHub https://api.github.com/repos/nymtech/nym/releases endpoint for new Nym releases.
If one is found, it downloads everything, sets up the files, and sends a notification to my mobile phone via Pushover.
I prefer to finalize updates manually so I can review logs or handle migration tasks if necessary. So the script stops short of automatically swapping in the new binary - it just alerts me.
Once you’re ready to perform the update you will only have to change one symlink and restart the nym-node service:
rm /root/nym-node
ln -s /root/nym-node-v2025.3-ruta /root/nym-node
systemctl restart nym-node
journalctl -u nym-node -f -n 100
The CLI script also waits two days (configurable) after detecting a new release before downloading the new release and sending that alert. I do this because dev teams often issue quick follow-up releases if any bugs show up. The two-day delay helps avoid “hot off the press” critical issues.
As usual, you can find the entire code in my GitHub Gist.
Here are the installation instructions. Simply follow these steps in your terminal:
mkdir /root/nym-update
cd /root/nym-update
# install UV as our python package manager:
curl -LsSf https://astral.sh/uv/install.sh | sh
# create the python environment
uv venv py312nu --python 3.12 --seed
# activate the environment
source /root/nym-update/py312nu/bin/activate

# download the files from the gist: https://gist.github.com/cs224/cff0fd1e862d023491aa25ea05354cb7

# install the additional requirements
uv pip install -r ./requirements.in

# update the nym-update.py script with your 'token' and 'user';
#  see the api documentation for more details: https://pushover.net/api

# check that that pushover alert actually works:
/root/nym-update/py312nu/bin/python /root/nym-update/nym-update.py --test-alert
# run the script with debug messages to see that it does what it is supposed to do:
/root/nym-update/py312nu/bin/python /root/nym-update/nym-update.py --debug

# set-up the systemd service and timer:
cp nym-update.service /etc/systemd/system/nym-update.service
cp nym-update.timer   /etc/systemd/system/nym-update.timer
systemctl daemon-reload
systemctl enable nym-update.timer
systemctl start nym-update.timer
# check the logs:
journalctl -u nym-update.service -f -n 100
Backup and Archiving
This section is a simplified version of the more detailed process described in Home Server Blueprint: Rock-Solid Home Server with Unattended Reboots, Secure Disk Encryption, and Cost-Effective Offsite Backups. If you need comprehensive instructions, please refer to that guide.
Installing Kopia and Rclone
For our offsite backup, we’ll use kopia and rclone.
Kopia manages efficient snapshot-based backups (deduplicated, encrypted, and versioned), while Rclone synchronizes data with various cloud storage providers.
- Kopia: Offers deduplication, encryption, and incremental backups. Great for maintaining both local and offsite snapshots.
- Rclone: A versatile tool that supports many cloud providers (Google Drive, Dropbox, SharePoint, Amazon S3, etc.). It can also handle bandwidth throttling and encryption on the fly.
First, install Rclone:
curl https://rclone.org/install.sh | sudo bashI named my offsite storage rclone-backup-sharepoint-site: in this example.
Before proceeding on your server, first set up and test your Rclone configuration locally and verify:
rclone about rclone-backup-sharepoint-site:Once it works on your local workstation, copy your verified configuration to your nym-node server:
scp ~/.config/rclone/rclone.conf avoro-root:/root/.config/rclone/rclone.confFinally, log in to your nym-node server and verify the offsite storage there:
rclone about rclone-backup-sharepoint-site:Next, install Kopia:
curl -s https://kopia.io/signing-key | gpg --dearmor -o /etc/apt/keyrings/kopia-keyring.gpg
echo "deb [signed-by=/etc/apt/keyrings/kopia-keyring.gpg] http://packages.kopia.io/apt/ stable main" | tee /etc/apt/sources.list.d/kopia.list
apt update && apt install kopia
Then, set up your Kopia repository to use the Rclone-based remote connection:
HOSTNAME=`hostname` KOPIA_REPOSITORY_SECRET="supersecret" bash -c 'kopia repository create rclone --password "${KOPIA_REPOSITORY_SECRET}" --remote-path=rclone-backup-sharepoint-site:"${HOSTNAME}" --description="My Offsite BTRFS Snapshots for ${HOSTNAME}" --content-cache-size-mb=512 --metadata-cache-size-mb=512'Re-connect to your new Kopia repository to ensure you know the password:
kopia repository connect rclone --remote-path=rclone-backup-sharepoint-site:"${HOSTNAME}"Finally, set a few global policies:
kopia policy set --global --max-parallel-snapshots=1 --max-parallel-file-reads=1
kopia policy set --global --keep-latest=7 --keep-hourly=0 --keep-daily=14 --keep-weekly=4 --keep-monthly=12 --keep-annual=3
kopia policy set --global --compression=pgzip
kopia policy get --global
kopia repository status
For local backups, we’ll use a Git repository to track historical configurations without having to retrieve them from offsite:
mkdir /root/nym-node-backup
cd /root/nym-node-backup
git init
Congratulations, your setup work is now complete.
Backup and Upgrade
It’s helpful to integrate your backup and archive steps into your regular upgrade process. For example, whenever you upgrade your node, use that opportunity to perform both archiving and backup tasks.
Let’s assume you’re using the Automatic Upgrades script.
A new nym-node binary might be downloaded as /root/nym-node-v2025.4-dorina-patched.
Stop the current nym-node service:
systemctl stop nym-node.servicePerform a backup:
readlink -f /root/nym-node > /root/nym-node-backup/nym-node.current_target.txt
rsync -av --links --info=progress2 --stats --exclude "*~" --exclude "*.bloom" /root/.nym /root/nym-node-backup/dotnym
rsync -av /etc/systemd/system/nym-node.service /root/nym-node-backup/
sqlite3 /root/.nym/nym-nodes/default-nym-node/data/clients.sqlite ".backup /root/nym-node-backup/clients_backup.sqlite" ".exit"
Test the new binary: Look up your command-line settings in the nym-node.service file’s ExecStart= statement. Then start the new binary manually:
chmod u+x /root/nym-node-v2025.4-dorina-patched
/root/nym-node-v2025.4-dorina-patched run --mode exit-gateway --public-ips "94.143.231.195" --hostname "wznymnode.webhop.me" --http-bind-address 0.0.0.0:8080 --mixnet-bind-address 0.0.0.0:1789 --verloc-bind-address 0.0.0.0:1790 --location DE --wireguard-enabled true --expose-system-hardware false --expose-system-info false --accept-operator-terms-and-conditions
If everything looks good, press Ctrl + C to stop the process.
Update the symlink:
rm /root/nym-node
ln -s /root/nym-node-v2025.4-dorina-patched /root/nym-node
Start the service:
systemctl start nym-node.service
# watch the logs:
journalctl -u nym-node -f -n 100
# verify the node's info endpoint:
curl -X 'GET' 'http://94.143.231.195:8080/api/v1/build-information' -H 'accept: application/json' | jq
Congratulations, you’ve backed up your previous configuration and successfully upgraded your nym-node.
Archiving
Now we’ll take care of archiving.
The kopia-ls and git-ls commands mentioned below are handy Bash aliases you can define in your ~/.bashrc (see Useful .bashrc Aliases).
Now we’re taking care of achriving. The kopia-ls and git-ls commands are bash aliases that you can define in your .bashrc file (see below).
git -C /root/nym-node-backup add -A && git -C /root/nym-node-backup -c user.name="Anonymous" -c user.email="anon@example.com" commit -m "Backup commit at $(date +%Y-%m-%d-%H%M)"
git-ls
kopia snapshot create --parallel=1 /root/nym-node-backup
kopia repository status
kopia-ls
DATESTAMP="$(date +%Y-%m-%d-%H%M)" && git -C /root/nym-node-backup bundle create /root/nym-node-backup-$DATESTAMP.bundle --all && git -C /root/nym-node-backup bundle verify /root/nym-node-backup-$DATESTAMP.bundle
# Check the commits HEAD~0, HEAD~1, HEAD~2, ...
# Which files changed:
git -C /root/nym-node-backup show --pretty="" --name-only HEAD~0
# What changed in those files:
git -C /root/nym-node-backup show HEAD~0
At this point, you have multiple ways to revert to previous configurations:
- Locally via your Git repository
- Offsite via Kopia and Rclone
- Locally via Git bundles
Useful .bashrc Aliases
If you like, you can add the following aliases to your ~/.bashrc:
alias nym-dl='f(){ local url="$1"; local tag="$(echo "$url" | sed -E "s|.*/nym-binaries-([^/]+)/nym-node|\1|")"; curl -fSL --silent "$url" -o "nym-node-$tag" && chmod +x "nym-node-$tag"; }; f'
alias nym-ls='curl --silent "https://api.github.com/repos/nymtech/nym/releases" | jq -r "(\"prerelease,draft,updated_at,url\"), (.[] | . as \$release | .assets[] | select(.name == \"nym-node\") | [\$release.prerelease,\$release.draft,.updated_at,.browser_download_url] |\
 @csv)"'

alias kopia-ls="kopia snapshot list --json | jq -r '.[] | \"\(.startTime[:19])Z \(.endTime[:19])Z  \(.source.path )  \(.rootEntry.obj )  \((.stats.totalSize / 1048576 | floor))MB  files:\(.stats.fileCount )  dirs:\(.stats.dirCount )\"'"

alias git-ls='( cd /root/nym-node-backup && git log --pretty=format:%H | while read c; do date=$(git show --no-patch --format="%cd" --date=format:"%Y-%m-%d-%H%M" "$c"); subj=$(git show --no-patch --format="%s" "$c"); target=$(git show "$c:nym-node.current_target.txt" 2>/dev/null | tr "\n" " "); [ -z "$target" ] && target="N/A"; echo "$date $c $subj $target"; done )'nym-lslists Nym binaries available on GitHub.nym-dl(with the link fromnym-ls) will download the binary to/root/. This is especially helpful if you’re not using the Automatic Upgrades script.kopia-lsshows an overview of your offsite backup history.git-lsshows a local Git history of changes you’ve committed in/root/nym-node-backup.
Kopia Maintenance
Here are some Kopia maintenance commands you should consider running occasionally:
# Quick maintenance (compact small indexes, etc.)
kopia maintenance run
# Pruning/Retention: Kopia also has internal "maintenance" or "prune" commands for removing old data from the repository:
kopia snapshot prune --delete
# Full maintenance (rebuild indexes, more thorough compaction, etc.): It's a good idea to schedule a periodic run of:
kopia maintenance run --full
With these backup, upgrade, and archiving steps in place, you’ll have a robust strategy for protecting and restoring your Nym node configurations.
Delegating
Earlier, I mentioned that if you prefer not to run your own nym-node, you can still contribute to the network by delegating your Nym tokens - such as to my node.
But before you can delegate, you’ll need to acquire some NYM tokens. The Nym documentation suggests purchasing them through the Bity broker.
While I haven’t personally used these services, you can also buy NYM tokens on centralized exchanges (CEX) like Kraken (on the native NYX network) or on decentralized exchanges (DEX) and CEX platforms like KuCoin or ByBit (on the ERC20 Ethereum network).
However, if you purchase tokens on the ERC20 network, you’ll need to transfer them to the native NYX network via GravityBridge.
There is a Delegation Advisor available, but I’m unsure of its current functionality.
Anyway, to get started, you’ll need a wallet. Head over to the Nym Wallet website and download the wallet for your operating system.
If you don’t already have an account, you’ll need to create one. The wallet will guide you through generating a BIP 39 Mnemonic Word List, which is a set of 24 unique words that serve as your account identifier. Store these words in a secure location (e.g., a Password Manager) because you’ll use them to access your wallet in the future.
Next, go to the Spectre Explorer and install the Keplr browser extension wallet for the Inter Blockchain Ecosystem.
Once logged in using your 24 unique words, you can use the Delegate button on the page of your chosen node, such as mine: E67dRcrMNsEpNvRAxvFTkvMyqigTYpRWUYYPm25rDuGQ.
Next steps
By now, you’ve either set up your own Nym node or contributed to the network by delegating some funds. If you’re eager to dive deeper, I recommend checking out the Nym Docs for more detailed information.
You can find support at the following platforms:
- Nym Forum: A community-driven space to discuss Nym’s technology and get answers to your questions.
- Nym on Discord: Join the conversation and connect with other users and developers in real time.
- operators:nymtech.chat on Matrix: A Matrix chatroom for technical discussions and support.
- Nym on GitHub: Explore the code, report issues, and contribute to the project.
Footnotes
I only discovered after writing this section that the Amnezia How to run your VPN page lists some Virtual Private Server (VPS) providers. I’ve already included a few in the Amnezia WireGuard for Censorship Resistance section. Also have a look at Running a Tor Exit node/Mysterium Node in Linode. (24629) | Linode Questions and Lars-Sören Steck: Euer Lars vom netcup-Team: Betreiben eines (Non-exit) Tor-Nodes. And a comment from the Node Operators Legal Forum: Might also be time to revive the Universal Privacy Alliance where one of the initial intentions was to support privacy providers with any legal issues. ↩︎
Originally, I used Duck DNS, but it encountered several downtimes and service degradations. In the meantime I have changed from No-IP to Free DNS because of the annoying manual renewal process at No-IP. ↩︎