
Using a MikroTik hAP ax³ (RouterOS) and the ROUTE64 Tunnel Broker for IPv6 at Home
Published by Weisser Zwerg Blog on

When your ISP makes IPv6 hard, a MikroTik hAP ax³ and the ROUTE64 tunnel broker can bring modern IPv6 connectivity to your home network - even behind carrier-grade NAT (CGNAT).
Rationale
Some ISPs cause real headaches with IPv6 at home. In this blog post we are going to use a MikroTik hAP ax³ and the ROUTE64 tunnel broker to work around those problems and still get stable and usable IPv6 connectivity at home.
I will explain my personal details in the appendix.
The only prerequisite you have to fulfill is a working IPv4 connection, even if it is behind carrier-grade NAT (CGNAT).
CGNAT means that many customers share a single public IPv4 address. Your router receives a private IPv4 address from your ISP, and the ISP translates all traffic to a shared public address. Outbound connections usually work fine, but inbound connections and classic port forwarding from the public internet to your home network are not possible without special support from the ISP.
Here are some helpful additional resources:
- Mikrotik - Tunnelbroker with Route64
- Setup Route64 tunnel broker on MikroTik
- List of IPv6 Tunnel Brokers
These links are not required to follow this guide, but they can be useful if you want to compare different configurations or troubleshoot your own setup later.
Different Readers and Different Levels of Prior Knowledge
Different readers have different levels of prior knowledge, so it is hard to write one guide that fits everyone. If the explanations below feel too short or too advanced for you, just copy the URL of this post into an AI assistant like ChatGPT and ask it to walk you through the sections you are not yet comfortable with. For example, you can ask it to explain unfamiliar concepts or show the same steps for a different Linux distribution.
Introduction
After writing my last blog post about Teleporting a Public IPv6 Address from Your VPS to Your Home Server, I realized that offering routed IPv6 addresses over a WireGuard tunnel to third-party users could be a business model on its own - and it actually is. The concept is called an IPv6 tunnel broker, and I have written a subsection in the appendix about Hurricane Electric and the classic IPv6 tunnel broker.
A tunnel broker usually gives you:
- A stable IPv6 prefix that you can use in your home network.
- One or more tunnel endpoints, for example using protocols like WireGuard, OpenVPN, or 6in4.
- A routed setup, where the tunnel broker advertises your IPv6 traffic to the global internet.
Your home router connects to the tunnel broker over IPv4 and builds an encrypted tunnel. Inside that tunnel you get native looking IPv6 connectivity, even if your ISP does not support IPv6 at all or only provides it in a broken way.
In this blog post I will explain how to use such a service together with the MikroTik hAP ax³ router in order to bring IPv6 to my home network in a clean and reproducible way.
Why not my FRITZ!Box?
Why not my FRITZ!Box 7590, you might ask. The details are explained below in My Personal Situation, but the short answer is that the FRITZ!Box can connect to tunnel brokers only with classic IPv6 transition mechanisms like 6to4, 6RD, or 6in4.
These mechanisms expect the FRITZ!Box to have a globally reachable IPv4 address or an ISP managed tunnel gateway that handles the encapsulated traffic.
My IPv4 connectivity is behind carrier-grade NAT (CGNAT), so inbound IPv4 connections and port forwarding are not possible in a simple way. If you are on CGNAT, a classic 6in4 tunnel over a FRITZ!Box is basically a non starter because the remote tunnel server on the internet cannot reach your private IPv4 address inside the ISP network.
Protocols like 6in4 encapsulate IPv6 packets directly inside IPv4 packets without encryption and without an extra NAT friendly layer. They usually require that both tunnel endpoints use public IPv4 addresses, or that there is a special relay that understands this traffic. CGNAT breaks this assumption, since the ISP router in front of you sees only private addresses and cannot know that it should forward 6in4 traffic to your FRITZ!Box.
Modern tunnel setups that are designed for CGNAT, like WireGuard or OpenVPN over UDP, behave like normal outbound VPN connections. From the ISP perspective this looks like any other encrypted connection to the internet, so it passes through CGNAT without special configuration.
That is the reason why you need to bring in a NAT friendly tunnel, for example WireGuard or OpenVPN, and terminate it at a router that can handle this setup, such as the MikroTik hAP ax³.
ROUTE64
route64.org (AS212895) is a non profit network operator that runs a fully automated platform offering free IPv6 tunnel broker and IPv4/IPv6 transit services to the Internet community.
An autonomous system, or AS, is a group of IP networks that is managed by a single organization and that uses a common routing policy on the Internet. Each AS has a unique number, in this case AS212895, that is used for BGP routing between networks.
Their tunnel broker lets users who do not have native IPv6 get connectivity via several tunnel types, for example WireGuard, GRE, or SIT.
You receive a static /56 IPv6 prefix that is routed over the tunnel and that you can split into smaller subnets and use at home, in a home lab, or on VPS servers.
A
/56prefix gives you 256 separate/64networks, which is more than enough for most home networks. You can use different/64networks for LAN, guest WiFi, lab VLANs, or VPN clients and still stay within the same delegated block from ROUTE64.
The project is funded purely by donations. For each euro you donate you receive sponsor tokens, using a simple rule (1 € = 10 tokens). You can spend these tokens to move from the free “No sponsor” tier into higher sponsor levels such as Silver, Gold, Platin, Diamond, and Provider.
These levels do not change the basic idea of “free IPv6 for everyone” for normal users. Instead they unlock larger quotas and extra features, for example more ASNs, more BGP sessions, more tunnels, additional tunnel broker prefixes, and advanced options such as anycast IP space. This way heavy users, lab builders, and hobby ISPs can support the project financially and at the same time receive more generous limits for their experiments.
MikroTik hAP ax³ and RouterOS
While the MikroTik hAP ax³ with RouterOS is extremely powerful and not very expensive (currently somewhere between 100 € and 120 €), this device also expects quite a lot from you in terms of networking knowledge and attention to detail. It is much closer to having a tiny ISP grade router in your living room than a typical consumer WiFi box.
Before you press buy now, I strongly suggest watching An Introduction to MikroTik RouterOS for Newbies! or at least skimming a few beginner guides, so you know what you are getting yourself into.
MikroTik itself is a Latvian company, founded in 1996 and still based in Riga, that builds routers, switches, and wireless equipment for everything from home offices to serious ISP networks. Their secret sauce is RouterOS, a Linux based network operating system that runs on all their routers, on x86 PCs, and as a virtual appliance (CHR) in many virtualisation platforms and public clouds.
The hAP ax³ itself is a deceptively serious little router. It offers WiFi 6 (802.11ax) on both 2.4 GHz and 5 GHz, with radio rates up to roughly 574 Mbit/s and 1200 Mbit/s respectively, driven by a 1.8 GHz quad core ARM CPU with 1 GB RAM and 128 MB NAND flash. On the wired side you get four 1 Gbit Ethernet ports plus a 2.5 Gbit Ethernet port that can provide PoE in or PoE out, and a USB 3.0 port for storage or an LTE modem. This hardware is far beyond typical “home router” specifications and is comfortable running several VPNs (for example WireGuard or IPsec), dynamic routing protocols such as BGP or OSPF, complex firewall rules, and QoS.
With RouterOS v7, which is what you will run on a new hAP ax³ today, you get a rebuilt BGP stack, native WireGuard support, ZeroTier integration, and MikroTik’s own “Back to Home” VPN for easy remote access behind CGNAT. On top of that come the usual MikroTik tools: a full stateful firewall, powerful queues for QoS, Hotspot and captive portal features, DHCP and DNS servers, MPLS and VPLS, bridging, VLANs, traffic generators, packet sniffers, and a scripting engine to glue everything together.
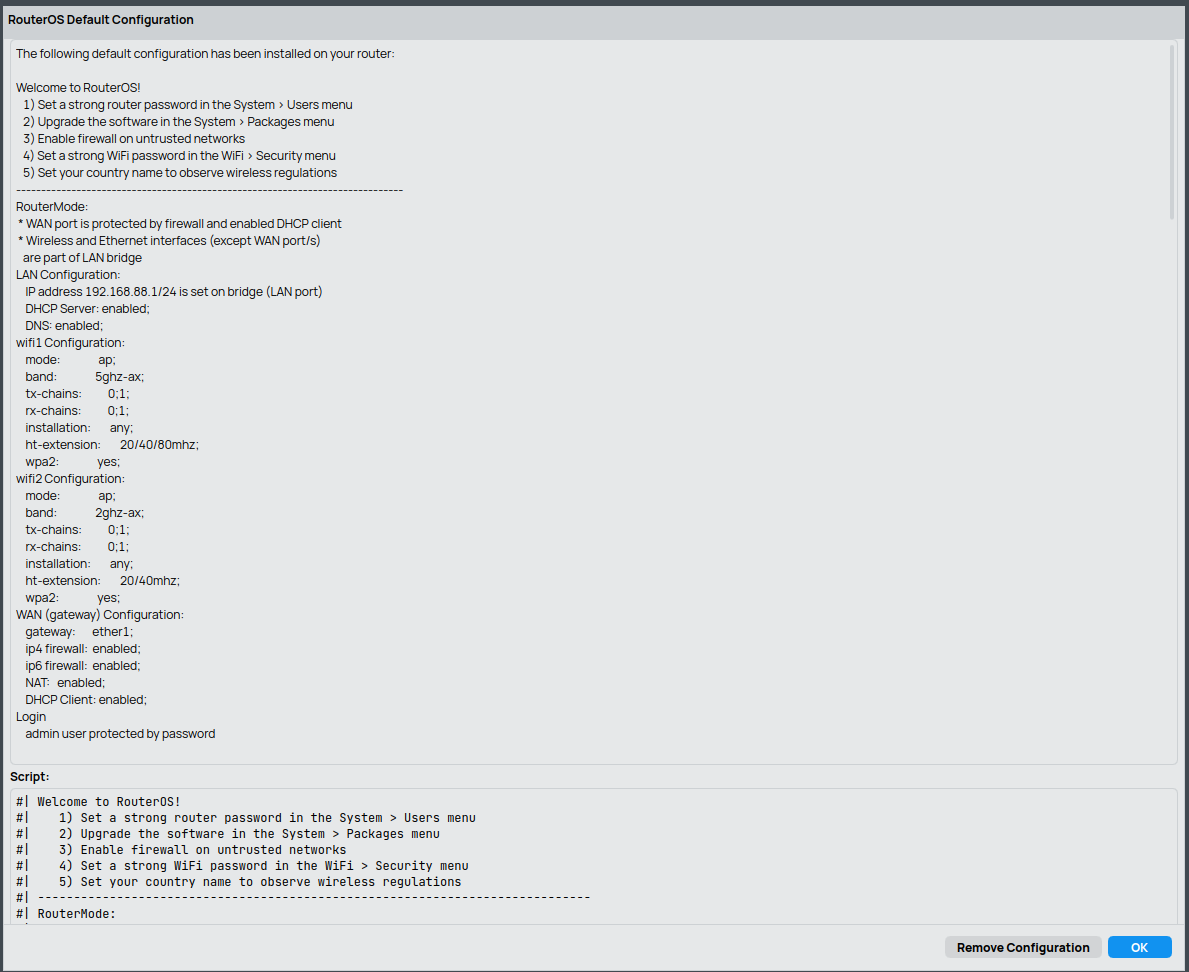
The flip side is that MikroTik expects you to be the grown up in the room. The default configuration gives you a reasonable home router setup: the first Ethernet port is used as WAN with a DHCP client and firewall, the remaining ports and WiFi are bridged into a LAN on 192.168.88.0/24 with a DHCP server. As soon as you start changing things, RouterOS will happily let you break your own network.
You need to enjoy understanding what NAT, routes, bridges, and VLANs actually do, or else MikroTik will feel like a pain in your but.
To tame all that power you will mostly use WinBox, MikroTik’s native management tool. It talks directly to RouterOS, can discover devices at layer 2 (even before they have an IP address), and exposes almost every knob and lever that the operating system offers. There is also a web UI called WebFig and a very capable command line interface over SSH, plus MAC based discovery tools and RoMON for rescuing devices on broken networks. However, WinBox is where most MikroTik administrators spend their time.
The current WinBox versions are available for Windows, macOS, and Linux, so you can use it on almost any desktop system.
The CLI syntax is the same across different MikroTik devices. This means that once you learn a command on the hAP ax³, you can apply it on a bigger core router or on a CHR in the cloud. Many advanced users therefore combine WinBox for initial discovery and visual understanding with the CLI for repeatable configuration scripts.
Here is how the MikroTik greets you after your first login:
Basic Usage
As far as I can tell, the WinBox interface, the WebFig web UI, and the CLI over SSH offer almost the same functionality. The text based configuration works very well together with ChatGPT driven workflows, which makes the CLI my preferred way to interact with the MikroTik. When I run into trouble, I usually export the current configuration, tell ChatGPT what I am trying to achieve, and then let it suggest a plan or concrete commands.
This style of workflow is especially useful when you are experimenting. You can share selected parts of your configuration, reason about them step by step, and then apply only the changes you are comfortable with. It is still important that you understand the high level concepts such as interfaces, bridges, routes, and firewall chains, but you do not have to remember every detail of the RouterOS syntax.
You set up public key authentication by first copying your SSH public key to the MikroTik:
scp ~/.ssh/id_rsa_mikrotik.pub admin@192.168.88.1:Then, in RouterOS, you import the key:
/user ssh-keys import user=admin public-key-file=id_rsa_mikrotik.pub
/user ssh-keys print
From that moment on you can log in to the MikroTik via SSH without retyping your password every time.
To dump the current state of the MikroTik configuration into a file, you can use:
ssh admin@192.168.88.1 '/export hide-sensitive' > mikrotik-$(date +%F).rsc
# or
ssh admin@192.168.88.1 '/export hide-sensitive terse' > mikrotik-$(date +%F).rsc
# or
#  This creates a binary backup of your MikroTik router's entire configuration (and some state) and saves it on the router's local storage (NAND, disk, or flash).
#  This type of backup is:
#  - Version-specific: Best restored on the same device model and RouterOS version/architecture.
#  - Not human-readable.
#  - Intended for "I want the box back exactly as it was" scenarios (including users and passwords).
#  By default, RouterOS saves the backup in the router’s root file store (what you see under /file).
ssh admin@192.168.88.1 '/system backup save'
# [admin@MikroTik] > /file print
# Flags: S - shared
#  #   NAME                           TYPE             SIZE LAST-MODIFIED
#  0   MikroTik-20251203-0536.backup  backup       416.5KiB 2025-12-03 05:36:10
#
# You restore the setup via:
# /system backup load name=MikroTik-20251203-0536.backup
#
# You can copy via WinBox or WebGUI or
# scp admin@192.168.88.1:MikroTik-20251203-0536.backup .
#
# You can allso export and restore via the text file mechanism
#  That .rsc file contains CLI commands that, when run, recreate the configuration.
#  It does not include runtime state, logs, queues counters, etc.
# /export show-sensitive file=myconfig
# /import file-name=myconfig.rsc
The first command produces a human readable export, while the terse version is more compact and easier to diff in a version control system.
The
hide-sensitiveflag removes passwords and some other secrets from the export. This makes it much safer to store the file in a git repository or to paste fragments into a support ticket or a ChatGPT conversation. If you ever need a full export that includes sensitive data, create it only for local backup and keep it encrypted.
The following example shows how you can update RouterOS and the device firmware:
/system package update check-for-updates
/system package update print
/system package update install

/system routerboard print
/system routerboard upgrade
/system reboot
First you check for available updates, then install them, and finally upgrade the routerboard firmware so that the bootloader matches the installed RouterOS version. A reboot is required to complete the process.
MikroTik offers different update channels such as
stable,long-term, andtesting. For a home router that is exposed to the internet but also uses newer features like WireGuard, thestablechannel is usually a good compromise between freshness and reliability.
Here are some example ping commands that RouterOS understands:
/ping [:resolve ipv6.google.com]
/ping address=[:resolve ipv6.google.com] count=5
/ping 2a00:1450:400a:805::200e interface=wireguard-route64
The first two commands resolve ipv6.google.com to an IPv6 address and then ping it, once with default settings and once with an explicit packet count.
The last command pings a specific IPv6 address and forces the traffic to go out via the wireguard-route64 interface, which is useful when testing your ROUTE64 tunnel.
The
:resolvefunction is a small scripting helper that performs a DNS lookup and returns an address that can be used as a parameter. This is handy when you want to avoid hard coding IP addresses in your test commands.
Here are some basic commands to interact with the DNS and DHCP server on the MikroTik:
# Let LAN clients use the MikroTik as DNS resolver
/ip dns set allow-remote-requests=yes

# Inspect existing static DNS entries
/ip dns static print

# Show all DHCP servers
/ip dhcp-server print

# Show detailed DHCP network settings (including domain, if set)
/ip dhcp-server network print detail

# Set the local DNS domain for the first network entry
/ip dhcp-server network set 0 domain=lan
# Alternative syntax if you prefer matching by address:
# /ip dhcp-server network set [find address=192.168.88.0/24] domain=lan

# List current DHCP leases
/ip dhcp-server lease print
With the domain=lan setting in place and allow-remote-requests=yes, clients that obtain their configuration via DHCP will typically see lan as their search domain.
If you then create a static DNS entry such as mydevice.lan, many systems will also resolve the shorter name mydevice automatically.
The
domainproperty controls which DNS suffix is handed out via DHCP option 15. Operating systems usually add this suffix when you try to resolve a bare hostname. For example, if your DNS has a recordprinter.lanand your client knows thatlanis the local domain, thenping printerwill internally be resolved asprinter.lan.
To create static DHCP leases and give devices stable names inside your network, you can either convert existing leases or add new ones:
# Option 1: make an existing lease static (keep current IP and MAC)
/ip dhcp-server lease make-static numbers=5

# Option 2: add a new static lease with your preferred IP and comment
/ip dhcp-server lease add \
    address=192.168.88.50 \
    mac-address=AA:BB:CC:DD:EE:FF \
    server=defconf \
    comment="My device"

# If you want this device to be available under a specific DNS name,
# add a matching static DNS entry:
/ip dns static add name=mydevice.lan address=192.168.88.50

# Verify both DHCP leases and DNS entries
/ip dhcp-server lease print
/ip dns static print
The
commentfield on the DHCP lease is only for your own reference in RouterOS and does not influence DNS. The name used in/ip dns static addis what actually controls how the device is reachable via your local DNS. Combining a static lease with a static DNS entry gives you a stable mapping from MAC to IP and from IP to hostname, similar to what you might be used to from Pi-hole or dnsmasq.
To watch the router logs in real time, you can use:
/log print
/log print follow-only
/log print where message~"WPS"
/log clear
The follow-only variant keeps printing new log entries as they appear, very similar to tail -f on a Unix system.
The where example filters messages that contain the string WPS, and log clear cleans out the current log buffer.
You can combine several conditions in a single
log print wherecommand, for example by matching ontopicsandmessageat the same time. This is very useful when debugging firewall rules or VPN tunnels, because you can focus only on log lines that are actually relevant to the service you are working on.
The following commands show you the system state in terms of RouterOS versions and which capabilities are currently enabled or disabled.
As this MikroTik is meant for home use, it is in the home device mode and not all of its capabilities are enabled by default, but you can switch them on if needed:
[admin@MikroTik] > /system package update print
            channel: stable
  installed-version: 7.20.5
[admin@MikroTik] > /system routerboard print
       routerboard: yes
        board-name: hAP ax^3
             model: C53UiG+5HPaxD2HPaxD
     serial-number: HK40ASHESH2
     firmware-type: ipq6000
  factory-firmware: 7.18.2
  current-firmware: 7.20.5
  upgrade-firmware: 7.20.5
[admin@MikroTik] > /system/device-mode/print
                 mode: home
     allowed-versions: 7.13+,6.49.8+
              flagged: no
     flagging-enabled: yes
            scheduler: no
                socks: no
                fetch: no
                 pptp: yes
                 l2tp: yes
       bandwidth-test: no
          traffic-gen: no
              sniffer: no
                ipsec: yes
                romon: no
                proxy: no
              hotspot: no
                  smb: yes
                email: no
             zerotier: no
            container: no
  install-any-version: no
           partitions: no
          routerboard: no
        attempt-count: 0
The
device-modefeature is MikroTik’s way to limit the attack surface and complexity for home users. Inhomemode, services that you do not typically need on an internet facing router are disabled. If you enable additional features such astraffic-gen,sniffer, orcontainer, keep in mind that this can increase both resource usage and the number of open doors that you have to protect with proper firewall rules.
MikroTik Tunnelbroker with Route64
After all this preliminary talk, let us now actually set up the tunnel broker connection with ROUTE64 and the MikroTik hAP ax³, step by step.
Create account on ROUTE64: The first step is to create an account at https://manager.route64.org. Registration is free and you can start using the service without any payment.
I find it a bit surprising that ROUTE64 does not offer two factor authentication or passkeys at the moment, but this seems to be the current situation.
Create an IPv6 tunnel broker service:
In the ROUTE64 Manager, go to "IPv6 Tunnelbroker > Add tunnelbroker" and fill the form roughly like this:
Region / Location*: choose a location that is reasonably close to you, for example Frankfurt or Paris.Tunnel configuration / Tunnel Typ*: select WireGuard.Remote endpoint*: this is your current public IPv4 address as seen from the internet. You can use sites like https://ipv4.seeip.org or https://ifconfig.co to discover it.- Even behind CGNAT there is still an external IPv4 address; it is just shared with other customers. That is fine. WireGuard only needs outbound UDP and works well through CGNAT.
- Optional description: for example
"home-mikrotik-hap-ax3".
Click Create Tunnelbroker Service when you are done.
Get your WireGuard configuration: Still in the ROUTE64 Manager:
- Go to
"IPv6 Tunnelbroker > List tunnelbrokers". - Find the tunnel you just created.
- Move your mouse over the actions for that entry and click
"Show example config".
You will see an example WireGuard configuration similar to this (taken from public guides, your real values will differ):
[Interface]
PrivateKey = YOUR_WG_PRIVATE_KEY
Address    = 2a11:6c7:abcd:1000::2/64

[Peer]
PublicKey  = FkVCzA3bhSrqOUhXNxVHDXSLDvWHUa7BGj75uuh85TE=
AllowedIPs = ::/1, 8000::/1
Endpoint   = 165.140.142.113:58140
PersistentKeepAlive = 15
Copy these values somewhere safe. We will transfer them into the MikroTik configuration in the next steps.
The
AllowedIPsline tells WireGuard which IPv6 destinations should be sent into the tunnel. The trick with::/1and8000::/1is a common way to express “all IPv6 addresses” in two halves. Combined, the ranges::/1and8000::/1cover the full::/0IPv6 space. ROUTE64 uses this style in their example configs, and we will mirror it on the MikroTik side.
Get your routed IPv6 /56 prefix:
In the ROUTE64 portal, go to "IPv6 Tunnelbroker > List IP subnets". You should see a routed prefix similar to:
2a11:6c7:abcd:2000::/56This /56 prefix is the block that ROUTE64 routes towards your tunnel. You will split it into multiple /64 networks and assign those to your LAN interfaces.
A
/56prefix contains 256/64networks. Each/64can be used for one broadcast domain or VLAN, for example your main LAN, a guest WiFi network, a home lab segment, or a VPN client network. For most home and hobby setups, a single/56from ROUTE64 is more than enough.
For the rest of this section I will use the following example values. Please replace all of them with your real values from the ROUTE64 portal:
Tunnel address      : 2a11:6c7:abcd:1000::2/64
Routed prefix       : 2a11:6c7:abcd:2000::/56
Chosen LAN /64      : 2a11:6c7:abcd:2001::/64
ROUTE64 server IP   : 165.140.142.113
ROUTE64 server port : 58140
ROUTE64 public key  : FkVCzA3bhSrqOUhXNxVHDXSLDvWHUa7BGj75uuh85TE=
Your private key    : YOUR_WG_PRIVATE_KEY
Configure the MikroTik hAP ax³ via SSH:
I assume that you are using the default factory configuration, where ether1 is the WAN interface, and bridge is the LAN bridge that contains ether2–ether5 and the WiFi interfaces, and that IPv4 is already working.
First, make sure that IPv6 support is enabled:
/ipv6 settings set disable-ipv6=noCreate the WireGuard interface (this corresponds to the [Interface] section in the ROUTE64 example):
# listen-port can be any unused UDP port on your router
/interface wireguard add \
    name=wireguard-route64 \
    listen-port=51820 \
    mtu=1420 \
    private-key="YOUR_WG_PRIVATE_KEY"

# -- IPv6: WAN side (the tunnel itself) --

# Assign the IPv6 tunnel address from ROUTE64 to the WireGuard interface
/ipv6 address add \
    address=2a11:6c7:abcd:1000::2/64 \
    interface=wireguard-route64

# ROUTE64 will route global IPv6 space for you.
# Use 2000::/3 (all current global unicast addresses) as the default IPv6 "internet":
/ipv6 route add \
    dst-address=2000::/3 \
    gateway=wireguard-route64 \
    comment="Default IPv6 via Route64 WireGuard"
2000::/3is the range that currently contains all globally routable IPv6 unicast addresses. Using this as the default route for IPv6 means that link local and unique local addresses stay local, while public IPv6 traffic goes through the ROUTE64 tunnel. You could also use::/0as a more general default, but2000::/3is slightly more conservative and matches the official allocation for global unicast.
Configure the WireGuard peer (this corresponds to the [Peer] section):
/interface wireguard peers add \
    interface=wireguard-route64 \
    public-key="FkVCzA3bhSrqOUhXNxVHDXSLDvWHUa7BGj75uuh85TE=" \
    endpoint-address=165.140.142.113 \
    endpoint-port=58140 \
    allowed-address=::/1,8000::/1 \
    persistent-keepalive=15s

# Technically:
# - ::/1 and 8000::/1 together represent "all IPv6" from WireGuard's perspective.
# - 2000::/3 (the route we added above) covers all current Global Unicast Addresses (GUA).
# RouterOS will use the more specific 2000::/3 static route for actual internet traffic,
# while allowed-address mostly acts as "which destinations we are allowed to send over this peer".public-key, endpoint-address, endpoint-port, and allowed-address must exactly match the [Peer] section in your ROUTE64 example configuration.
The persistent-keepalive option sends a small packet every 15 seconds so that the CGNAT mapping stays open.
Without
persistent-keepalive, long idle periods could allow the NAT mapping in your ISP network to expire. If that happens, the ROUTE64 side might still send packets, but they will no longer reach your router until you send something out again. Keepalive traffic prevents this and usually has a negligible bandwidth impact.
IPv6 on the LAN side (giving addresses to your devices)
If the terminology used here is unfamiliar to you, have a look at the section Detour: IPv6 Router Advertisements (RA), DHCPv6, and (Proxy) Neighbor Discovery from my previous blog post, where I explained terms like “Neighbor Discovery”, “RA”, and “SLAAC” in more detail.
First, configure Neighbor Discovery (Router Advertisements) on the LAN bridge:
# Inspect existing ND configuration
/ipv6 nd print detail

# Configure Neighbor Discovery (RA) on the LAN bridge
/ipv6 nd set [find default=yes] interface=bridge mtu=1420 advertise-mac-address=yes disabled=no
ROUTE64 gave you a /56 prefix, for example 2a11:6c7:abcd:2000::/56. You can split that into 256 /64 networks.
Let us pick 2a11:6c7:abcd:2001::/64 for your existing LAN bridge and hand it out via SLAAC:
# Hand out your chosen /64 to LAN via SLAAC
/ipv6 address add address=2a11:6c7:abcd:2001::/64 interface=bridge advertise=yes
(Optional but recommended) - advertise IPv6 DNS via RA: Now decide how you want to deliver DNS to your clients. Here are two common options. In practice you will choose one of them, not both.
- Option A lets your clients use a public IPv6 resolver such as Cloudflare directly.
- Option B lets the MikroTik itself act as DNS server, which then forwards queries to your ISP or to public resolvers.
Option B gives you more flexibility later, for example if you want to add local hostnames or use DNS over HTTPS on the router.
Option A: advertise a public IPv6 DNS server directly
# This is Cloudflare's IPv6 DNS resolver
# We are advertising Cloudflare's resolver directly, not the router's own IPv6 address.
/ip dns set servers=2606:4700:4700::1111,1.1.1.1 allow-remote-requests=yes

# Advertise Cloudflare's IPv6 resolver via RA (RDNSS)
/ipv6 nd set [find interface=bridge] advertise-dns=yes dns=2606:4700:4700::1111
Option B: use the MikroTik as DNS for the LAN
# Example config: "DNS from ISP → MikroTik → LAN clients"
/ip dhcp-client set [find interface=ether1] use-peer-dns=yes add-default-route=yes

# Leave 'servers' empty if you only want ISP provided DNS
/ip dns set servers="" allow-remote-requests=yes

# Give the router a stable IPv6 LAN address inside your /64
/ipv6 address add address=2a11:6c7:abcd:2001::1/64 interface=bridge advertise=yes

# Advertise the router as DNS via RA (RDNSS)
/ipv6 nd set [find interface=bridge] advertise-dns=yes dns=2a11:6c7:abcd:2001::1
At this point, your MikroTik should be able to establish a WireGuard tunnel to ROUTE64 over IPv4, using only outbound UDP traffic, which is allowed even when you are behind CGNAT.
IPv6 firewall
For my setup the IPv6 firewall was already in a reasonable state with the default factory configuration (defconf), but you should double check your own rules to be sure.
Below is a minimal, stateful IPv6 firewall that is suitable for a typical home router with a ROUTE64 tunnel.
A note on
defconfand the full MikroTik firewall: In the examples below I am using a minimal but sane IPv6 firewall that is good enough for a typical home router with a ROUTE64 tunnel. It is stateful, allows ICMPv6, and drops new inbound connections from the internet.MikroTik’s factory default configuration (
defconf) comes with a more extensive set of rules:
- address lists for so called “bogon” and non global IPv4 and IPv6 prefixes
- RAW rules for cases like DHCP discovery, bad TCP or ICMP patterns, and unroutable addresses
- extra allow rules for IPsec, HIP, DHCPv6 PD, traceroute, and other protocols
If you want full parity with MikroTik’s default firewall, for example on a more exposed router or when you rely heavily on IPsec, take a look at the official Building Advanced Firewall guide in the MikroTik documentation. Apply the IPv4 and IPv6 sections from there and then layer the ROUTE64 configuration from this post on top.
Input chain: protect the router itself
/ipv6 firewall filter
add chain=input action=accept connection-state=established,related,untracked \
    comment="IPv6: allow established/related to router"

add chain=input action=drop connection-state=invalid \
    comment="IPv6: drop invalid to router"

add chain=input action=accept protocol=icmpv6 \
    comment="IPv6: allow ICMPv6 to router"

add chain=input action=accept in-interface-list=LAN \
    comment="IPv6: allow management from LAN"

add chain=input action=drop \
    comment="IPv6: drop everything else to router"
As long as your MikroTik only initiates the tunnel (that is, it behaves as a WireGuard client), you usually do not need special IPv4 firewall rules specifically for WireGuard.
If you later expose WireGuard to the internet and want ROUTE64 or other peers to initiate connections towards your router, you will need to allow the WireGuard UDP port in
/ip firewall filter:/ip firewall filter add chain=input action=accept protocol=udp dst-port=<route64-port> comment="Allow WireGuard from ROUTE64"
Forward chain: protect LAN devices
/ipv6 firewall filter
add chain=forward action=accept connection-state=established,related,untracked \
    comment="IPv6: allow established/related forwarding"

add chain=forward action=drop connection-state=invalid \
    comment="IPv6: drop invalid forwarding"

add chain=forward action=accept in-interface-list=LAN \
    comment="IPv6: allow LAN to anywhere over IPv6"

add chain=forward action=accept protocol=icmpv6 \
    comment="IPv6: allow ICMPv6 forwarding"

add chain=forward action=drop in-interface-list=!LAN \
    comment="IPv6: drop new inbound from internet"
The result of this ruleset is that outbound traffic from LAN to the internet over IPv6 is allowed, replies are accepted, and new connections from the internet into your LAN are blocked unless you later add explicit allow rules.
ICMPv6 is significantly more important for IPv6 than ICMP is for IPv4. It is used for Path MTU Discovery, Neighbor Discovery, and various control messages. Blocking ICMPv6 too strictly often leads to mysterious IPv6 connectivity problems. That is why the example rules explicitly allow ICMPv6 both to the router and through the router.
Just keep in mind for the future:
- If you ever want to expose a service over IPv6, you’ll add specific accept rules in the forward chain (before the final drop in-interface-list=!LAN).
Make sure the WireGuard interface stays in the “WAN” side
You already have a clean default interface list setup if it looks like this:
[admin@MikroTik] > /interface list member print
Columns: LIST, INTERFACE
# LIST  INTERFACE
;;; defconf
0 LAN   bridge
;;; defconf
1 WAN   ether1
In this situation the bridge interface represents your whole internal network and is in the LAN list, and ether1 is your uplink to the internet and is in the WAN list. That is exactly what we want as a starting point.
The important part for the ROUTE64 tunnel is: do not add wireguard-route64 to LAN.
If you accidentally put the WireGuard interface into the LAN list, then the last drop in the default factory configuration (defconf) firewall rules in-interface-list=!LAN would no longer match traffic coming from the tunnel,
and would stop protecting you from internet-originated packets on the tunnel.
MikroTik interface lists such as
LANandWANare like labels. You can attach several interfaces to one list and then write firewall rules against the list instead of each interface by name. In the IPv6 firewall earlier, the rulechain=forward action=drop in-interface-list=!LANmeans “drop new incoming packets that come from any interface that is not marked as LAN.” For that logic to stay correct, the WireGuard interface must not be part of theLANlist.
You can optionally add wireguard-route64 to the WAN list.
This is not strictly required, but it is a nice way to keep your configuration consistent and readable:
every interface that faces the internet, either directly or through a tunnel, ends up in WAN.
[admin@MikroTik] > /interface list member add list=WAN interface=wireguard-route64
[admin@MikroTik] > /interface list member print
Columns: LIST, INTERFACE
# LIST  INTERFACE
;;; defconf
0 LAN   bridge
;;; defconf
1 WAN   ether1
2 WAN   wireguard-route64
This does not change the basic routing behaviour by itself, but it helps your future self.
When you later read firewall rules like in-interface-list=WAN, it is immediately clear that they apply both to the physical uplink ether1 and to the WireGuard tunnel wireguard-route64,
that is to all interfaces that are considered internet facing in your configuration.
Quick tests
From a LAN client you can now perform some simple checks:
- Verify that you have an IPv6 address in
2a11:6c7:abcd:2001::/64. - Ping your router’s LAN address, for example
ping6 2a11:6c7:abcd:2001::(or whatever address you configured as the router’s IPv6 address on the bridge). - Ping something on the internet, such as
ping6 ipv6.google.com. - Open https://test-ipv6.com in a browser and confirm that IPv6 is working.
You can find out your router’s IPv6 LAN address on the MikroTik with:
/ipv6 address print detail where interface=bridgeYou typically see two kinds of addresses for the router on the LAN side:
- A global address in your ROUTE64 prefix, for example
2a11:6c7:abcd:2001::/64.- A link local address (
fe80::…), which your Linux desktop or other clients use as the default gateway.So from any LAN client you can ping the router’s global IPv6 address:
ping -6 -c3 2a11:6c7:abcd:2001::
If something does not work as expected, first check directly on the MikroTik:
/interface wireguard print detail
/ipv6 route print
/ipv6 address print
/ipv6 firewall filter print
These commands will give you a good overview of the tunnel status, routing table, assigned IPv6 addresses, and active firewall rules.
Appendix
My Personal Situation
Until recently I had a setup in which I did not route internet traffic directly from my public facing VPS to my home server.
There was always a “protocol break” in between via the Traefik reverse proxy.
The sequence was always internet > Traefik > WireGuard tunnel > home server, so there was no direct routing of raw internet traffic to my home server.
A “protocol break” here means that one connection is terminated and a new one is created with different protocols or encryption. In my case, TLS and HTTP were terminated on Traefik, and a new connection was established over WireGuard to the home server. This gives you an extra security and abstraction layer, but it also makes true end to end connectivity more complicated.
In my recent blog posts I described how I started to weaken this strict sequence and allow more direct connectivity:
- In Private Email with Mailu Behind Traefik Reverse Proxy I used a TCP proxy with TLS passthrough.
- In Teleporting a Public IPv6 Address from Your VPS to Your Home Server I set up IPv6 routing between the VPS and my home server.
This also meant that I wanted to separate my home server even more clearly from the rest of my home network. To achieve this, I restructured my setup and introduced my FRITZ!Box between my Salt Fiber Box and my internal network:
Internet
   |
[Salt Fiber Box]  -- has global prefix 2001:db8:dead:beef::/64
   |
   +-- devices directly on Salt LAN (e.g. home server) → get global IPv6 (works)
   |
   +-- [FRITZ!Box 7590 WAN 192.168.1.2, single IPv6 address, IPv4 NAT only]
           |
           +-- my LAN with all normal home devices (192.168.188.x, fd80:.../64) → only ULA, no IPv6 internet
Devices that are directly on the Salt Fiber Box LAN can receive globally routable IPv6 addresses from the 2001:db8:dead:beef::/64 prefix. However, devices behind the FRITZ!Box only see a private IPv4 range and an IPv6 Unique Local Address (ULA) prefix (fd80:…/64). ULA addresses are only meant for local communication and are not routed on the public internet.
Salt and the Salt Fiber Box
This is where the real problems started. I learned that devices connected directly to the Salt Fiber Box can receive one global IPv6 address, but there is no additional IPv6 prefix that can be delegated further downstream.
In practice this means that the FRITZ!Box, as seen by Salt, only has:
- a link local IPv6 address (fe80::…),
- one global IPv6 address for itself,
but no extra prefix that it can use for its own LAN.
Many ISPs offer “prefix delegation” with DHCPv6 or similar mechanisms. Your router then receives, for example, a
/56or/60and can split that into multiple/64subnets for different internal networks. Salt, in this setup, only offers a single/64tied to the Salt Fiber Box itself and does not delegate a larger prefix to customer routers behind it.
With the default Salt internet setup I had to accept some hard constraints that I cannot simply work around:
- Salt’s default product is “IPv6 first” plus IPv4 behind CGNAT (carrier-grade NAT).
- At home you receive one fixed
/64IPv6 prefix. - Your IPv4 address is in a 10.x or 100.x range and is shared via carrier grade NAT.
This means you cannot accept inbound IPv4 connections and you cannot use classic IPv4 port forwarding.
- Unless you pay for Salt’s “Static IP addresses (v4 and v6)” option for 9.95 CHF per month, which gives you real static public IPv4 and IPv6 instead of CGNAT.
- The Salt Fiber Box does not delegate additional IPv6 prefixes to routers behind it.
- The documentation describes “you get 2a04:ee41:XXXX:XXXX::/64” as the address or prefix.
- Posts from users with USG or other routers confirm that they receive one static IPv6 address and IPv4 behind CGNAT, but not a delegatable prefix for their own router.
- The FRITZ!Box IPv6 tunnel modes are not well suited for CGNAT. Its “Use IPv6 with a tunnel protocol” feature covers 6to4, 6RD, and 6in4. These modes expect the FRITZ!Box to have a globally reachable IPv4 address or to use an ISP managed tunnel gateway.
- 6in4 over CGNAT is essentially not realistic unless you have a static public IPv4 address and the NAT is configured in a special way for protocol 41.
Protocol 41 is the IP protocol number that carries 6in4 tunnels. It is neither TCP nor UDP, so many NAT devices and firewalls do not understand it well. They often only track connections based on TCP and UDP ports, which makes protocol 41 fragile or impossible behind complex NAT setups such as CGNAT.
Here is what the Salt Fiber Box is effectively doing to my network. Some key facts:
- It is always a router, never just a simple modem. There is no official bridge mode.
- Many customers are on DS-Lite or CGNAT:
- You receive a public IPv6 prefix at home.
- Your IPv4 traffic is behind carrier grade NAT, so inbound IPv4 connections and port forwarding are impossible unless you pay for a static public IPv4.
So in my situation:
- Native IPv6 behind the FRITZ!Box via Salt is basically not possible with the current behaviour of the Salt Fiber Box.
- Running a classic 6in4 tunnel broker directly on the FRITZ!Box is also not realistic, because of CGNAT and the limited tunnel options available on the FRITZ!Box.
- For reliable IPv6 you need a tunnel that is friendly to NAT, for example over WireGuard or OpenVPN, and you need to terminate this tunnel behind the Salt Fiber Box, but the FRITZ!Box cannot do it.
In the end I basically had two strategies to choose from:
- Use the FRITZ!Box with native IPv4 from the ISP at 9.95 CHF per month and add IPv6 via a tunnel broker, because many FRITZ!Box models can use IPv4 natively from the ISP, perform NAT for your LAN, and obtain IPv6 via a tunnel (6in4 or 6to4) and then advertise that IPv6 prefix into the LAN.
- Or move the “smart” routing and tunnelling logic to a dedicated router behind the Salt Fiber Box, and let that device handle IPv6 via a tunnel broker using NAT-friendly WireGuard or OpenVPN as a tunnel.
The first option comes with an important caveat. For 6in4 or 6to4 tunnels, the outer packets are IPv4 protocol 41, not TCP or UDP. Many NAT devices and DMZ implementations do not handle this correctly, because they only understand ports and not generic IP protocols. The additional CGNAT layer in Salt’s network makes this even more fragile.
So if you pay for a static public IPv4 from Salt and you are no longer behind CGNAT, a DMZ configuration might be enough for the FRITZ!Box 6in4 tunnel to work. But this is not guaranteed. You still have to test if Salt forwards protocol 41 correctly.
Tunnel Broker via WireGuard
This is why I started to look for other router devices that were more powerful than my FRITZ!Box and that could work with tunnel brokers over WireGuard. I considered several options:
- Turris Omnia (and newer Turris models) with Turris OS, which is built on top of OpenWrt.
- Ubiquiti UniFi Dream Router (UDR / UDR7). This puts you into the UniFi ecosystem, which can be very comfortable, but it is less “hackable” than an OpenWrt or Turris based system.
- OpenWrt out of the box. You can flash OpenWrt onto common Asus, TP-Link, or Netgear devices, or you can buy devices that ship with OpenWrt as the primary operating system.
- For example, GL.iNet has models like the Flint series: Flint (GL-AX1800) comes with OpenWrt and gives you root access so that you can fully customize and optimize the device. The extra storage provides a small local drive for additional packages and applications.
For this kind of setup it is important that the router can act as a full WireGuard endpoint, can create routed IPv6 subnets from the tunnel, and can announce those prefixes into your LAN, for example via Router Advertisements and proper firewall rules.
In the end I decided to go with the MikroTik hAP ax³, mainly because of its very good price to value ratio and because RouterOS gives me a lot of flexibility for IPv6 routing and WireGuard based tunnel broker setups.
Netgear Nighthawk R7000 and Tomato by Shibby
Several years before my current setup, I spent several years running a Netgear Nighthawk R7000 with Tomato by Shibby. This combination was my first real step into “proper” home networking beyond what the ISP or a stock consumer router could offer.
Tomato is an alternative firmware for consumer routers that replaces the original vendor firmware. It offers more advanced features such as better QoS, more detailed graphs and statistics, VLAN support, flexible firewall rules, and various VPN options. For hobbyists it was a very attractive way to turn an off the shelf router into something that felt much closer to a prosumer device.
I really liked that setup. It gave me a lot of flexibility: I could experiment with different WAN setups, tweak firewall rules in detail, run VPNs directly on the router, and monitor traffic in a way that stock firmware simply did not allow. The R7000 hardware was strong enough at the time, and Tomato by Shibby made it feel like a small lab box rather than just a “Wi-Fi router”.
However, there was a big downside: security updates were not coming in a timely way, especially in the later years. Tomato by Shibby was essentially a private side project and not a commercial product with guaranteed maintenance. At the same time the router was sitting at the edge of my network, fully exposed to the internet, so missing updates became a real concern. The Tomato by Shibby project is now defunct since around 2021, so from a security perspective it is no longer a viable option for an internet facing router.
Despite these issues, I still look back at that time with some nostalgia. Tomato by Shibby gave me a lot of learning opportunities and showed me what was possible with custom firmware. In a way, that experience prepared me for later setups with OpenWrt style systems and, eventually, for moving to more actively maintained platforms such as MikroTik RouterOS.
Setup Cloudflare WARP Connector on MikroTik
Before settling on ROUTE64, I also looked at Cloudflare WARP and the Cloudflare WARP Connector on MikroTik. WARP is Cloudflare’s “VPN like” service that sends your traffic through Cloudflare’s network, mainly to improve privacy and performance. The WARP Connector is the headless variant that you can run on routers and servers instead of on laptops or phones.
On MikroTik, the idea is simple: you create a WireGuard interface, connect it to Cloudflare’s WARP endpoints, and then route selected traffic through that tunnel.
Internally, WARP uses WireGuard. Your router gets an address inside Cloudflare’s WARP network and sends outbound traffic through Cloudflare. However, WARP does not give you your own public IPv6 prefix or static addresses. It is great for outbound connectivity, but it is not a tunnel broker in the sense of ROUTE64, where you receive a routed prefix for your LAN and can host inbound services on stable IPv6 addresses.
If you want to try this yourself, I recommend following the excellent step by step guide from animmouse: Setup Cloudflare WARP Connector on MikroTik
For the use case in this blog post (home IPv6 with ROUTE64, stable prefix, inbound services), the free WARP is fine to experiment with, but it is not a replacement for a real IPv6 tunnel broker.
The Easier Route - NAT66 Instead of a Tunnel Broker
When I first wrote this post, I deliberately didn’t think about NAT66.
For years I’d internalised the usual IPv6 story:
- We finally have enough addresses, so we don’t need NAT anymore.
- There is no IETF RFC for NAT66; instead there is RFC 4864 explaining why IPv6 networks don’t need NAT for protection.
- Articles like You Thought There Was No NAT for IPv6, But NAT Still Exists emphasise that NAT66 is somewhat frowned upon, even though vendors quietly ship it (Linux/netfilter, firewalls, and now MikroTik RouterOS v7).
So my mental model was:
“If I’m doing IPv6 ‘properly’, I should avoid NAT and use a routed prefix.”
That’s exactly what the ROUTE64 + WireGuard setup in the main article does: no translation, a full /56 routed to my home, and global IPv6 addresses on the LAN.
However, if your primary goal is simpler:
“I just want all devices behind the Salt Fiber Box and my MikroTik to have working IPv6.”
…then letting the MikroTik do NAT66 (IPv6‑to‑IPv6 NAT) is a very practical alternative.
Cloudflare WARP is essentially a big NAT66/NAT64 box at scale (you get egress addresses in their network, but no routed prefix back home).
This appendix shows how to:
- Look at what can stay exactly as it is when switching from ROUTE64 to NAT66.
- Undo only the ROUTE64/WireGuard‑specific parts.
- Configure NAT66 on the MikroTik behind the Salt Fiber Box.
Throughout, I’ll stick to the same style as the main article: SSH commands, “look / expect / change” flow, and small explanations of what’s going on.
Diff Summary
Here is a quick diff style summary of the changes we’ll need to make:
-/interface wireguard add listen-port=51820 mtu=1420 name=wireguard-route64
-/interface wireguard peers add allowed-address=::/1,8000::/1 endpoint-address=... endpoint-port=52929 interface=wireguard-route64 name=peer1 persistent-keepalive=25s public-key="..."
-/ipv6 route add comment="Default IPv6 via Route64 WireGuard" dst-address=2000::/3 gateway=wireguard-route64
-/ipv6 address add address=...::2 interface=wireguard-route64
-/ipv6 address add address=... interface=bridge
-/ipv6 nd set [ find default=yes ] advertise-dns=no interface=bridge mtu=1420
+/ipv6 settings set accept-router-advertisements=yes
+/ipv6 address add address=fd12:3456:789a:1::1 interface=bridge
+/ipv6 firewall nat add action=masquerade chain=srcnat comment="NAT66: ULA -> Salt global IPv6 (ether1)" out-interface-list=WAN
+/ipv6 nd set [ find default=yes ] dns=fd12:3456:789a:1::1 interface=bridge mtu=1420
What Can Stay As‑Is
The good news: most of your LAN‑side logic does not care whether your IPv6 comes via a tunnel broker or via NAT66.
Topology and basic RouterOS layout: All of this stays the same:
- Physical topology:
Internet | [Salt Fiber Box] -- has global prefix 2001:db8:dead:beef::/64 | +-- devices directly on Salt LAN (e.g. home server) → get global IPv6 (works) | +-- [MikroTik WAN 192.168.1.2, single IPv6 address, IPv4 NAT + IPv6 NAT66] -- bridge(LAN) -- Wi-Fi and LAN ports -- clients | +-- my LAN with all normal home devices (192.168.88.x, fd80:.../64) - Interface roles:
ether1is still the WAN side (connected to the Salt box).bridgeis still the LAN bridge for all internal interfaces.
- Interface lists:
LANlist includesbridge.WANlist includes at leastether1.
IPv4 side (DHCP, NAT, firewall): None of this changes:
- The MikroTik still gets IPv4 from the Salt Fiber Box (often via DHCP).
- You still do IPv4 NAT (
masquerade) out ofether1. - Your existing IPv4 firewall rules keep working unchanged.
We are only touching the IPv6 side here.
IPv6 firewall rules: The IPv6 firewall rules from the main article are general “sane defaults” for a home router:
- Allow established/related traffic (both input and forward).
- Allow ICMPv6 (needed for IPv6 to function properly).
- Allow management access from LAN.
- Drop invalid packets.
- Drop new inbound connections from the internet.
Those rules work equally well whether the internet‑facing IPv6 is:
- The routed
/56from ROUTE64 over WireGuard, or - A single
/64from Salt with NAT66 on the MikroTik.
So if you already configured them earlier, you can keep them verbatim. We’ll rely on them again in the NAT66 setup.
As I did not change my default factory configuration (
defconf) for the firewall I will also not modify anything at this point.
To check:
/ipv6 firewall filter printYou do not need a different IPv6 firewall philosophy just because you switch from ROUTE64 to NAT66. The same “stateful firewall at the edge” pattern works for both.
Neighbor Discovery (RA) behaviour on the LAN: The rough idea also stays the same:
- The bridge interface (
bridge) is where IPv6 Router Advertisements (RAs) are sent to LAN clients. - You want RA enabled there, with sensible intervals and options.
- The router advertises:
- A prefix (which changes between ROUTE64 and NAT66, but the mechanism is identical).
- Optionally a DNS server (RDNSS).
There will be details we change (the prefix, and maybe the DNS address we advertise), but conceptually nothing about “RA runs on bridge and hands prefixes to clients” changes.
You can inspect your current ND/RA config with:
/ipv6 nd print detail where interface=bridgeWe’ll adjust this later, but the important part: we will keep using ND on bridge.
What We Need to Undo (ROUTE64 / WireGuard Only)
Now to the clean‑up.
We’ll remove everything that is specifically tied to the ROUTE64 tunnel broker:
- The WireGuard interface and peer.
- The IPv6 addresses from the ROUTE64
/56. - The static IPv6 route that points into the tunnel.
- Any RA DNS pointing at the old ROUTE64 prefix.
As a reminder, here is how we created the WireGuard side, the related LAN side
/64address, and the list membership in the “WAN” list:# listen-port can be any unused UDP port on your router /interface wireguard add \ name=wireguard-route64 \ listen-port=51820 \ mtu=1420 \ private-key="YOUR_WG_PRIVATE_KEY" # -- IPv6: WAN side (the tunnel itself) -- # Assign the IPv6 tunnel address from ROUTE64 to the WireGuard interface /ipv6 address add \ address=2a11:6c7:abcd:1000::2/64 \ interface=wireguard-route64 # ROUTE64 will route global IPv6 space for you. # Use 2000::/3 (all current global unicast addresses) as the default IPv6 "internet": /ipv6 route add \ dst-address=2000::/3 \ gateway=wireguard-route64 \ comment="Default IPv6 via Route64 WireGuard" # Let us pick `2a11:6c7:abcd:2001::/64` for your existing LAN bridge and hand it out via SLAAC: # Hand out your chosen /64 to LAN via SLAAC /ipv6 address add address=2a11:6c7:abcd:2001::/64 interface=bridge advertise=yes # Make sure the WireGuard interface stays in the "WAN" side /interface list member add list=WAN interface=wireguard-route64
Everything else (LAN bridge, interface lists, firewall) remains.
Safety net: export your config: From an SSH session:
/export file=before-route64-undo
/system backup save name=before-route64-undo
You’ll now have:
before-route64-undo.rsc- a text export.before-route64-undo.backup- a binary backup.
If you ever want to roll back, you can re‑import the .rsc or restore the .backup.
Remove the IPv6 “internet via WireGuard” route: When configuring ROUTE64, we added a static IPv6 route for “all global internet” via the WireGuard interface, typically 2000::/3 using wireguard-route64 as the gateway.
Step 1: Look:
/ipv6 route print detailYou’re looking for a line like:
dst-address=2000::/3 gateway=wireguard-route64 ...or possibly ::/0 via wireguard-route64 if you used a full default route.
You may also see a default route via ether1 and a link‑local gateway (fe80::…%ether1); we keep that one.
Step 2: Remove the WireGuard route:
/ipv6 route remove [find dst-address=2000::/3 && gateway=wireguard-route64]Step 3: Check again:
/ipv6 route printYou should see no routes pointing to wireguard-route64 anymore.
Remove IPv6 addresses from the ROUTE64 prefix
We placed ROUTE64 addresses:
- On the WireGuard interface (
wireguard-route64) - one/64for the tunnel. - On the LAN bridge (
bridge) – one/64(or/64plus explicit::1) out of your/56.
Assume your ROUTE64 /56 looked like: 2a11:6c7:abcd:2000::/56. Substitute your actual prefix throughout.
On the WireGuard interface:
Step 1: Look:
/ipv6 address print detail where interface=wireguard-route64
# /ipv6 address print where address="2a11:6c7:abcd:1000::2/64"
You should see something like (in the example values we called it “Tunnel address”):
address=2a11:6c7:abcd:1000::2/64 interface=wireguard-route64 ...Step 2: Remove:
/ipv6 address remove [find address="2a11:6c7:abcd:1000::2/64"]Step 3: Check again:
/ipv6 address print where interface=wireguard-route64On the LAN bridge:
Step 1: Look:
/ipv6 address print detail where interface=bridgeYou’ll see your previous ROUTE64 /64s (in the example values we called it “Chosen LAN /64”), for example:
address=2a11:6c7:abcd:2001::/64  interface=bridge advertise=yes
address=2a11:6c7:abcd:2001::1/64 interface=bridge advertise=yes
Step 2: Remove:
/ipv6 address remove [find interface=bridge && address~"2a11:6c7:abcd:200"]Step 3: Check again:
/ipv6 address print where interface=bridgeAt this point bridge should no longer have any 2a11:... addresses – only link‑local (fe80::…) and anything else you may have configured separately.
Remove the WireGuard peer and interface: We first delete the peer(s), then the interface itself.
Remove the ROUTE64 WireGuard peer
Step 1: Look:
/interface wireguard peers print detailYou’re looking for the peer that used wireguard-route64:
interface=wireguard-route64
public-key="..."
endpoint-address=...
allowed-address=::/1,8000::/1
...
Step 2: Remove:
/interface wireguard peers remove [find interface=wireguard-route64]Step 3: Check again:
/interface wireguard peers printIt should be empty, or contain only unrelated peers.
Remove the WireGuard interface
Step 1: Look:
/interface wireguard print detailYou’ll see something like:
name=wireguard-route64 listen-port=51820 ...Step 2: Remove:
/interface wireguard remove [find name=wireguard-route64]Step 3: Check again:
/interface wireguard printThere should be no wireguard-route64 interface anymore.
Clean up interface list membership: We previously added wireguard-route64 to the WAN interface list so firewall rules could treat it as internet‑facing.
Step 1: Look:
/interface list member print where interface=wireguard-route64If you see something like:
LIST  INTERFACE
2 WAN   *A
Step 2: Remove:
/interface list member remove 2After that step 3: Check again:
/interface list member printShould show only the “real” WAN interface(s), e.g. ether1.
Reset ROUTE64‑specific RA/DNS settings: If you followed the ROUTE64 section as written, you probably set RA DNS to either:
- Cloudflare IPv6 (
2606:4700:4700::1111), or - The router’s ROUTE64 address (
2a11:6c7:abcd:2001::1).
Those now point at things we just deleted, so let’s neutralise them before reconfiguring for NAT66.
RA DNS on the bridge:
Step 1: Look:
/ipv6 nd print detail where interface=bridgeYou might see:
advertise-dns=yes dns=2606:4700:4700::1111or:
advertise-dns=yes dns=2a11:6c7:abcd:2001::1Step 2: Reset:
/ipv6 nd set [find interface=bridge] advertise-dns=no dns=""We’ll re‑enable advertise-dns later with NAT66‑appropriate DNS addresses.
/ip dns configuration: If you pointed ip dns servers at specific resolvers purely for the ROUTE64 setup, you can either keep them or go back to using the ISP’s DNS.
For now, a good neutral default is:
/ip dhcp-client set [find interface=ether1] use-peer-dns=yes add-default-route=yes
/ip dns set servers="" allow-remote-requests=yes
This says:
- Let the DHCP client on
ether1get DNS from the Salt Fiber Box. - Use those for the router’s resolver (and, if allowed, for the LAN too).
Sanity check after uninstall: Quick checks:
/interface wireguard print
/ipv6 address print
/ipv6 route print
/interface list member print
You should not see:
- Any
wireguard-route64interface or peers. - Any
2a11:...addresses from the ROUTE64/56. - Any IPv6 route via
wireguard-route64.
At this point you have:
- A plain Salt Fiber Box → MikroTik → LAN topology.
- IPv4 still working as before.
- IPv6 firewall rules still in place.
- No tunnel broker bits left.
Time to add NAT66.
What We Need to Add for NAT66
Now we switch to using the IPv6 connectivity I already have from Salt, but instead of getting a routed /56 from a tunnel broker, we:
- Let the MikroTik learn a single IPv6 address and default route from the Salt Fiber Box.
- Give the LAN a private IPv6 range (ULA).
- Do NAT66 on the MikroTik so all those internal ULA addresses share the router’s global IPv6 on
ether1.
Make sure IPv6 is enabled and RAs are accepted: We want MikroTik to:
- Accept Router Advertisements on
ether1(from the Salt box). - Forward IPv6 between
ether1andbridge.
Check the global IPv6 settings:
/ipv6 settings print
# Here are my current values
                    disable-ipv6: no
                         forward: yes
                accept-redirects: yes-if-forwarding-disabled
    accept-router-advertisements: yes-if-forwarding-disabled
      disable-link-local-address: no
If disable-ipv6 is yes, turn it on:
/ipv6 settings set disable-ipv6=noThen:
/ipv6 settings set forward=yes accept-router-advertisements=yes
# ipv6 *accept router advertisements* configuration has changed, please restart device to apply settings
/system reboot
Now see what the Salt Fiber Box is giving us:
/ipv6 address print where interface=ether1
/ipv6 route print where dst-address=::/0
You want:
- A global IPv6 (not just
fe80::) onether1. - A default IPv6 route via
fe80::something%ether1.
If those aren’t present, enable IPv6 on the Salt Fiber Box LAN first.
Assign a ULA prefix on the LAN and advertise it: Because Salt is not delegating a routed prefix for your MikroTik, we use a Unique Local Address (ULA) range internally (Think: “IPv6’s answer to RFC1918 private IPv4”).
ULAs live in:
fc00::/7. In practice, everyone usesfd00::/8(becausefc00::/8was reserved for a central allocation scheme that never really took off).Terminology: ULA (
fd00::/8) is for “locally unique but not globally routed” IPv6. It’s the IPv6 equivalent of10.0.0.0/8,192.168.0.0/16, etc.Just to clarify:
fe80::is not ULA. It’s the IPv6 link-local rangefe80::/10. Every IPv6 interface must have a link-local address and these are only valid on a single layer-2 link (one Ethernet / Wi-Fi segment). Routers must not forward packets with a link-local source or destination beyond that link.
Pick a ULA prefix, for example:
- LAN prefix:
fd12:3456:789a:1::/64 - Router’s LAN address:
fd12:3456:789a:1::1
First, make sure Neighbor Discovery uses bridge for RAs:
/ipv6 nd set [find default=yes] interface=bridge advertise-mac-address=yes disabled=noThen, assign the ULA /64 to the bridge and tell it to advertise:
/ipv6 address add address=fd12:3456:789a:1::1/64 interface=bridge advertise=yesWhat this does:
- The router itself gets
fd12:3456:789a:1::1on the LAN. - It sends RAs on
bridgeso clients autoconfigure addresses infd12:3456:789a:1::/64.
Check:
/ipv6 address print where interface=bridgeYou should see that ULA address listed.
On a LAN client (Linux/macOS):
ip -6 addressYou should see something like:
inet6 fd12:3456:789a:1:....../64 scope globalThat’s good.
Advertise DNS to LAN clients (RDNSS): With IPv6 itself in place, we need DNS.
Two common options:
- Use MikroTik as DNS forwarder (my recommendation)
- Advertise a public IPv6 DNS directly (e.g. Cloudflare)
We will go with the MikroTik as DNS forwarder.
- Ensure the IPv4 DHCP client on
ether1uses the ISP DNS:/ip dhcp-client set [find interface=ether1] use-peer-dns=yes add-default-route=yes - Configure RouterOS DNS:
Empty/ip dns set servers="" allow-remote-requests=yesserversmeans “use DNS from the DHCP client” (the Salt box’s DNS). - Advertise the router’s IPv6 address as DNS via RA:
/ipv6 nd set [find interface=bridge] advertise-dns=yes dns=fd12:3456:789a:1::1
Clients will now:
- Autofill a ULA address in
fd12:3456:789a:1::/64. - Use
fd12:3456:789a:1::1as their DNS resolver.
The router in turn forwards those queries to the Salt Fiber Box / ISP DNS.
Terminology: RDNSS is the “Recursive DNS Server” option inside IPv6 Router Advertisements. In RouterOS it’s controlled by
advertise-dnsanddns=in/ipv6 nd.
Add the NAT66 rule: This is the core of the new setup.
RouterOS v7 has an IPv6 NAT table: /ipv6 firewall nat. We’ll add a source NAT rule that says:
“For packets leaving via
WAN, rewrite their source IPv6 to the IPv6 on that WAN interface.”
If you already have LAN and WAN interface lists set up:
/ipv6 firewall nat add chain=srcnat out-interface-list=WAN action=masquerade comment="NAT66: ULA -> Salt global IPv6 (ether1)"That’s it.
This operates very much like IPv4 masquerade:
- All traffic from your ULA LAN going out via
ether1gets its source rewritten to the global IPv6 onether1. - MikroTik tracks connections so replies are mapped back to the correct internal host.
If you prefer to be explicit and you know you’ll always have exactly ether1 as WAN:
/ipv6 firewall nat add chain=srcnat out-interface=ether1 action=masquerade comment="NAT66: ULA -> Salt global IPv6 on ether1"You can see counters with:
/ipv6 firewall nat print statsOnce clients start talking IPv6, the packet and byte counters will start increasing.
Terminology: NAT66 means IPv6‑to‑IPv6 NAT. In this case, it’s many‑to‑one: many internal ULA addresses → one global IPv6 on
ether1.
Re‑use the existing IPv6 firewall rules
Because we kept the stateful IPv6 firewall rules from the ROUTE64 setup (or the default factory configuration (defconf)), we don’t need to change them for NAT66. They still do exactly what we want:
- Input chain: protect the router itself.
- Forward chain: protect the LAN from unsolicited inbound traffic, while allowing outbound.
Here is how the firewall rules interact with NAT66:
- Outbound connections:
- Match “LAN to anywhere” in
forward→ allowed out. - Hit the NAT66
srcnatrule → translated to the global IPv6 onether1.
- Match “LAN to anywhere” in
- Reply traffic:
- Matches
connection-state=established→ allowed back in.
- Matches
- New unsolicited inbound connections:
- Reach the
forwardrule “drop new inbound from internet” → dropped (unless you later override with adst-natand an allow rule).
- Reach the
Test that everything works
From a LAN client:
- Confirm IPv6 address & gateway:
- On Linux/macOS:
ip -6 address ip -6 route - You should see:
- A global ULA address in
fd12:3456:789a:1::/64. - A default route via the MikroTik’s link‑local (
fe80::...).
- A global ULA address in
- On Linux/macOS:
- Ping the router’s ULA:
ping -6 fd12:3456:789a:1::1 - Ping an external IPv6 host:
ping -6 ipv6.google.com - Open https://test-ipv6.com in your browser and verify IPv6 connectivity.
On the MikroTik:
/ipv6 firewall nat print stats
/ipv6 route print
You should see:
- The NAT66 rule’s counters increasing.
- A default route via
fe80::...%ether1being used.
If all that works: congratulations, you now have working IPv6 on your LAN via NAT66, without the extra moving parts from the tunnel broker.
NAT66 vs ROUTE64 - When to Choose Which
To wrap up:
- ROUTE64 + WireGuard (main article):
- You get a routed
/56that is really yours. - No IPv6 NAT; everything is globally addressable.
- Inbound services are straightforward (assign stable IPv6 addresses, open firewall).
- Extra moving parts: VPS/tunnel broker account, WireGuard tunnel, static routes.
- You get a routed
- NAT66 on MikroTik (this appendix):
- Simpler: no VPS or tunnel; just the Salt Fiber Box and your MikroTik.
- Uses the native IPv6 connectivity Salt already gives you.
- All LAN devices share the router’s single global IPv6 (just like IPv4 NAT).
- Inbound services require IPv6 port‑forward rules and don’t get “nice” global addresses.
The original post focused on the “clean” IPv6 routing approach. This appendix shows that, if you’re willing to compromise on IPv6 purity, NAT66 is indeed the easier route for the specific “Salt Fiber Box → MikroTik → LAN” setup.