
Private Email with Mailu Behind Traefik Reverse Proxy
Published by Weisser Zwerg Blog on

Reclaim your privacy by running a self-hosted Mailu server on your home hardware, with a small virtual private server (VPS) and Traefik as the Internet-facing gateway.
Rationale
This post is part of the Digital Civil Rights and Privacy series. You’ll learn how to run your own Mailu e-mail system on a home server while using Traefik on a separate virtual private server (VPS) as a reverse proxy to serve as the gateway to the public internet. This design keeps all data at home under your physical control; the VPS only forwards traffic and stores nothing.
Two practical problems we’ll solve:
- The current guidance for using Traefik as a reverse proxy on a different host can be confusing or incomplete. This guide shows a clean, working setup.
- Many ISPs block outbound port 25, preventing direct delivery from a home connection. We’ll cover reliable workarounds using a VPS gateway.
I believe the most privacy-friendly setup is one you control: your server in your apartment, protected by you. With this approach you gain full data ownership while still being reachable on the public Internet via the VPS. We’ll also touch on deliverability essentials (DNS, authentication, TLS, reputation) and point to helpful resources for deeper reading.
Here are some helpful additional resources:
- Traefik as reverse proxy (different host)
- How to Setup a Mail Server on Debian Using Mailu and Start Sending Emails Today
- Building, deploying and securing your own mail server with Docker
- Self-hosted mail server: What you need today (c’t / heise+, Oct 20, 2023).
It explains the current bar for deliverability (DNS, auth, TLS, reputation) and why running your own server is getting tougher. - Home Server Blueprint: Rock-Solid Home Server with Unattended Reboots, Secure Disk Encryption, and Cost-Effective Offsite Backups
Different Readers and Different Levels of Prior Knowledge
Different readers have different levels of prior knowledge, so it is hard to write one guide that fits everyone. If the explanations below feel too short or too advanced for you, just copy the URL of this post into an AI assistant like ChatGPT and ask it to walk you through the sections you are not yet comfortable with. For example, you can ask it to explain unfamiliar concepts or show the same steps for a different Linux distribution.
Prerequisites
We will use Traefik as a Reverse Proxy on our netcup Virtual Private Server (VPS), which we set up earlier and made accessible over the internet.
In the Traefik docker-compose.yml from my previous post, I still use
traefik:v2.8.0. If you want to utilize a more recent version, check out Christian Lempa’s boilerplates and specifically his library/compose/traefik file. Currently, this usestraefik:v3.6.0.
For this guide, I’ll assume you’re working with a VPS, have Traefik set up as a reverse proxy on this VPS, and that the VPS is accessible via the internet.
Private Link: WireGuard (Networking and Network Topology Overview)
In order to connect the home host to the VPS you’ll need a private link: WireGuard/Tailscale/SSH-reverse or any other tunnel. We’ll use a WireGuard Hub-and-Spoke (Star) topology[1]. This setup allows us to securely access services like Mailu on your home server from anywhere on the public internet through the Traefik reverse proxy while keeping your data private and under your control.
Here’s a simple visual overview of the setup:

At the top of this configuration at the top of this Ʌ (upside-down V) is your VPS server reachable via the internet, which acts as the “hub” (“star-center”) and hosts the Traefik reverse proxy. Connected to this hub is your home server, where Mailu and other services will run. Both are linked securely using WireGuard in a Virtualized Mesh Network, creating a private and encrypted connection between them.
For a step-by-step guide on setting up a WireGuard virtualized mesh network, check out the WireGuard section in the ODROID-M1: Dockerized Home Assistant page.
Getting my Hub and Spoke setup to work took some time, mainly because I overlooked the following lines in the wg0.conf at my star center at my netcup VPS:
# Allow routing between clients
# PostUp = iptables -A FORWARD -i %i -j ACCEPT; iptables -A FORWARD -o %i -j ACCEPT
# PostDown = iptables -D FORWARD -i %i -j ACCEPT; iptables -D FORWARD -o %i -j ACCEPT
# The below rules are functionally equivalent to the simpler ones above but are "idempotent", e.g. can be run several times and still produce the same result
PostUp = iptables -C FORWARD -i %i -j ACCEPT 2>/dev/null || iptables -A FORWARD -i %i -j ACCEPT; iptables -C FORWARD -o %i -j ACCEPT 2>/dev/null || iptables -A FORWARD -o %i -j ACCEPT
PostDown = iptables -D FORWARD -i %i -j ACCEPT 2>/dev/null || true; iptables -D FORWARD -o %i -j ACCEPT 2>/dev/null || true
As detailed in Wireguard Netzwerk mit Routing einrichten.
Domain Name and DNS Service
To receive mail on your own server, you need a domain name such as example.com.
You purchase domains from a domain registrar and pay a yearly fee.
The price depends on the so-called top-level domain (TLD) - the part after the last dot.
For example, in example.com the TLD is .com.
Once you own a domain, choose a DNS provider for it. This might be the same company as your registrar, or a different one. Your DNS provider hosts your zone and publishes records (A/AAAA, MX, TXT, etc.) to the public internet. Most registrars let you change the domain’s nameservers to point at your DNS provider. After you switch nameservers, manage all your records at the DNS provider - not at the registrar.
I use Dynadot as the registrar and Cloudflare as the DNS provider. This combo supports DNSSEC and keeps things flexible. You can also keep both registration and DNS at Cloudflare, but I like separating roles.
DNSSEC has two steps: enable it at your DNS provider (which generates DS/keys) and publish the DS record at your registrar. Both sides must be configured for DNSSEC to be active.
Cloudflare doesn’t register every TLD. Availability changes over time, so check your desired TLD at both your registrar and Cloudflare rather than relying on specific examples that may be outdated.
For email-friendly TLDs with sensible pricing, consider .de, .name, .dev, .xyz, .pub, etc.
Note: you’ll publish MX records pointing to your Mailu hostnames (e.g.,
mail.example.com), but the e-mail addresses themselves may be under the root domain (e.g.,user@example.com).
Before moving on, pick a domain you want for mail (for example, your-last-name.name), register it, set up a DNS provider, and (ideally) enable DNSSEC.
Nice extras: enable WHOIS privacy at your registrar.
If you use Cloudflare, use DNS only (grey cloud) for any records used by mail so Traefik/Mailu handle TLS directly without Cloudflare in the middle.
Proxy status best-practice:
- DNS only (grey cloud) for
mail.example.com(SMTP/IMAP/POP3, submission, MTA-STS, etc.).- Proxied (orange cloud) is fine for pure web endpoints (e.g.,
webmail.example.com,autoconfig.example.com); set SSL/TLS mode → Full (strict) so Cloudflare validates your origin cert. ACMEdns-01validation works either way because it uses TXT records.
Cloudflare’s orange-cloud proxy does not proxy SMTP/IMAP/POP3.
Your MX must point to a grey-cloud (DNS-only) hostname, otherwise mail delivery will fail.
Keep mail.example.com grey; you may orange-cloud only web endpoints.
Set-Up
Mailu Setup Utility
Start with the Mailu setup utility.
It’s a simple web form. You fill in a few choices and download config files (including docker-compose.yml and mailu.env) to launch Mailu with Docker Compose on your home server.
My configuration follows the storage design from Home Server Blueprint: Rock-Solid Home Server with Unattended Reboots, Secure Disk Encryption, and Cost-Effective Offsite Backups.
I want my e-mail data encrypted at rest but excluded from nightly off-site backups, so I use the path /mnt/luks_btrfs_volume/@local_only_storage/mailu.
If you prefer your mail to be included in backups, use /opt/offsite_backup_storage/mailu instead.
As mentioned earlier, you’ll publish MX records pointing to your Mailu hostnames (e.g., mail.example.com), while the e-mail addresses can live at the root domain (e.g., user@example.com).
I personally keep addresses under the Mailu hostname (e.g., user@mail.example.com) to keep things explicit.
Autodiscovery tip: Many clients expect
autoconfig.<email-domain>(Thunderbird) andautodiscover.<email-domain>(Outlook).
- If your addresses are
user@example.com, publishautoconfig.example.comandautodiscover.example.com.- If your addresses are
user@mail.example.com, publishautoconfig.mail.example.comandautodiscover.mail.example.com.You can also add SRV records for Outlook if needed.
My setup utility choices (adapt to your network):
- Mailu storage path:
/mnt/luks_btrfs_volume/@local_only_storage/mailu - Main mail domain and server display name:
mail.example.com - Linked Website URL:
https://mail.example.com - Enable the admin UI:
yes - Enable the API:
no - Enable Web e-mail client:
snappymail - IPv4 listen address:
10.0.1.2; this is the IP of your home server in the WireGuard network. - Subnet of the docker network:
192.168.203.0/24; leave this as is. - Enable IPv6:
no - Enable an internal DNS resolver (unbound):
yes - Public hostnames:
mail.example.com,autoconfig.mail.example.com,autodiscover.mail.example.com
Once you’re done click on the Setup Mailu button at the bottom.
The web form does not accept
@characters in paths. Remove@while filling the form and add it back in the generated files afterward.
On the next page, the wizard shows direct download links. I install the stack under /opt/mailu:
> mkdir /opt/mailu
> wget https://setup.mailu.io/2024.06/file/347a00e2-eb92-46d1-b565-0bae0b8f1824/docker-compose.yml
> wget https://setup.mailu.io/2024.06/file/347a00e2-eb92-46d1-b565-0bae0b8f1824/mailu.env
Check both files before you start:
- Add back any
@you removed from the storage path indocker-compose.yml. - In my case the Linked Website URL didn’t propagate; set
WEBSITE=https://mail.example.cominmailu.env.
Because we’re behind a reverse proxy on a different host (the VPS), set the trusted proxy addresses (REAL_IP_FROM=):
- The IP that the VPS is known by in the internet, e.g.
1.2.3.4. This IP will be given to you by your VPS provider most likely in its online admin interface. - The IP that the VPS is known by in the WireGuard network, e.g.
10.0.1.1
So the parameter should read: REAL_IP_FROM=1.2.3.4,10.0.1.1
Also add the proxy protocol ports at the bottom of mailu.env:
PROXY_PROTOCOL=25,465,587,993,995,4190Now start the stack:
# The documentation says you should use: "docker compose -p mailu up -d",
#   but as the docker-compose.yml file is in /opt/mailu the docker-compose project name is already mailu and you can omit the "-p mailu"
# In addition, for the first start I'd omit the -d so that you see the logs on the console.
docker compose up
And then create the initial admin account (admin@mail.example.com; adjust the password) in a different console:
docker compose exec admin flask mailu admin admin mail.example.com PASSWORDNext we’ll adjust the Traefik reverse proxy on the VPS.
Traefik Reverse Proxy
The Mailu docs include Traefik as reverse proxy (different host). Use that as your baseline and then apply the adjustments below for a clean, working setup.
For a modern Traefik compose, I like Christian Lempa’s boilerplates and specifically his library/compose/traefik file. They track current v3.x conventions and are easy to adapt - check the image tag in the template you copy and pin the exact version you want to run.
Post-quantum (PQ) TLS in Traefik and clients: Traefik v3.5 added support for the hybrid key exchange X25519MLKEM768 (X25519 + ML-KEM-768) when built with Go 1.24+. On the client side, OpenSSL 3.5 started prioritizing hybrid PQ groups by default. You can probe a site with a recent OpenSSL:
openssl s_client -connect example.com:443 -tls1_3 -groups X25519MLKEM768.You can enable post-quantum key exchange in TLS (protects against harvest-now-decrypt-later) without changing certificates. In TLS 1.3 the thing that protects the session’s confidentiality (the key agreement) is decoupled from the thing that authenticates the server (its certificate/signature). That lets us swap in a post-quantum (PQ) key agreement - today, ML-KEM (Kyber) - while keeping your existing RSA/ECDSA certificates and new versions of Traefik since v3.5 support that.
Encrypted Client Hello (ECH): As of today, Traefik itself does not expose server-side ECH. The Go 1.24 standard library added ECH support for servers, so Traefik could adopt it in the future; follow the upstream issue for status.
Today, when you open a TLS connection, you whisper to the network “Hi, I’m going to host.name” (the Server Name Indication (SNI) inside ClientHello). Encrypted Client Hello (ECH) puts that whisper inside an encrypted envelope. On-path observers (ISP, café Wi-Fi, employer, national firewall) can still see the IP you reached, but not which exact hostname you’re visiting on that IP, nor a bunch of other client-fingerprinting details from the ClientHello.
Encrypted Client Hello hides the real SNI (hostname you’re asking for), ALPN choice, most of your ClientHello parameters (cipher suites, signature algorithms, supported groups, key shares, etc.). That cuts down passive hostname disclosure and TLS-fingerprinting.
It doesn’t hide the server IP, port, timing/size patterns, and any unencrypted DNS lookups you make to discover the site (unless you use DoH/DoT/ODoH). It also doesn’t hide the fact that you’re using ECH at all. But it prevents easy SNI blocking: many censors and enterprise boxes block by reading cleartext SNI; with ECH they must resort to cruder IP blocking.Why people care (practical wins): Privacy on shared infrastructure, if many domains live behind the same IP (CDN, large SaaS, shared hosting like a Traefik reverse proxy), ECH stops the network from learning which tenant/site you touched. Resistance to trivial censorship as “Block everything whose SNI matches example.com” no longer works; a censor has to block the whole IP range (collateral damage rises). Less client fingerprinting, since the real ClientHello is hidden, on-path trackers get less entropy to identify “this looks like Alice’s browser on her phone at lunch.”
Below is the configuration approach I use and why each choice matters:
http3: false (HTTP/3 (QUIC) vs. TLS‑passthrough): We’re implementing a TCP TLS‑passthrough router for mail.example.com on the port :443 that forwards HTTPS to Mailu’s front.
Some browsers (Brave, Edge) will try HTTP/3 over UDP/443 first.
Traefik handles HTTP/3 at the HTTP layer, not the TCP passthrough layer, so there’s no matching HTTP router for that host and as a consequence Traefik itself answers the H3 request with “404 page not found”.
Other browsers (Chrome/Firefox) are using HTTP/2 (TCP) and therefore hit the TCP passthrough, which works.
The reason, why Traefik behaves like that is that when HTTP/3 is enabled on an entrypoint, Traefik also opens UDP :443 and serves HTTP/3 itself; only HTTP routers (with TLS) can match H3 traffic.
Passthrough only applies to TCP/TLS, not to QUIC/UDP.
SMTP Port 25 and Server-First Protocols:
The SMTP port 25 example in the official Mailu docs (section Traefik as reverse proxy (different host)) needs extra care.
In the sample, mailu-smtp appears under services: but not under routers: - unlike other entries (for example, mailu-imaps) that show up in both places.
Simply adding a matching router is usually not enough for port 25.
Why? SMTP on port 25 is a server-first protocol: the client connects and then waits for the server’s greeting banner before sending anything.
Traefik’s TCP routing logic often relies on seeing client-first bytes (e.g., a TLS ClientHello for SNI matching).
With server-first traffic on 25/tcp, the client sends nothing initially, so Traefik has nothing to peek for SNI-based decisions and may never dial the backend.
In practice, two reliable options exist:
- Delegate port 25 to HAProxy: Use HAProxy instead of Traefik only for port 25. It handles server-first protocols well.
- Use a dedicated Traefik entrypoint for 25 with a single backend: If you insist on Traefik for 25, bind a separate entrypoint and attach one TCP router/service to it (no SNI multiplexing, no TLS on 25). This removes the need to inspect client bytes. For further details see How to handle Server First protocols?.
I tried the second solution with different versions of Traefik, but could not make it work. Therefore I reverted to use HAProxy for port 25 instead.
Restrict the Cloudflare API Token:
You’ll see a cf_api_token in the config.
This token lets your ACME client use the DNS-01 challenge to issue TLS certificates (e.g., via Let’s Encrypt).
Keep your existing
httpChallengeresolver for normal hostnames, and add a second resolver for Cloudflare/DNS-01.
Ideally, give this token only the rights it needs and scope it to a single zone. Create a custom API token in Cloudflare (preferred over the global API key) with:
- Zone → Zone → Read
- Zone → DNS → Edit
- Include only the zone
example.com. - Copy the token (we’ll use it as
CF_DNS_API_TOKEN, and you can also set the same value toCF_ZONE_API_TOKENfor best compatibility).
Use something along the lines of the following:
docker-compose.yml:
secrets:
  cf_api_token:
    file: ./secrets/cf_api_token

services:
  traefik:
    image: traefik:v3.5.3
    command: --api.insecure=true --providers.docker
    secrets:
      - cf_api_token
    environment:
      CF_DNS_API_TOKEN_FILE: /run/secrets/cf_api_token
      CF_ZONE_API_TOKEN_FILE: /run/secrets/cf_api_token
    ports:
      - "80:80"
      - "443:443"
      - "443:443/udp"
      - "127.0.0.1:8081:8081"
      # - "25:25" # handled via haproxy below to support "Server-first SMTP (banner first)";
      #   see https://doc.traefik.io/traefik/v3.0/routing/routers/ : How to handle Server First protocols?
      - "465:465"
      - "993:993"
      - "995:995"
      - "4190:4190"
    volumes:
      - /var/run/docker.sock:/var/run/docker.sock:rw
      - ./traefik-config/traefik.yml:/etc/traefik/traefik.yml
      - ./traefik-config/dynamic-mailu.yml:/etc/traefik/dynamic/dynamic-mailu.yml
      - ./traefik-config/acme.json:/etc/traefik/acme/acme.json
  haproxy25:
    image: haproxy:3.2.7
    container_name: haproxy25
    restart: unless-stopped
    ports:
      - "25:25"
    volumes:
- ./haproxy-config/haproxy.cfg:/usr/local/etc/haproxy/haproxy.cfg:rotraefik.yml:
global:
  sendAnonymousUsage: false

log:
  level: DEBUG

# experimental: # http3: true

entryPoints:
  web:
    address: ":80"
    allowACMEByPass: true
    http:
      redirections:
        entryPoint:
          to: web-secure
          scheme: https
          # Make the redirect router *less* dominant than your ACME router:
          priority: 1
  web-secure:
    address: ":443"
    http2:
      maxConcurrentStreams: 250
    http3: false
      # advertisedPort: 443
  traefik:
    address: ":8081"
  # mailu-smtp:
  #   address: :25
  mailu-imaps:
    address: :993
  mailu-pop3s:
    address: :995
  mailu-submissions:
    address: :465
  mailu-sieve:
    address: :4190


providers:
  file:
    directory: /etc/traefik/dynamic
    # filename: dynamic.yml
    watch: true
  docker:
    exposedByDefault: false
    watch: true

api:
  insecure: true

certificatesResolvers:
  default:
    acme:
      email: user@example.com
      storage: /etc/traefik/acme/acme.json
      httpChallenge:
        entryPoint: web

  cf-dns:             # new dns-01 resolver for Cloudflare
    acme:
      email: user@example.com
      storage: /etc/traefik/acme/acme.json
      dnsChallenge:
        provider: cloudflare
        # Optional but handy:
        delayBeforeCheck: 0
        resolvers:
          - "1.1.1.1:53"
          - "8.8.8.8:53"

  alpn:
    acme:
      email: user@example.com
      storage: /etc/traefik/acme/acme.json
tlsChallenge: {} # TLS-ALPN-01 over :443dynamic-mailu.yml:
http:
  routers:
    mailu-acme-only:
      entryPoints: [web]
      # host-scoped ACME path -> only mail.example.com goes to Mailu
      rule: "PathPrefix(`/.well-known/acme-challenge/`) && (Host(`mail.example.com`) || Host(`autoconfig.mail.example.com`) || Host(`autodiscover.mail.example.com`))"
      service: mailu-web
      priority: 1000

    # (optional) Plain HTTP for mail host if you want Mailu to answer on :80
    mailu-http:
      entryPoints: [web]
      rule: "Host(`mail.example.com`)"
      service: mailu-web
      priority: 50

  services:
    mailu-web:
      loadBalancer:
        servers:
          - url: "http://10.0.1.2:80"

tcp:
  routers:
    mailu-websecure:
      entryPoints: [web-secure]
      # Add extra mail FQDNs here if you use them
      rule: "HostSNI(`mail.example.com`) || HostSNI(`autoconfig.mail.example.com`) || HostSNI(`autodiscover.mail.example.com`) || HostSNI(`mta-sts.mail.example.com`)"
      tls:
        passthrough: true
      service: mailu-websecure

    # mailu-smtp:
    #   entryPoints: [mailu-smtp]
    #   rule: "HostSNI(`*`)"
    #   service: mailu-smtp

    mailu-submissions:
      entryPoints: [mailu-submissions]
      rule: "HostSNI(`*`)"
      tls:
        passthrough: true
      service: mailu-submissions

    mailu-imaps:
      entryPoints: [mailu-imaps]
      rule: "HostSNI(`*`)"
      tls:
        passthrough: true
      service: mailu-imaps

    mailu-pop3s:
      entryPoints: [mailu-pop3s]
      rule: "HostSNI(`*`)"
      tls:
        passthrough: true
      service: mailu-pop3s

    mailu-sieve:
      entryPoints: [mailu-sieve]
      rule: "HostSNI(`*`)"
      service: mailu-sieve

  # https://doc.traefik.io/traefik/migrate/v3/#v352
  # https://doc.traefik.io/traefik/reference/routing-configuration/tcp/serverstransport/
  # serversTransports:
  #   ppv2:
  #     proxyProtocol:
  #       version: 2

  services:
    mailu-websecure:
      loadBalancer:
        proxyProtocol: {version: 2}
        # serversTransport: ppv2
        servers:
          - address: "10.0.1.2:443"

    # mailu-smtp:
    #   loadBalancer:
    #     proxyProtocol: {version: 2}
    #     # serversTransport: ppv2
    #     servers:
    #       - address: "10.0.1.2:25"

    mailu-submissions:
      loadBalancer:
        proxyProtocol: {version: 2}
        # serversTransport: ppv2
        servers:
          - address: "10.0.1.2:465"

    mailu-imaps:
      loadBalancer:
        proxyProtocol: {version: 2}
        # serversTransport: ppv2
        servers:
          - address: "10.0.1.2:993"

    mailu-pop3s:
      loadBalancer:
        proxyProtocol: {version: 2}
        # serversTransport: ppv2
        servers:
          - address: "10.0.1.2:995"

    mailu-sieve:
      loadBalancer:
        proxyProtocol: {version: 2}
        # serversTransport: ppv2
        servers:
- address: "10.0.1.2:4190"haproxy.cfg:
global
  # log to stdout (supported in 3.2)
  log stdout format raw local0
  master-worker

defaults
  mode tcp
  log global
  option tcplog
  timeout connect 5s
  timeout client  2m
  timeout server  2m

frontend smtp_in
  bind :25
  default_backend mailu_smtp

backend mailu_smtp
  # PROXY v2 toward Mailu so it sees real client IPs
  server mailu 10.0.1.2:25 send-proxy-v2 check inter 5s rise 2 fall 2
Reverse DNS for the VPS Public IP
Set the reverse DNS (PTR) of your VPS’s public IP to mail.example.com.
This is a key signal for mail deliverability and helps receivers trust your server.
I set this in my VPS control panel under the rDNS (Reverse DNS / PTR) section.
What “good” looks like (forward-confirmed rDNS):
- PTR:
IP → mail.example.com(set at your VPS provider; you can’t set PTR in your own zone). - A/AAAA:
mail.example.com → IP(set in your DNS provider). - HELO/EHLO: Your SMTP banner should present
mail.example.com.
These three should agree. Many receivers check for this “forward-confirmed reverse DNS” and penalize mismatches.
The PTR must be set on the IP that sends outbound mail. In this design, that’s the VPS (your public gateway), not the home server.
Quick tests
# Reverse lookup (should return mail.example.com)
dig +short -x 1.2.3.4

# Forward lookup (should return your VPS IP)
dig +short mail.example.com A
dig +short mail.example.com AAAA

# SMTP banner (look for EHLO and hostname)
nc -vz mail.example.com 25 || telnet mail.example.com 25
Egress for SMTP Port 25
My home Internet Service Provider (ISP) blocks outgoing traffic (egress) on SMTP port 25, which is the standard port for server-to-server e-mail delivery. This means that any service running on your home network - including your Mailu server - cannot open direct SMTP connections to other mail servers on the internet. This is often called a “port 25 block” or “SMTP egress filtering”.
ISPs do this to prevent spam and abuse: infected home machines are often used to send large volumes of unsolicited e-mail directly to other mail servers, and blocking port 25 stops that. Instead, they expect customers to send mail via authenticated submission ports (like 465 or 587) on a trusted mail provider, where abuse controls and rate limits can be enforced.
Because we also want our Mailu system to send e-mail to the outside world, we need to find a workaround for this port 25 block.
Smarthost/Relay
The simplest workaround is to use a smarthost (relay) and send all outbound mail through a provider on port 587 (STARTTLS) or 465 (implicit TLS) with authentication. A smarthost is basically another mail server that accepts your outgoing messages and then delivers them to the final destination on your behalf. From the point of view of the internet, mail appears to come from the smarthost, not from your home server.
Mailu natively supports RELAYHOST, RELAYUSER, RELAYPASSWORD, and OUTBOUND_TLS_LEVEL.
When you use a relay, the OUTBOUND_TLS_LEVEL value encrypt is recommended.
Example providers include Amazon SES, Postmark, SendGrid (Twilio), SMTP2GO, Mailgun, and others.
While this option is the simplest, I advise against it because it defeats the whole purpose of keeping all data at home under our physical control. Once you use a smarthost or relay, all your outgoing e-mail passes through a third party, and even if you use end-to-end encryption, the metadata - who you talk to, how often, and how much you send - is still visible to them.
Therefore, I recommend keeping direct delivery and egress via the VPS, using policy routing and NAT. The goal is to route only TCP port 25 traffic from Mailu to the VPS over WireGuard and then perform SNAT (Source Network Address Translation) on the VPS. In practice, this means only your SMTP server-to-server traffic (port 25) leaves your home via the encrypted WireGuard tunnel to the VPS. The VPS rewrites the source IP (SNAT) so that other mail servers on the internet see the VPS’s public IP as the sender, while all mailbox data and state remain on your home server.
Source Network Address Translation (SNAT) and Policy Routing
SNAT (Source Network Address Translation) means rewriting the source IP (and optionally the source port) of packets as they leave a system.
On Linux this is done with iptables in the nat table, specifically in the POSTROUTING chain, which is consulted just before packets leave an interface.
There you use targets like SNAT (with a fixed --to-source 1.2.3.4) or MASQUERADE (which automatically uses the interface’s current IP) to change the source address.
The kernel’s conntrack (connection tracking) subsystem then keeps a state table that maps each connection’s original 5-tuple (internal IP/port, external IP/port, protocol) to its translated version,
so that replies coming back to the public IP can be “untranslated” and delivered to the correct internal host.
This whole SNAT process makes it look to both sides as if they were talking directly, even though the traffic is actually traversing a NAT gateway.
Modern systems often use iptables-nft, which keeps the familiar iptables command line and semantics but programs rules into the newer nftables engine under the hood;
the concepts of nat/POSTROUTING/SNAT/conntrack stay the same, only the backend implementation changes.
Below I will show you two scripts, one for the home server (smtp-egress-home-via-vps.sh) and one for the VPS (smtp-egress-vps.sh), that implement SNAT and policy routing for this narrow use case.
With smtp-egress-home-via-vps.sh and smtp-egress-vps.sh we build a very narrow SMTP egress path via WireGuard and a VPS.
The home script marks only TCP/25 flows from the Mailu Docker subnet, uses a separate policy routing table to send those marked packets through the WireGuard interface, and installs firewall rules that allow this traffic out while accepting only the corresponding replies. The VPS script then forwards these packets to the internet and applies SNAT so that they appear to come from the VPS’s public IP with a matching PTR record and EHLO hostname, effectively bypassing the ISP’s port-25 block while leaving all non-SMTP traffic from the home network completely unchanged.
In other words:
- At home you decide “only Mailu’s SMTP traffic goes through the tunnel,” and everything else continues to use your normal internet connection.
- On the VPS that SMTP traffic leaves with a clean, static public IP that you control in DNS, which is important for mail deliverability and reputation.
Pitfalls
The most difficult part of getting this working was adding the raw-table exception (see the smtp-egress-home-via-vps.sh script below) that allows SMTP replies from the WireGuard interface wg0 to reach the containers and that must run before Docker’s raw-table drop rules.
The raw table runs before conntrack and long before the filter table chains (including DOCKER-USER and FORWARD).
Docker installs per-container “hairpin guard”[2] rules that drop any packet destined for a container IP if it did not enter via that container’s bridge interface.
Because our reply traffic arrives on wg0 (not from the Docker bridge), it gets dropped in the raw table’s PREROUTING chain and never reaches the DOCKER-USER accept rules (see the script below).
In other words, Docker assumes that packets for a container should always arrive through the corresponding bridge. Anything that appears “from the outside” directly on another interface looks suspicious and is dropped early in the raw table to prevent hairpin and spoofing issues.
Debugging this was tricky, because iptables -vnL DOCKER-USER counters stay at 0 for the br-8288… DROP rule: the packets never reach the filter/DOCKER-USER chain at all - they die earlier in the raw table.
I was able to get a trace by:
# $CIP is the container's IP (must be 192.168.203.x)
iptables -t raw -I PREROUTING 1 -i wg0 -p tcp --sport 25 -d "$CIP" -j TRACE
nft monitor trace
iptables -t raw -D PREROUTING -i wg0 -p tcp --sport 25 -d "$CIP" -j TRACE
Another hurdle was that nft’s live tracer (because I am on iptables-nft) does not log much to the traditional kernel log on iptables-nft systems. The old way to look at traces was:
dmesg -w | grep TRACEBut on iptables-nft systems nothing shows up there; instead you have to use
nft monitor traceto see the trace output.
WireGuard Config Nuance
You also need to adapt the WireGuard configuration on both the home server and the VPS.
On the Home Server
On the home server, you should set AllowedIPs = 0.0.0.0/0 on the home-to-VPS peer and Table = off in the [Interface] section.
In WireGuard, AllowedIPs is both a routing selector and an access control list.
By using 0.0.0.0/0 on the peer that points to the VPS, you tell the kernel: “any IPv4 destination is allowed to go through this tunnel if the routing policy sends it there.”
Without this, only the prefixes (for example only traffic originating from 10.0.1.2) listed in AllowedIPs would be eligible to use the tunnel.
We then set Table = off and use policy routing so that we do not hijack all traffic.
By default, wg-quick adds routes for each AllowedIPs entry into your main routing table.
If you set AllowedIPs = 0.0.0.0/0 and keep the defaults, wg-quick will install a default route via wg0, and your entire internet traffic will go through the VPS (which is not what we want here).
Setting Table = off (again, in the [Interface] section) on the home server tells wg-quick not to add any routes at all.
This way, only the packets we explicitly mark (with fwmark 25) are policy-routed into table 100 and forwarded via wg0.
All other traffic continues to use the normal default route of your home internet connection.
On the VPS Side
On the receiving VPS side, you need to add AllowedIPs = 192.168.203.0/24, 10.0.1.2/32 to the peer that represents your home server.
On the VPS, AllowedIPs in the home-peer entry plays the “reverse” role: it defines which source addresses are allowed to arrive from that peer, and which destination addresses the VPS is allowed to send back through that tunnel.
Because the Mailu containers at home use 192.168.203.0/24 as their source addresses, the home-to-VPS tunnel must permit that subnet.
You also include the home node’s WireGuard tunnel address (10.0.1.2/32) so that return traffic to the peer itself works cleanly.
In practice, this means the VPS will accept packets coming from 192.168.203.0/24 over the tunnel and knows that replies to those addresses (and to 10.0.1.2) should be sent back via the WireGuard peer, not via its normal default gateway.
Configurations and Scripts
You can find the relevant fragments below.
wg0.conf on the home server:
# sudo systemctl restart wg-quick@wg0   # after editing wg0.conf (Table=off etc.)
# sudo /usr/local/sbin/smtp-egress-home-via-vps.sh enable

[Interface]
Address = 10.0.1.2
PrivateKey = xxx
# IMPORTANT: we control routing with policy rules. Prevent wg-quick from injecting routes automatically.
Table = off
# Keep overlay reachability to the 10.0.1.0/24 WG network (hub on VPS).
PostUp   = ip route add 10.0.1.0/24 dev wg0 || true
PostDown = ip route del 10.0.1.0/24 dev wg0 || true
# Optional but recommended (avoid drops with policy-routing asymmetry):
PreUp    = sysctl -w net.ipv4.conf.all.rp_filter=2
PostDown = sysctl -w net.ipv4.conf.all.rp_filter=0

[Peer]
PublicKey = yyyy
Endpoint = vps.example.net:51820
# CRITICAL: this allows WireGuard to accept/encapsulate traffic to ANY Internet dest via this peer.
AllowedIPs = 0.0.0.0/0, 10.0.1.0/24
PersistentKeepalive = 25
wg0.conf on the VPS server:
# sudo systemctl restart wg-quick@wg0   # after editing wg0.conf
[Peer]
PublicKey = zzz
# IMPORTANT: include Mailu's container subnet so replies to 192.168.203.0/24 go back over wg0.
AllowedIPs = 10.0.1.2/32, 192.168.203.0/24
smtp-egress-home-via-vps.sh
#!/usr/bin/env bash
set -Eeuo pipefail

# --------- adjustable ---------
WG_IF="wg0"
MAILU_NET="192.168.203.0/24"   # Docker Mailu subnet
MARK_HEX="0x19"                # 0x19 == 25 (smtp)
TABLE="100"
PRIO="10025"
# --------------------------------

ipt()  { iptables -w "$@"; }
iptn() { iptables -w -t nat "$@"; }
iptm() { iptables -w -t mangle "$@"; }
iptr() { iptables -w -t raw "$@"; }
sys()  { sysctl -q "$@"; }

save_sys()  { sysctl -n "$1" 2>/dev/null; }
restore_sys() {
  local key="$1" file="$2"
  [ -f "$file" ] || return 0
  # Strip whitespace/newlines; expect a bare value like "0|1|2"
  local val; val="$(tr -d ' \t\r\n' < "$file")"
  [ -n "$val" ] && sys -w "$key=$val" || true
}

STATE_DIR="/run/smtp-egress-home"
mkdir -p "$STATE_DIR"

case "${1:-}" in
  enable)
    # Record and set sysctls we rely on
    save_sys net.ipv4.ip_forward >"$STATE_DIR/ip_forward.prev"  || true
    save_sys net.ipv4.conf.all.rp_filter >"$STATE_DIR/rpf_all.prev"  || true
    save_sys net.ipv4.conf."$WG_IF".rp_filter >"$STATE_DIR/rpf_wg.prev"  || true
    save_sys net.ipv4.conf.default.rp_filter >"$STATE_DIR/rpf_def.prev" || true

    sys -w net.ipv4.ip_forward=1 >/dev/null || true
    sys -w net.ipv4.conf.all.rp_filter=2 >/dev/null || true
    sys -w net.ipv4.conf.default.rp_filter=2 >/dev/null || true
    sys -w net.ipv4.conf."$WG_IF".rp_filter=2 >/dev/null || true

    # Try to detect the Docker bridge for MAILU_NET (works well for /24 like 192.168.203.0/24).
    NET_PREFIX="${MAILU_NET%/*}"           # e.g. 192.168.203.0
    PREFIX3="${NET_PREFIX%.*}."            # e.g. 192.168.203.
    BR_IF="$(ip -o -4 addr show | awk -v pfx="$PREFIX3" '$2 ~ /^br-/ && index($4,pfx)==1 {print $2; exit}')" || BR_IF=""
    [ -n "$BR_IF" ] && save_sys "net.ipv4.conf.$BR_IF.rp_filter" >"$STATE_DIR/rpf_br.prev" || true
    [ -n "$BR_IF" ] && sys -w "net.ipv4.conf.$BR_IF.rp_filter=2" >/dev/null || true

    # Allow container SMTP towards wg0 and allow return traffic
    ipt -C DOCKER-USER -s "$MAILU_NET" -o "$WG_IF" -p tcp --dport 25 -j ACCEPT 2>/dev/null || ipt -I DOCKER-USER 1 -s "$MAILU_NET" -o "$WG_IF" -p tcp --dport 25 -j ACCEPT

    # Accept replies from wg0 to the Mailu subnet *before* Docker's DOCKER/bridge hairpin drop.
    ipt -C DOCKER-USER -i "$WG_IF" -d "$MAILU_NET" -m conntrack --ctstate ESTABLISHED,RELATED -j ACCEPT 2>/dev/null || ipt -I DOCKER-USER 1 -i "$WG_IF" -d "$MAILU_NET" -m conntrack --ctstate ESTABLISHED,RELATED -j ACCEPT

    # Raw-table exception: let SMTP replies from wg0 reach containers (must run *before* Docker's raw drops)
    iptr -C PREROUTING -i "$WG_IF" -d "$MAILU_NET" -p tcp --sport 25 -j ACCEPT 2>/dev/null || iptr -I PREROUTING 1 -i "$WG_IF" -d "$MAILU_NET" -p tcp --sport 25 -j ACCEPT


    # MARK ONLY tcp/25 from Mailu subnet
    iptm -C PREROUTING -s "$MAILU_NET" -p tcp --dport 25 -j MARK --set-mark "$MARK_HEX" 2>/dev/null || iptm -A PREROUTING -s "$MAILU_NET" -p tcp --dport 25 -j MARK --set-mark "$MARK_HEX"

    # Policy rule: fwmark -> table 100
    ip rule show | grep -q "fwmark $((0x19)).*lookup $TABLE" || ip rule add fwmark "$MARK_HEX" table "$TABLE" pref "$PRIO"

    # Table 100: default via wg0 (device route)
    ip route show table "$TABLE" | grep -q "^default" || ip route add default dev "$WG_IF" table "$TABLE"

    # NAT bypass on wg0 for exactly this flow (top of chain)
    iptn -C POSTROUTING -o "$WG_IF" -s "$MAILU_NET" -p tcp --dport 25 -j ACCEPT 2>/dev/null || iptn -I POSTROUTING 1 -o "$WG_IF" -s "$MAILU_NET" -p tcp --dport 25 -j ACCEPT


    echo "Enabled: SMTP-only egress via ${WG_IF} (fwmark=${MARK_HEX} -> table ${TABLE})."
    ;;

  disable)
    iptn -D POSTROUTING -o "$WG_IF" -s "$MAILU_NET" -p tcp --dport 25 -j ACCEPT 2>/dev/null || true
    iptr -D PREROUTING -i "$WG_IF" -d "$MAILU_NET" -p tcp --sport 25 -j ACCEPT 2>/dev/null || true
    ipt  -D DOCKER-USER -s "$MAILU_NET" -o "$WG_IF" -p tcp --dport 25 -j ACCEPT 2>/dev/null || true
    ipt  -D DOCKER-USER -i "$WG_IF" -d "$MAILU_NET" -m conntrack --ctstate ESTABLISHED,RELATED -j ACCEPT 2>/dev/null || true
    iptm -D PREROUTING -s "$MAILU_NET" -p tcp --dport 25 -j MARK --set-mark "$MARK_HEX" 2>/dev/null || true

    ip rule del fwmark "$MARK_HEX" table "$TABLE" pref "$PRIO" 2>/dev/null || true
    ip route flush table "$TABLE" 2>/dev/null || true

    # Restore sysctls (if recorded)
    restore_sys net.ipv4.ip_forward "$STATE_DIR/ip_forward.prev"
    restore_sys net.ipv4.conf.all.rp_filter "$STATE_DIR/rpf_all.prev"
    restore_sys net.ipv4.conf.default.rp_filter "$STATE_DIR/rpf_def.prev"

    # Recompute BR_IF (best-effort) to restore its rp_filter if we changed it
    NET_PREFIX="${MAILU_NET%/*}"; PREFIX3="${NET_PREFIX%.*}."
    BR_IF="$(ip -o -4 addr show | awk -v pfx="$PREFIX3" '$2 ~ /^br-/ && index($4,pfx)==1 {print $2; exit}')" || BR_IF=""
    [ -e "/proc/sys/net/ipv4/conf/$WG_IF/rp_filter" ] && restore_sys "net.ipv4.conf.$WG_IF.rp_filter" "$STATE_DIR/rpf_wg.prev" || true
    [ -n "$BR_IF" ] && [ -e "/proc/sys/net/ipv4/conf/$BR_IF/rp_filter" ] && restore_sys "net.ipv4.conf.$BR_IF.rp_filter" "$STATE_DIR/rpf_br.prev" || true

    echo "Disabled: SMTP-only egress via ${WG_IF}."
    ;;

  status)
    echo "=== ip rule ==="; ip rule
    echo "=== table $TABLE ==="; ip route show table "$TABLE"
    echo "=== mangle PREROUTING (tcp/25 mark) ==="; iptables -t mangle -S PREROUTING | grep -- "--dport 25" || true
    echo "=== nat POSTROUTING (${WG_IF} tcp/25 bypass) ==="; iptables -t nat -S POSTROUTING | grep -E "${WG_IF}|ACCEPT|MASQUERADE" || true
    echo "=== DOCKER-USER rules (active) ==="; iptables -S DOCKER-USER | grep -E "${WG_IF}|${MAILU_NET}|dport 25|ESTABLISHED" || true
    echo "=== sysctls ==="; echo -n "ip_forward="; sysctl -n net.ipv4.ip_forward
    echo "=== DOCKER-USER (counters) ==="; iptables -vnL DOCKER-USER || true
    echo "=== raw PREROUTING (${WG_IF} -> ${MAILU_NET} tcp sport 25) ==="; iptr -vnL PREROUTING | grep -E "${WG_IF}|${MAILU_NET//\//\\/}|sport 25" || true
    ;;

  verify)
    set +e
    echo "=== Preflight ==="
    ip -br link show dev "$WG_IF"
    echo "Peer selection requires: WG peer AllowedIPs include 0.0.0.0/0"
    echo

    echo "Policy lookup without mark (should use main table):"
    ip route get 8.8.8.8 || true
    echo
    echo "Policy lookup WITH mark $MARK_HEX (should resolve via ${WG_IF} in table ${TABLE}):"
    ip route get 8.8.8.8 mark "$MARK_HEX" 2>/dev/null || echo "(could not verify; check peer AllowedIPs and table $TABLE)"
    echo
    echo "Counters:"
    iptables -t mangle -vnL PREROUTING | grep -E "dpt:25|MARK" || true
    iptables -t nat    -vnL POSTROUTING | grep -E "${WG_IF}|ACCEPT|MASQUERADE" || true
    iptables -t raw    -vnL PREROUTING | grep -E "${WG_IF}|${MAILU_NET//\//\\/}|sport 25" || true
    ;;

  *)
    echo "Usage: $0 {enable|disable|status|verify}"
    exit 1
    ;;
esac
Dedicated smtp-egress.service on the home server (waits for wg0 + Mailu network):
# /etc/systemd/system/smtp-egress.service
# systemctl daemon-reload
# systemctl enable --now smtp-egress.service
[Unit]
Description=SMTP egress policy routing (Mailu -> VPS via wg0)
Wants=wg-quick@wg0.service docker.service
After=wg-quick@wg0.service docker.service

# If you have a systemd unit for Mailu, add it here:
# Wants=mailu.service
# After=mailu.service

[Service]
Type=oneshot
RemainAfterExit=yes

# Wait for wg0
ExecStartPre=/usr/bin/bash -lc 'until ip link show wg0 >/dev/null 2>&1; do sleep 1; done'

# Wait for Docker to have installed its chains (DOCKER-USER is what the script touches)
ExecStartPre=/usr/bin/bash -lc 'until iptables -S DOCKER-USER >/dev/null 2>&1; do sleep 1; done'

# Wait for the Mailu bridge interface that owns 192.168.203.0/24 to exist (matches the script’s autodetect logic)
ExecStartPre=/usr/bin/bash -lc 'until ip -o -4 addr show | grep -qE '\'' br-[^ ]+ +inet 192\.168\.203\.'\''; do sleep 1; done'

ExecStart=/usr/local/sbin/smtp-egress-home-via-vps.sh enable
ExecStop=/usr/local/sbin/smtp-egress-home-via-vps.sh disable

[Install]
WantedBy=multi-user.target
smtp-egress-vps.sh
#!/usr/bin/env bash
set -Eeuo pipefail

# ====== adjustable ======
WAN_IF="eth0"
WG_IF="wg0"
MAILU_NET="192.168.203.0/24"
PUB_IP="1.2.3.4"      # VPS public IPv4 with correct PTR/rDNS
# ========================

ipt()  { iptables -w "$@"; }
iptn() { iptables -w -t nat "$@"; }
iptm() { iptables -w -t mangle "$@"; }
sys()  { sysctl -q "$@"; }

case "${1:-}" in
  enable)
    sys -w net.ipv4.ip_forward=1 >/dev/null || true

    # Allow ONLY Mailu-subnet SMTP from wg0 out to the Internet, and allow return.
    ipt -C FORWARD -i "$WG_IF" -o "$WAN_IF" -s "$MAILU_NET" -p tcp --dport 25 -j ACCEPT 2>/dev/null || ipt -A FORWARD -i "$WG_IF" -o "$WAN_IF" -s "$MAILU_NET" -p tcp --dport 25 -j ACCEPT
    ipt -C FORWARD -i "$WAN_IF" -o "$WG_IF" -m conntrack --ctstate ESTABLISHED,RELATED -j ACCEPT 2>/dev/null || ipt -A FORWARD -i "$WAN_IF" -o "$WG_IF" -m conntrack --ctstate ESTABLISHED,RELATED -j ACCEPT

    # PMTU safety through the tunnel
    iptm -C FORWARD -i "$WG_IF" -p tcp --tcp-flags SYN,RST SYN -j TCPMSS --clamp-mss-to-pmtu 2>/dev/null || iptm -A FORWARD -i "$WG_IF" -p tcp --tcp-flags SYN,RST SYN -j TCPMSS --clamp-mss-to-pmtu
    iptm -C FORWARD -o "$WG_IF" -p tcp --tcp-flags SYN,RST SYN -j TCPMSS --clamp-mss-to-pmtu 2>/dev/null || iptm -A FORWARD -o "$WG_IF" -p tcp --tcp-flags SYN,RST SYN -j TCPMSS --clamp-mss-to-pmtu

    # Explicit SNAT for ONLY tcp/25 from the Mailu subnet. Insert at top to outrank generic MASQUERADE.
    iptn -C POSTROUTING -o "$WAN_IF" -s "$MAILU_NET" -p tcp --dport 25 -j SNAT --to-source "$PUB_IP" 2>/dev/null || iptn -I POSTROUTING 1 -o "$WAN_IF" -s "$MAILU_NET" -p tcp --dport 25 -j SNAT --to-source "$PUB_IP"

    echo "Enabled: SMTP egress via ${PUB_IP} (only tcp/25 from ${MAILU_NET})."
    ;;

  disable)
    iptn -D POSTROUTING -o "$WAN_IF" -s "$MAILU_NET" -p tcp --dport 25 -j SNAT --to-source "$PUB_IP" 2>/dev/null || true
    iptm -D FORWARD -i "$WG_IF" -p tcp --tcp-flags SYN,RST SYN -j TCPMSS --clamp-mss-to-pmtu 2>/dev/null || true
    iptm -D FORWARD -o "$WG_IF" -p tcp --tcp-flags SYN,RST SYN -j TCPMSS --clamp-mss-to-pmtu 2>/dev/null || true
    ipt  -D FORWARD -i "$WAN_IF" -o "$WG_IF" -m conntrack --ctstate ESTABLISHED,RELATED -j ACCEPT 2>/dev/null || true
    ipt  -D FORWARD -i "$WG_IF" -o "$WAN_IF" -s "$MAILU_NET" -p tcp --dport 25 -j ACCEPT 2>/dev/null || true

    echo "Disabled: SMTP egress via ${PUB_IP}."
    ;;

  status)
    echo "=== Interfaces ==="; ip -br addr show dev "$WAN_IF"; ip -br addr show dev "$WG_IF"
    echo "=== IP forward ==="; sysctl -n net.ipv4.ip_forward
    echo "=== FORWARD (counters) ==="; iptables -vnL FORWARD
    echo "=== NAT POSTROUTING (counters) ==="; iptables -t nat -vnL POSTROUTING
    echo "=== MANGLE FORWARD (MSS clamp) ==="; iptables -t mangle -vnL FORWARD | grep -i mss || true
    ;;

  verify)
    set +e
    echo "=== Preflight ==="
    ip -br link show dev "$WG_IF"
    ip -br link show dev "$WAN_IF"
    echo "Check that wg peer AllowedIPs include 192.168.203.0/24 so return to Mailu goes over wg0."
    echo

    echo "=== Rule presence ==="
    iptables -S FORWARD | grep -E "$WG_IF|$WAN_IF|dport 25" || true
    iptables -t nat -S POSTROUTING | grep -E "SNAT --to-source $PUB_IP|$MAILU_NET|dport 25" || true
    echo

    echo "=== Hints to actively validate in another terminal ==="
    echo "VPS WAN side (should show src $PUB_IP):   sudo tcpdump -ni $WAN_IF 'tcp port 25 and src $PUB_IP'"
    echo "VPS WG side  (should show src 192.168.203.x): sudo tcpdump -ni $WG_IF  'tcp port 25 and src net $MAILU_NET'"
    echo "Conntrack view: sudo conntrack -L -p tcp --dport 25 | grep -E 'src=|dst='"
    ;;

  *)
    echo "Usage: $0 {enable|disable|status|verify}"
    exit 1
    ;;
esac
Dedicated smtp-egress-vps.service on the VPS server:
# /etc/systemd/system/smtp-egress-vps.service
# systemctl daemon-reload
# systemctl enable --now smtp-egress-vps.service
[Unit]
Description=VPS SMTP egress gateway (SNAT tcp/25 from Mailu subnet via wg0)
Wants=wg-quick@wg0.service network-online.target
After=wg-quick@wg0.service network-online.target

# If you use a firewall manager that applies rules late, add it here so we run after it:
# After=ufw.service nftables.service

# When wg-quick@wg0 stops, also stop this (so ExecStop runs and cleans up)
PartOf=wg-quick@wg0.service

[Service]
Type=oneshot
RemainAfterExit=yes

# Wait for interfaces to exist
ExecStartPre=/usr/bin/bash -lc 'until ip link show wg0  >/dev/null 2>&1; do sleep 1; done'
ExecStartPre=/usr/bin/bash -lc 'until ip link show eth0 >/dev/null 2>&1; do sleep 1; done'

# Optional but strongly recommended: ensure the public IP is actually configured on WAN_IF
# Replace 1.2.3.4 and eth0 to match your script variables.
ExecStartPre=/usr/bin/bash -lc 'until ip -o -4 addr show dev eth0 | grep -q " 1.2.3.4/"; do sleep 1; done'

ExecStart=/usr/local/sbin/smtp-egress-vps.sh enable
ExecStop=/usr/local/sbin/smtp-egress-vps.sh disable

[Install]
WantedBy=multi-user.target
WantedBy=wg-quick@wg0.service
Configure Mailu via the Admin Web Interface
At this point, you’ve set up all the required infrastructure, so from here on you can mostly follow standard setup guides such as:
- How to Setup a Mail Server on Debian Using Mailu and Start Sending Emails Today
- Building, deploying and securing your own mail server with Docker
Log in to the Mailu admin interface as your admin@mail.example.com user with the password that we set earlier via the docker compose exec command, using one of the hostnames of your mail system, for example mail.example.com.
Right after the first login, change this password to a strong one. You can also choose the “Update password” option in the left menu.
The admin account is the “root” of your mail system. If someone gets this password, they can reset user passwords, read mail and change DNS-related settings, so treat it like the keys to your whole setup.
DNS Entries for E-Mail
In the left menu, go to “Mail domains”, then in the table row for your domain, click the “Details” icon in the “Actions” column (the list icon with three horizontal lines). I am describing this in so much detail because it took me quite some time to find it.
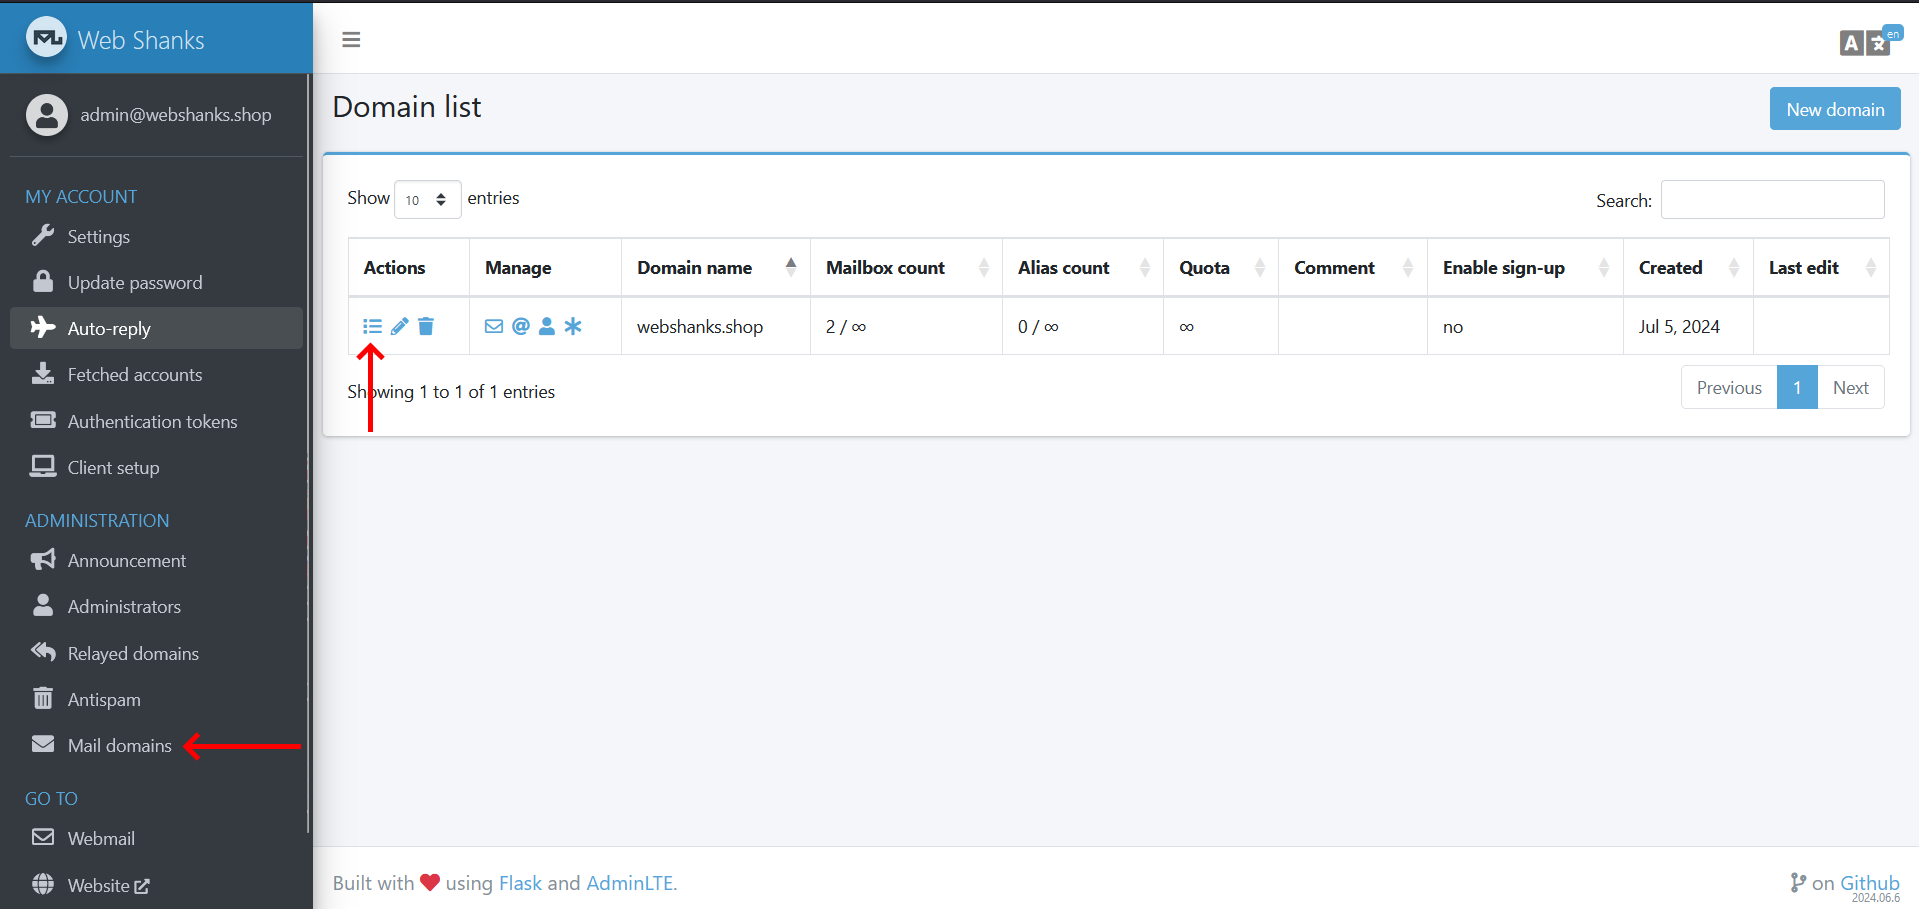
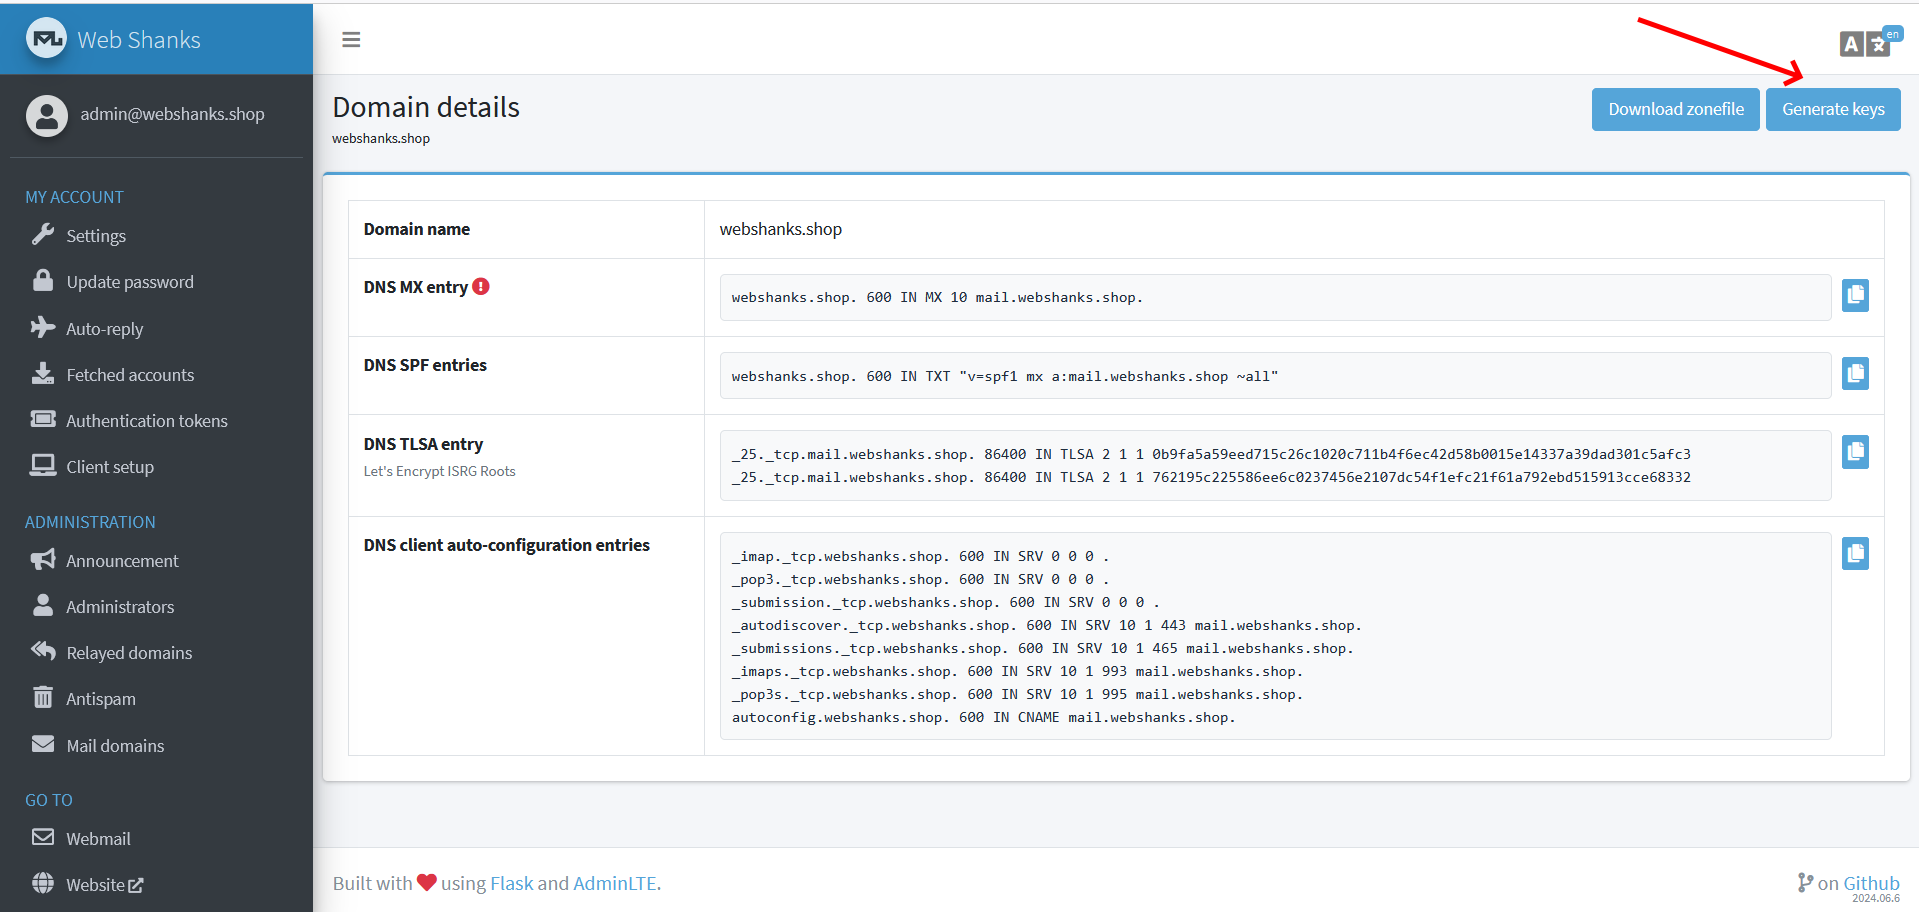
On the domain details page, you can generate the keys that you will need for DKIM and DMARC.
- DKIM (DomainKeys Identified Mail) adds a cryptographic signature to your outgoing e-mail. Receiving servers can verify this signature using the public key you publish in DNS. This is a strong signal that the message really comes from your server.
- DMARC (Domain-based Message Authentication, Reporting and Conformance) tells other mail providers how to handle messages that fail SPF/DKIM checks (for example, reject, quarantine, or just report). Even a basic “none” policy with reporting helps you see if someone is abusing your domain.
You will also need SPF (Sender Policy Framework), usually a single TXT record like
v=spf1 mx -all, which tells other servers which hosts are allowed to send mail for your domain. Together, SPF, DKIM and DMARC form the basic “authentication trio” most big providers expect today.
At the top right of the “Domain details” page, you can use the Download zonefile button. Download this file and import it at your DNS provider (for example, Cloudflare).
IMPORTANT: Before you import the zonefile from Mailu at your DNS provider, export the current state as a zonefile (or backup) from your DNS provider.
Some DNS providers may not accept the zone file “as is” but it still helps as a checklist: you can copy the individual records (A, AAAA, MX, TXT, etc.) into your provider’s web interface. Make sure you adjust the TTLs and any provider-specific flags if needed.
If your DNS provider supports DNSSEC, it is a good idea to enable it once your records are stable. Combined with DANE/TLSA, this can further improve the security of your mail transport, but it is an advanced step and not required for a working setup.
Once the DNS records are created and have propagated, you should see the “DNS MX entry” icon in Mailu turn into a green checkmark.
DNS changes are not instant. Depending on TTL and the provider, propagation can take from a few minutes to several hours. If you do not see the green checkmark yet, wait a bit and try again.
E-Mail Users
Next, you can create users on your mail system.
Again in the “Mail domains” section, click on the mail envelope symbol in the “Manage” column for your domain.
On the resulting page, you will find an Add user button at the top right. Use it to create all the user accounts you want at this point, for example user@mail.example.com.
You can always return to this page later to add or remove users.
E-Mail Aliases
It is also a good idea to set up e-mail aliases for some standard addresses such as:
abuse@mail.example.comhostmaster@mail.example.comnoc@mail.example.compostmaster@mail.example.comsecurity@mail.example.comwebmaster@mail.example.com
You can create these aliases by clicking on the @ symbol in the “Mail domains” section in the “Manage” column.
Many big providers and some anti-abuse systems expect domains to have working
abuse@andpostmaster@addresses. You can simply forward these aliases to your main admin inbox so you do not have to check multiple accounts.
Testing
At this point your mail system should be ready to go. To verify that everything is in good shape, you should perform a couple of tests.
Self-Mail Test in the Snappy Webmail Interface
Log out of the Admin Web Interface and log in to the Snappy Webmail interface by browsing to mail.example.com.
Use your newly created e-mail user’s username and password, then click Sign in Webmail.
As a first step, check that you can send an e-mail to yourself.
If that works: congratulations!
If that does not work, check the logs where you executed docker compose up to start your Mailu stack and look for errors. From there, fix the first error you see and try again.
Check SSL/TLS Certificates
You can perform both checks on the VPS where Traefik is running on.
# Check the SSL/TLS certificate for the IMAP connection at the Traefik level
> openssl s_client -connect mail.example.com:993 -servername mail.example.com -crlf -quiet

# Check the SSL/TLS certificate for the SMTPS (SMTP over implicit TLS/SSL) connection at the Traefik level
> openssl s_client -connect mail.example.com:465 -servername mail.example.com -crlf -quiet
With openssl s_client you should see:
- The certificate chain (look for
subject=andissuer=lines). SSL-Sessioninformation showing a modern protocol (for exampleTLSv1.3).- A line like
Verify return code: 0 (ok)if everything is valid.
If verification fails, double-check your Traefik configuration (cert resolver, domains, SNI).
Configure Mail Client KMail
Next, configure a mail client like KMail or Thunderbird. Use parameters like the following:
- IMAP Server:
mail.example.com - Encryption: SSL/TLS
- Port: 993
- Username:
user@mail.example.com - Password: your credentials.
- Outgoing mail server (SMTP):
mail.example.com - Encryption: SSL/TLS
- Port: 465
- Username:
user@mail.example.com - Password: your credentials.
Some clients try “auto configuration” and may suggest different ports or non-encrypted connections. Always double-check that:
- IMAP uses port 993 with SSL/TLS.
- SMTP uses port 465 with SSL/TLS (implicit TLS), or 587 with STARTTLS if you configured it that way.
Once the client is connected, you should see your test e-mail from the previous webmail test in your inbox.
Now send another test e-mail to yourself using your newly configured mail client. If it shows up in webmail and in the client, your basic send/receive path is working.
Receiving External E-Mail
Next, check if your mail server is reachable by other mail servers via the public internet.
As port 25 is often blocked by ISPs on home networks, you need to run this test from a second VPS that can connect to port 25 on your mail server mail.example.com.
The following command tests basic connectivity:
> telnet mail.example.com 25If this does not work (for example, it hangs or cannot connect), then most likely port 25 is blocked by the internet provider.
You can also check that your mail server responds correctly using the swaks (Swiss Army Knife for SMTP) tool:
> swaks --server mail.example.com --port 25 --timeout 60 --quit-after HELOIf that works, you should be able to receive e-mails from the outside.
Verify this by using another e-mail account (for example, on a different provider) and sending a test message to user@mail.example.com.
If the test e-mail does not arrive:
- Check the sending provider’s bounce message (if any).
- Look at the SMTP logs in Mailu (
docker compose logs -f smtp). - Confirm that your DNS MX record points to
mail.example.comand not to an old hostname.
Sanity Checks
Finally, run some sanity checks on your mail system:
- SMTP Diagnostics: enter your mail server address, for example
mail.example.com. - Open Relay Test: enter your mail server address, for example
mail.example.com. - Domain Score (DMARC Score, SPF Score): enter your domain name, for example
example.com. - Test the Spammyness of your Emails: follow the on-screen instructions and send an e-mail to the address they give you.
- If you activated TLSA, you can use this free tool to validate your configuration: DANE/TLSA validator for inbound SMTP services.
Pay special attention to:
- Open relay: this must be closed. An open relay will quickly get your server blacklisted.
- SPF, DKIM, DMARC: these should all pass for messages you send to test services. They strongly influence deliverability.
- Reverse DNS (PTR record): your IP should resolve back to a hostname that matches (or is consistent with) your mail server’s identity.
Congratulations! At this point, you should have finished setting up your own e-mail server and confirmed that it works correctly.
Conclusions
In this guide, you’ve learned how to set up your own Mailu e-mail server behind traefik as a reverse proxy, with a small VPS in front and your main server safely running at home.
By hosting your own instance, you keep full control over your messages, metadata, and configuration instead of relying on a large provider.
You now have:
- A Mailu stack running on your home server.
- Traefik on a VPS acting as the internet-facing entry point.
- DNS, TLS, and basic deliverability checks in place.
- A setup that is private by design: the VPS only forwards encrypted traffic, while your data stays at home.
Running your own mail server is not “set and forget”, but with this architecture you have a strong, privacy-respecting base that you fully own.
Appendix
E-Mail Encryption (S/MIME, Autocrypt-PGP, WKD-PGP)
With the Mailu setup you built in this guide, you are already in a good position for privacy, especially if you run Mailu only for yourself at home and mainly communicate with other people who do the same. As long as your devices stay uncompromised, your messages are only accessible to you and your communication partners, with only limited metadata visible. From the outside world, only the connections between mail transfer agents (MTA-to-MTA) are visible. From that perspective, end-to-end encryption might look optional.
In normal e-mail, some metadata is always visible to the servers that relay your messages: sender, recipient, subject line, dates, and the servers that handled the message. The body may be protected in transit with TLS, but it is usually stored in clear text on each mail server unless you add end-to-end encryption.
So when does encryption add real benefits? It helps a lot when you communicate with people who use mail services run by other people or organizations (for example, big webmail providers or company servers). It is also useful if you worry that your home server could be compromised in the future. In these situations, end-to-end e-mail encryption makes sure that the message content (not the metadata) can only be decrypted on the endpoints (desktop PCs or mobile devices) when the recipient actually reads it.
Also, if you want to open up your Mailu installation on your home server for family and friends, encryption is a good idea. It means that, even as the server administrator, you technically cannot read the content of their e-mails, even if you wanted to.
All the work we do in this chapter of the appendix will also prepare us for the next chapter, where we will talk about Delta Chat, a decentralized and secure messenger app that uses e-mail and encryption as its backend. With the recently released Delta Chat Version 2, chats are end-to-end encrypted, always and by default. But more about that in the next chapter.
For your full understanding of the limitations of e-mail encryption more broadly here are a few good online write-ups that discuss the subject-line and other metadata limitations:
- Email Security on Privacy Guides: explains that metadata (including Subject) remains visible even when the body is encrypted.
- Email Encryption Options: SMTP TLS vs PGP vs S/MIME vs Portal Pickup on LuxSci blog: states clearly that PGP does not encrypt headers (sender, recipient, subject) and outlines implications.
- 15 reasons not to start using PGP on SecuShare: enumerates many practical limitations of PGP/e-mail and includes the subject-line / header metadata issue.
E-Mail Encryption Options
Currently, three main techniques are used for end-to-end e-mail encryption: S/MIME, Autocrypt-PGP, and WKD-PGP.
S/MIME’s big advantage over Autocrypt/WKD-PGP is how identity and trust are handled and how well it integrates with “normal” mail clients (especially corporate Outlook / Apple Mail setups). For a single private user, that can be useful if you talk a lot with people in more formal or enterprise environments. Otherwise, Autocrypt/WKD is usually simpler and at least as private for everyday use.
- S/MIME: Uses X.509 certificates issued by a certificate authority (CA). Trust is hierarchical: your mail client trusts certain CAs in its root store, and a CA vouches that this public key belongs to this e-mail address (and maybe name/organisation).
- Autocrypt: A convenience layer on top of OpenPGP. Your mail client automatically attaches your OpenPGP public key in a header and learns your peers’ keys from their headers. It intentionally does almost no key verification (opportunistic security), focusing on making encryption “just happen” between normal users.
- WKD (Web Key Directory): A way to publish and fetch OpenPGP keys via HTTPS from the domain of the e-mail address (e.g.
https://openpgpkey.example.com/...). The domain effectively vouches for the key, which makes key discovery more reliable and less phishing-prone than random keyservers.
Conceptually, S/MIME and PGP solve the same problem (encrypt and sign e-mail), but they live in different ecosystems. S/MIME is widely used in companies with central IT that can provision certificates. PGP-based solutions are more common in the open-source and privacy communities and make it easier for individuals to generate and manage their own keys.
WKD-PGP is also how Proton Mail handles e-mail encryption. Proton leans into OpenPGP for standardisation and interoperability with other PGP users and tools. Proton optimises for “use battle-tested OpenPGP so we can work with the rest of the ecosystem,” accepting PGP’s subject-line limitation (for now). Proton also developed its own OpenPGP certificate authority (CA) to improve trust in keys.
Another privacy-focused e-mail service that often comes up in conversations is Tuta (formerly Tutanota). Tuta’s encryption is more “closed” but very metadata-protecting and moving to post-quantum cryptography. They explicitly do not use PGP or S/MIME, citing lack of subject encryption, poor algorithm agility, no Perfect Forward Secrecy (PFS), and the EFAIL history, among other reasons. In PGP e-mail encryption, the message body and attachments are end-to-end encrypted, but e-mail subject lines are not. Proton, for example, protects subject lines on Proton’s servers (zero-access), but these are not end-to-end encrypted when crossing the normal e-mail network. This is a limitation of PGP’s current e-mail format, not something specific to Proton.
S/MIME
Unfortunately, the set of trusted certificate authorities (CAs) that issue free, long-lived S/MIME certificates is very small.
As of sources around 2022 - 2025:
- Actalis (Italy) offers one free mailbox-validated S/MIME certificate per account for private use (valid for one year).
- Wikipedia still lists several “free for private use” S/MIME offers (Actalis, WISeKey, short trials from GlobalSign, Secorio, etc.), but many of these are short-lived (1 - 3 months) or positioned as trials rather than stable, long-term options.
If your employer or university runs its own public key infrastructure (PKI), you might get an S/MIME certificate from them, but that usually ties your identity to that organisation and is meant for work or study, not for a private, long-term mailbox on your own domain.
There is also a common catch with (most) free S/MIME offerings, including Actalis: the CA generates your key pair on the server and then sends you a PKCS#12 (.p12 / .pfx) file to import. That means the CA has had your private key at least once, even if they promise to discard it.
Some commercial S/MIME products allow you to generate your own key pair locally and send only a certificate signing request (CSR), which is better for privacy, but this is rare in the free personal segment.
Because of these limitations (few free options, short validity, and server-generated keys), I will not go deeper into S/MIME in this guide and will instead focus on OpenPGP-based options that give you full control over your own keys.
Autocrypt
Autocrypt is designed to make OpenPGP encryption “just work” between normal e-mail users, even if they never think about keys. To keep things simple, it deliberately does not try to detect man-in-the-middle (MITM) attacks or spoofing: the key in the header can be silently replaced by an active attacker who sends spoofed mail, and users are not warned when keys change.
This design choice trades strong identity verification for easy everyday encryption. Autocrypt assumes that most attackers cannot reliably intercept and modify all your messages, and that for many users “some encryption most of the time” is still a big improvement over “no encryption at all”.
Autocrypt is mainly supported by privacy-oriented e-mail clients such as K-9 Mail, Thunderbird (with built-in OpenPGP), and KMail. Support is improving, but it is still not as widely deployed as S/MIME in large corporate environments.
Autocrypt also tries to be “automatic”, but the trust story is very different. S/MIME’s trust is rooted in the CA store the client already uses and understands; Autocrypt’s is closer to TOFU (Trust on First Use): “I saw a key in a header once, so I’ll just trust it from now on.”
In practice, this means Autocrypt is great for people who mostly care that their everyday mail to friends and family is encrypted with minimal setup. It is less ideal if you need strong guarantees that you are always talking to the right cryptographic identity (for example, in high-risk or professional threat models).
To verify that Autocrypt is configured correctly in your e-mail client use the “view headers” feature of your e-mail client. This gives you the raw headers so you can inspect them. According to the Autocrypt Level 1 specification, the header has these fields:
Autocrypt: addr=you@example.com;
           prefer-encrypt=mutual|nopreference;
           keydata=<BASE64 of full public key>
Web Key Directory (WKD)
Web Key Directory (WKD) is a way to publish and fetch OpenPGP keys via HTTPS from the domain of the e-mail address (for example: https://openpgpkey.example.com/...).
The domain effectively vouches for the key, which makes key discovery more reliable and less phishing-prone than using random keyservers.
If you use OpenPGP/GnuPG for e-mail security, consider publishing your public key with Web Key Directory.
It is usually much easier than it looks at first. If you followed this guide, you are already sending e-mail from your own domain (for example: user@example.com) and you have a publicly reachable virtual private server (VPS) running Traefik as a reverse proxy.
That is already enough to make WKD-PGP work.
You only need to publish your public key at a specific URL location on your VPS, so that WKD-aware tools can find it. Traefik will simply serve these files over HTTPS like any other static content.
WKD has two publishing modes (“direct” and “advanced”), but both boil down to placing your OpenPGP keys under a
/.well-known/openpgpkey/path on a host such asopenpgpkey.example.comor your main domain. Tools like GnuPG can generate the correct file layout and hashes for you, so you usually do not have to care about the exact URL structure.
When a sender uses a supporting mail client and adds an e-mail address to a message, the client will automatically check whether WKD is set up for the receiver’s domain. If a public key is found, it is fetched and imported into the keyring, allowing secure communication without the user having to search keyservers or exchange keys manually.
Tooling: GnuPG, Kleopatra Certificate Manager, and KMail
The workhorse for OpenPGP encryption is The GNU Privacy Guard, or GnuPG (gpg) for short.
It is a powerful command-line tool that implements the OpenPGP standard.
But PGP is quite involved and comes with many command-line switches that are hard to remember. I personally prefer to use the Kleopatra certificate manager on the desktop. Kleopatra is an open-source certificate manager and graphical front-end for cryptographic services, mainly designed to handle OpenPGP and S/MIME (X.509) certificates. Under the hood, Kleopatra is “just” a GUI for GnuPG, so you can freely mix use of the command line and the graphical interface.
On Windows, Kleopatra is typically installed as part of Gpg4win. On most Linux distributions, it is available as a normal package (often called
kleopatra) and integrates nicely with the KDE desktop. Either way, the keys you create are stored in the same GnuPG keyring thatgpguses.
To create a PGP key for your e-mail account in Kleopatra, go to
File > New OpenPGP Key Pair.... Enter your name and the e-mail address you want to use, then follow the wizard. You should protect your private key with a strong password (passphrase).
After creating the key, export and safely store a revocation certificate and a backup of your private key. A revocation certificate lets you mark the key as invalid if you ever lose control of it or forget the passphrase.
I use KeePassXC as a password manager and as a backup store for my secrets. KeePassXC is just an encrypted container (KDBX). KeePassXC should be a backup/transport vault, not a replacement for GnuPG’s own keyring. Whether this is a “good idea” depends on your threat model:
- You already trust KeePassXC with everything else (online banking passwords, etc.).
- You use a strong master password, maybe a keyfile, and sane KDBX settings.
Pros of this approach:
- You get a central, encrypted backup of your GPG key, protected twice: by the key’s own passphrase and by the KeePassXC database encryption (KDBX uses AES/ChaCha20 + Argon2; with a good master password/keyfile this is strong).
- It is very convenient for restoring keys after reinstalling, setting up new machines, and avoiding permanent key loss (a surprisingly common problem).
The pattern is:
- Store your GPG passphrase as a KeePassXC entry.
- Attach files to that entry (ASCII-armored public and secret key export, revocation certificate, ownertrust backup).
You can use Kleopatra to export the public key (right-click on the key →
Export...) and the secret key (right-click on the key →Backup Secret Keys).
For command-line users, something like this works:# list all your keys gpg --list-keys # public key (ASCII armored): gpg --export --armor 'you@example.com' > you-public.asc # secret key (ASCII armored): gpg --export-secret-keys --armor 'you@example.com' > you-secret.asc # optional: trust settings gpg --export-ownertrust > ownertrust.txt # strongly recommended: revocation certificate gpg --output revoke-you.asc --gen-revoke 'you@example.com'
KMail is the KDE e-mail client. Autocrypt support was added in KDE Gear 21.04, and KMail also implements WKD (Web Key Directory). KMail delegates all Autocrypt-PGP and WKD-PGP related operations to the underlying GnuPG, so you get the same cryptographic engine everywhere.
To enable encryption in KMail:
-
Open
Settings > Configure KMail… > Security > Encryption.
Simply turn on all the OpenPGP-related options-checkboxes (Autocrypt and WKD). For all other values, the defaults are fine; you mostly just need to enable the features. -
Then go to
Settings > Configure KMail… > Accounts.
Select the account you want to use with encryption, clickModify…, then go to theCryptographytab. -
Choose the PGP key that matches your e-mail address.
Enable “Use same key for encryption and signing” so that KMail uses that key for both actions. -
In the Autocrypt section, check all the checkboxes for this account.
And in the “Overwrite defaults” section, also check all the checkboxes in that section.
That’s it: KMail will now use your GnuPG key for Autocrypt-PGP and WKD-PGP, and will try to encrypt mail automatically whenever it can find a key for your contacts.
Make sure WKD lookups are used (GnuPG side): KMail doesn’t speak WKD directly; it asks GnuPG to locate keys by e-mail address, and GnuPG’s
auto-key-locatemechanism decides how (local keyring, WKD, keyservers, etc.). Any MUA that uses--locate-keysbenefits from WKD this way.On most modern GnuPG installations, WKD is already part of the default
auto-key-locatechain. If you want to be explicit:
- Open
~/.gnupg/gpg.confin a text editor.- Add or adjust a line like:
auto-key-locate local,wkd,keyserver
local- check existing keys in your keyring.wkd- query recipients’ domains via Web Key Directory.keyserver- fall back to configured keyserver(s).
Setting up OpenPGP Web Key Directory
The following steps should be performed on your virtual private server (VPS) where Traefik is running.
I assume that the dockerized Traefik lives in /opt/traefik and that you run all commands from that directory.
I will set up the so-called advanced WKD layout, which is only slightly more complex than the “direct” method. The advanced method is good for multi-domain and “WKD as a service” use cases. That matters if you want to serve several e-mail domains with the same VPS/Traefik/home server/Mailu infrastructure. In that case, all domains can be served by the same backend, while each e-mail domain still has its own WKD URL pattern.
For each of your mail domains you need a DNS A record (and optionally AAAA for IPv6; CNAME can also work) similar to openpgpkey.mail.example.com pointing to your VPS IP address.
The target directory structure will look like:
./wkd/
  nginx.conf
  public/
    .well-known/
      openpgpkey/
        mail.example.com/
          policy
          hu/<32-char-hash-for-user>   # binary key (gpg --export)
        example.com/
          policy
          hu/<32-char-hash-for-user>   # binary key (gpg --export)
        abc.xyz/
          policy
          hu/<32-char-hash-for-user>   # binary key (gpg --export)
We start with the setup for the mail.example.com domain:
mkdir -p ./wkd/public/.well-known/openpgpkey/mail.example.com/hu
touch ./wkd/public/.well-known/openpgpkey/mail.example.com/policy
The policy file can be empty.
The <32-char-hash-for-user> and the binary key can be generated via:
gpg-wks-client --print-wkd-hash user@mail.example.com
# or
gpg --with-wkd-hash -k user@mail.example.com

# Use the hash that you see on screen as the file name of the binary public key:
gpg --export --export-options export-minimal \
    -o /opt/traefik/wkd/public/.well-known/openpgpkey/mail.example.com/hu/<32-char-hash-for-user> \
    user@mail.example.com
Next, create a docker-compose-wkd-for-mailu-domains.yml file in the /opt/traefik directory:
services:
  wkd_nginx:
    image: nginx:1.29.3
    container_name: wkd_nginx
    restart: unless-stopped
    networks:
      - main
    volumes:
      # WKD static files:
      - ./wkd/public:/usr/share/nginx/html:ro
      # nginx vhost / WKD-specific config
      - ./wkd/nginx.conf:/etc/nginx/conf.d/wkd.conf:ro
    labels:
      - traefik.enable=true
      - traefik.docker.network=main

      # Route WKD HTTPS traffic from Traefik to this container
      - traefik.http.routers.wkd.entrypoints=web-secure
      - traefik.http.routers.wkd.rule=Host(`openpgpkey.mail.example.com`)
      - traefik.http.routers.wkd.tls=true

      # Use the Cloudflare dns-01 resolver
      - traefik.http.routers.wkd.tls.certresolver=cf-dns

      # Service (nginx listens on 80 in the container)
      - traefik.http.services.wkd.loadbalancer.server.port=80

networks:
  main:
    external:
      name: traefik_default
And an nginx.conf file at ./wkd/nginx.conf:
server {
    listen 80 default_server;
    server_name _;

    # WKD files live under:
    #   /usr/share/nginx/html/.well-known/openpgpkey/mail.example.com/...
    root /usr/share/nginx/html;

    # Serve WKD content for advanced method
    #
    # For user@mail.example.com the client will fetch:
    #   https://openpgpkey.mail.example.com/.well-known/openpgpkey/mail.example.com/hu/<hash>?l=user
    #
    # Files you need on disk:
    #   .well-known/openpgpkey/mail.example.com/policy           (can be empty)
    #   .well-known/openpgpkey/mail.example.com/hu/<hash>        (binary public key)
    #
    location /.well-known/openpgpkey/ {
        # Serve as binary blob (recommended for WKD)
        default_type  application/octet-stream;

        # Allow cross-origin fetches
        add_header    Access-Control-Allow-Origin * always;

        # Don't auto-index directories
        autoindex     off;

        # Make sure only existing files are served
        try_files     $uri =404;
    }
}
Once that is done, start this Compose file:
docker compose -f docker-compose-wkd-for-mailu-domains.yml up -dVerify your setup
First, check that DNS for openpgpkey.mail.example.com points to your VPS:
# The second parameter is the authoritative DNS server; for my setup it is a Cloudflare DNS server
nslookup openpgpkey.mail.example.com sandra.ns.cloudflare.com
# or
dig @sandra.ns.cloudflare.com openpgpkey.mail.example.com A +short

# If the following does not show a result, some DNS server in the path may not have updated its cache yet
nslookup openpgpkey.mail.example.com
# or
resolvectl query openpgpkey.mail.example.com
If the DNS names have not propagated yet to your local resolver, you can temporarily point your network interface to a public DNS server:
# Find the network interface name
ip link
# or
nmcli device status

# Set the DNS (example using Cloudflare DNS)
resolvectl dns <ifname> 1.1.1.1

# You can undo this setting with
resolvectl revert <ifname>
# or by using NetworkManager to disconnect and reconnect the interface
Next, check that the TLS certificate was correctly issued via Traefik and the Let’s Encrypt ACME protocol:
openssl s_client -connect openpgpkey.mail.example.com:443 -servername openpgpkey.mail.example.com -crlf -quietThen check on raw HTTPS level that the key file can be fetched:
curl -I "https://openpgpkey.mail.example.com/.well-known/openpgpkey/mail.example.com/hu/<hash>?l=user"Once all the above is working correctly, the actual WKD “magic” should work as expected:
# Only check that the key is present (do not import into your keyring)
gpg -vv --auto-key-locate clear,nodefault,wkd --locate-external-keys user@mail.example.com

# Import the key into your keyring using WKD
gpg --auto-key-locate local,wkd --locate-keys user@mail.example.com
# or, if you also want to fall back to keyservers:
# gpg --auto-key-locate local,wkd,keyserver --locate-keys user@mail.example.com
Once keys are imported via the WKD method, you can see origin=wkd with:
gpg --list-keys --with-key-originYou can also configure Kleopatra to show the
Origincolumn, so you can visually confirm that a key came from WKD.
Interoperability with Proton Mail
Sending and receiving encrypted e-mails between your Mailu instance (with WKD-PGP) and Proton Mail should work out of the box. Both sides speak WKD-PGP and can fetch the other side’s public key automatically, so they can mutually encrypt e-mails without manual key exchange.
The one extra thing you can do on both sides is to make sure that the relevant keys are treated as trusted keys.
Trusting Keys from Proton
On your Mailu side, I suggest you import the key from the ProtonCA. Proton developed its own OpenPGP certificate authority (CA), ProtonCA, and began signing encryption keys to guarantee that they belong to a specific Proton account.
ProtonCA exists because Proton is uniquely positioned to act as a CA for its own users: they control the e-mail domain and can easily confirm that a specific key belongs to a particular Proton e-mail address. While Proton users themselves may not notice a big change, this makes life much easier for people using PGP to send end-to-end encrypted e-mails to Proton users. No matter how you obtain a Proton user’s PGP key, you can be confident it is valid and recent (actively used within the past six months) if it is signed by ProtonCA.
To avoid certifying old keys, ProtonCA enforces a strict expiration policy.
Each key is certified for six months at a time.
A month before a certificate expires, ProtonCA checks whether the associated e-mail address is still active and the current key has not been removed.
If both criteria are met, ProtonCA renews the certification for another six months.
You import the ProtonCA key into your local keyring via:
# Use the WKD protocol directly
gpg -vv --auto-key-locate clear,nodefault,wkd --locate-keys openpgp-ca@proton.me

# or use the ProtonCA API
curl 'https://mail-api.proton.me/pks/lookup?op=get&search=openpgp-ca@proton.me' | gpg --import
Before you continue, you should check the fingerprint, which you can find on the ProtonCA website: 0a8652fe5d53386057899fe9d806c1af5978e8c7.
Proceed only if the fingerprints match.
When you verify a signature or encrypt to someone, GnuPG distinguishes between:
- Validity / certification - “Have you (or a trusted CA) checked that this key really belongs to
user@domain?”- Ownertrust - “Do you trust this key’s owner (or CA) to sign other people’s keys correctly?”
ProtonCA is meant to be an entity you give high ownertrust to, because it vouches for many Proton users’ keys.
In Kleopatra, you can now:
- Right-click the ProtonCA key and choose “Certify…” with one of your own keys (trust level “ultimate”).
- Then right-click again and choose “Change Certification Power…” to give it the power to certify other keys.
The first step tells GnuPG that you trust the ProtonCA key after checking its fingerprint. The second step tells GnuPG that you are willing to use the ProtonCA signatures to calculate the validity of keys ProtonCA has signed (that is, you accept the ProtonCA trust chain).
If you prefer to use GnuPG directly on the command line, you can do:
gpg --edit-key openpgp-ca@proton.me
gpg> lsign        # locally sign the ProtonCA key
gpg> save
gpg> trust        # set to "full" (4)
gpg> save
From that moment on, keys fetched from Proton WKD should have an automatic validity of “full”. In KMail, that will show up as a green “Signed by” envelope around the e-mail message.
IMPORTANT: Currently, in November 2025, there seems to be a bug in ProtonCA’s renewal process, and I opened a support ticket with them. I checked several keys of people whom I know are using Proton Mail regularly, and many of those certifications end in October 2025.
Trusting Keys from Any Other Source
For any other key that you want to trust - after you have verified the key fingerprint through an independent communication channel like an instant messenger, phone call, or in person - you can use a similar process in Kleopatra:
- Right-click the key.
- Choose “Certify…” and certify it with one of your own keys (trust level “ultimate”).
This tells GnuPG that you have personally checked that this key belongs to that e-mail address.
Making Proton Trust Your WKD Key
On the Proton Mail side, you can also mark your Mailu/WKD key as trusted.
- Sign in to your Proton account and go to “Contacts”.
- Pick the Mailu user account for which we set up WKD-PGP.
- Click the e-mail settings icon (gear wheel).
- Click “Show advanced PGP settings”.
There you will see the fingerprint of your WKD key. Under “Actions” you can choose “Trust” once you have verified that the fingerprint matches your local record.
Proton has a support article explaining the different lock colours and what they mean: How to check encryption status using lock icons.
Managing Your E-Mail Domain via Proton
Sadly, ProtonCA will only sign keys that belong to e-mail addresses hosted by Proton (their own domains or custom domains you host through Proton). It is not a general “bring any e-mail address and we’ll sign it” service like a public TLS CA.
If you point example.com’s MX DNS record to Proton and use Proton Mail to host you@example.com, then:
- Proton will manage (or at least store) the OpenPGP key for that account, and
- ProtonCA will sign that key as belonging to
you@example.com.
You can then export that Proton-signed key and use it in GnuPG, Thunderbird, etc.
So if you are okay with using Proton Mail (including with your own domain):
- Move the address to Proton.
- ProtonCA will automatically sign the key for that address.
- You can then export and reuse that certified key anywhere.
Proton Threat Model
When describing S/MIME above, I mentioned a common catch with (most) free S/MIME offerings: the CA generates your key pair on the server and then sends you a PKCS#12 (.p12 / .pfx) file to import.
That means the CA has had your private key at least once, even if they promise to discard it.
There is a conceptual similarity between “the CA controls the key generation” and “Proton controls the client that generates my key”.
The reason people complain more loudly about CA-generated keys is:
- In that case, third-party access to your private key is certain and systemic.
- With Proton, access is not required by the design - it would require an active, in-principle detectable betrayal (for example, shipping a malicious client or being forced to do so).
From a paranoid point of view, it is absolutely fair to keep this in mind and to treat Proton’s “we don’t have your key” as: “we designed it so we don’t have your key, assuming we are honest and our client builds are what we say they are.”
For that reason, I would argue that following this guide and setting up your own Mailu instance on your home server under your control is still superior to handing over your e-mails to any third-party service, even privacy-focused ones like Proton Mail.
Serving Several Mail Domains With One Mailu Instance
In the main part of this blog post we have set up a single e-mail domain.
You use a DNS MX record for mail.example.com, and the DNS A and AAAA records for that host resolve to mail.example.com.
One Mailu server instance can however handle e-mail for many different domains at the same time.
In this appendix I would like to review some of the options you have for doing that in a clean and maintainable way.
Let us assume that your Mailu setup for the domain abc.com is working fine.
After that success you would like to add the domains abc.net and xyz.com.
You can think of abc.net and xyz.com as brand e-mail domains.
Every user in the organisation that owns user@abc.com should also get an e-mail address at user@abc.net and at user@xyz.com.
Conceptually, each person in the organisation can end up with three different addresses across these domains.
The main design question or dilemma at this point becomes: how many real mailboxes per user should you set up?
Option A: Full separation with one real mailbox in each domain: In the first option you keep everything completely separated. For each user you create three independent real mailboxes:
user@abc.comuser@abc.netuser@xyz.com
Each of these mailboxes has its own login credentials and its own storage. The user then configures three accounts in their mail client and handles them as three separate identities and inboxes.
This model is easy to understand conceptually, because what you see is what you get: every domain has its own users, its own inboxes, and can be administered almost like a standalone system.
Option B: One primary mailbox with forwarding or aliases from brand domains: In the second option each user has one main mailbox, for example user@abc.com.
The additional brand addresses are then mapped onto this primary mailbox using forwarding or aliases. For example:
user@abc.netforwards touser@abc.comuser@xyz.comforwards touser@abc.com
The user only configures one account, user@abc.com, in their mail client. They still receive all messages sent to user@abc.net and user@xyz.com, but everything arrives in the same inbox.
In Mailu, “aliases” are generally preferable for brand addresses that should share one mailbox. “Forwarding” is a per‑user feature and is more appropriate for “send everything from this mailbox to Gmail / another provider”.
If they need to reply with the exact brand domain, they can configure multiple identities or sender addresses in their desktop or mobile client.
Many mail clients support the idea of one technical account with several identities. The account defines how you log in (IMAP and SMTP login), while identities define which
From:address and display name are used for a specific message.
Concerns and potential problems: The “one mailbox, many identities” setup is very convenient for users and administrators, but it comes with a few concerns that you should consider.
One important risk is user error. A user might accidentally reply from the wrong domain if they are not paying attention to the From address.
For some organisations this is only a cosmetic issue, but for others it can be confusing or even unprofessional if a reply suddenly comes from @abc.com instead of @abc.net.
A simple and effective mitigation is to use mail filters in the primary mailbox, usually user@abc.com.
You can route e-mails that were originally sent to user@abc.net or user@xyz.com into separate folders, so that it is visually clear which domain they came in on.
For example, you can create folders such as Brand/abc.net and Brand/xyz.com and define rules that move messages based on the recipient address.
In KMail you can bind an identity to a specific folder: right‑click the folder → Properties… → General tab, uncheck Use default identity and select the desired identity. When you reply from that folder, KMail will use that identity automatically.
This way users get a clear visual hint for which identity they should use when replying. In practice this can be a good compromise that reduces complexity but still keeps the different brands visible and understandable.
GPG / PGP and WKD (Web Key Directory)
Because we already have a Web Key Directory set up with the advanced directory layout and it is working correctly for abc.com, the question now arises how to handle cryptographic keys across the three domains.
Should each e-mail address (user@abc.com, user@abc.net, user@xyz.com) have its own PGP key, so that each user manages three separate keys?
Or is it acceptable and practical to use one PGP key tied to the person behind user@abc.com and use that same key for all three e-mail addresses?
OpenPGP was designed with the idea of one key per person and multiple e-mail addresses as additional user IDs (UIDs) on that key. Most modern mail clients and WKD implementations handle this pattern very well. Using three different keys for one human quickly becomes painful when you later need to rotate keys, move to a new device, or revoke access, because you must perform each operation three times and communicate the changes to all contacts.
DNS, hostnames, and IP addresses (including rDNS considerations):
Right now, we use something like the following:
mail.abc.comas the main mail host, with an A/AAAA record pointing to the Mailu server.
You might now wonder whether you should also create brand specific hostnames, for example:
mail.abc.netmail.xyz.com
The question is whether there is a benefit in having a separate mail hostname for each domain, for example for branding, TLS certificates, or reputation, compared to using a single hostname for all domains, such as only mail.abc.com.
If we do create mail.abc.com, mail.abc.net, and mail.xyz.com, do we also need separate IP addresses for each hostname in order to set appropriate rDNS (reverse DNS) for each hostname and avoid any negative impact on spam scoring?
Or is it acceptable to have several mail hostnames pointing to the same IP address, use a single rDNS name, and still maintain good deliverability and reasonable spam scores?
In practice most receiving mail servers mainly check that the sending IP address has a valid reverse DNS entry and that the hostname given in the SMTP
EHLOorHELOgreeting resolves back to that same IP. Using one shared IP and one consistent rDNS name for several domains is very common. Separate IP addresses make sense when you want strict separation between tenants or very different reputations, but they are not required for a small self hosted setup like the one we build with Mailu.
These are many questions at once. In the following sections I will first show how a fully separated setup would look, and then I will suggest a slimmed down configuration that serves the same purpose but reduces administrative overhead significantly.
mailu.env vs. configuration in the admin GUI
Before we go deeper into multi domain setups, there is one important remark: in everyday operation you usually do not change mailu.env when you add extra mail domains.
You only need to touch mailu.env if you also introduce new hostnames (for example mail.xyz.com) that should terminate TLS on this server.
In the normal case you simply add xyz.com in the Mailu admin GUI under Mail domains → New domain.
Mailu will then show you exactly which DNS records you have to set up so that this additional mail domain works correctly.
Mailu uses two different but related concepts in mailu.env:
DOMAIN(inmailu.env) describes the main mail domain of your installation. This domain is used for things like bounce addresses and DMARC reports. It is mostly an internal or default identity that represents “this Mailu installation as a whole”.HOSTNAMES(inmailu.env) lists the hostnames that clients connect to for IMAP, SMTP and webmail. These are also the hostnames for which Mailu will request TLS certificates when you use Let’s Encrypt. You can list several hostnames here, separated by commas.
A practical way to think about it is the following:
DOMAINis about “who am I” as a mail system when I need a default domain name, for example forpostmasteraddresses or for internally generated messages.HOSTNAMESis about “where do clients and other servers reach me” on the network level, and which names must be covered by valid TLS certificates.
Whenever you change mailu.env you will need to recreate or restart the Mailu containers so that the new values are applied.
In contrast, changes done through the admin GUI are stored in the database and take effect immediately without touching the containers.
The actual mail domains that you serve to your users, such as abc.com or xyz.com, live in the Mailu database and are managed through the admin GUI under "Mail domains".
This part is separate from mailu.env and is where you define which e-mail domains exist, which users and aliases they contain, and how they behave.
Three real mailboxes per user and separate PGP keys per email address
In the fully separated setup you adapt HOSTNAMES in mailu.env so that it lists one hostname per mail domain, including the usual auto-configuration helpers:
HOSTNAMES=mail.abc.com,autoconfig.abc.com,autodiscover.abc.com, mail.abc.net,autoconfig.abc.net,autodiscover.abc.net, mail.xyz.com,autoconfig.xyz.com,autodiscover.xyz.comYou would also use three different IP addresses for mail.abc.com, mail.abc.net, and mail.xyz.com and set up DNS A and AAAA records and rDNS for each of them.
Using separate IP addresses is not technically required for basic mail delivery, but it gives you the option to separate reputation and blacklisting between domains. If one brand gets into trouble with spam filters, the other brands are less likely to be affected if they use different IPs with their own reverse DNS. This is a pattern that commercial mail hosting providers sometimes use when they host several independent customers.
Next, you create three different mail domains in the Mailu admin GUI, which later correspond to MX records:
abc.comabc.netxyz.com
Then, in DNS, you point each domain’s MX record at the appropriate mail hostname (e.g. abc.com → mail.abc.com, abc.net → mail.abc.net, etc.).
Mailu itself doesn’t care which hostname was used, as long as they all resolve to your server.
In Mailu the association “domain → mail hostname” is done purely in DNS, not in Mailu’s database:
- Mailu just knows about domains (
abc.com,abc.net,xyz.com).HOSTNAMESis a global list of hostnames the stack answers as and requests TLS certs for.- Which domain uses which hostname is decided by your MX records.
After that you create three real mailboxes per user:
user@abc.comuser@abc.netuser@xyz.com
Each of these is a real Mailu user with its own login and its own mailbox. The server treats them as three independent accounts.
For PGP and WKD you use a separate key for each e-mail address. Each of the three addresses gets its own OpenPGP key and its own user ID (UID). You then publish the corresponding public keys in the WKD directory structure on the associated web server for each domain, so that clients can automatically discover the correct key for each address.
On the user side, people set up each mailbox separately in their mail client.
They work with three independent inboxes, and each mailbox has its own PGP key as cryptographic identity.
This is very explicit: when they send from user@xyz.com, they also use the PGP key that belongs to user@xyz.com.
So the "Everything separate, maximum isolation" setup looks like this:
- Mailboxes: one real mailbox per domain (
user@abc.com,user@abc.net,user@xyz.com). - PGP and WKD: one separate key per address, published in the WKD of the corresponding domain.
- DNS and rDNS: separate hostnames per domain, with their own A and AAAA records and reverse DNS entries, usually backed by multiple IPs.
Pros
This design gives you crystal clear separation of brands at every layer. Each domain has its own hostname, its own mailboxes, its own cryptographic keys, and potentially its own IP space. You can move, revoke, or rotate keys, certificates, and IPs on a per domain basis without touching the others.
If later you decide to migrate only
xyz.comto a different provider or a different physical server, you can move that one domain with its IP, MX, and WKD setup and leave the rest untouched. This kind of isolation can be attractive for small commercial hosting or when you plan to sell or spin off one of the brands.
Cons
The price you pay is complexity and overhead, especially for a hobby setup. Users have to juggle multiple accounts, multiple passwords, and multiple PGP keys. From an operational point of view, you must think about backups, monitoring, and migrations for three times as many objects: more mailboxes, more keys, more hostnames, and often more IP addresses.
I would only consider this design if you were building a small commercial mail hosting platform or a multi tenant environment. For a personal Mailu project or a single small organisation it is usually too much work for the benefit you get.
One user, many brands (my recommended base)
To reduce administrative overhead and still get almost all benefits of a multi domain, multi user setup, I recommend the following model: one real mailbox per person, but several branded addresses that all point to that mailbox.
In practice I would do this:
- Keep
abc.comas the main domain andmail.abc.comas the only canonical mail hostname with an IP address (A and AAAA records) and rDNS configured. This meansmail.abc.comis the name that appears in your MX records and in your SMTPEHLOgreeting. - Add
abc.netandxyz.comas additional mail domains in the Mailu admin GUI and configure the DNS records as Mailu describes. - Create one user per person, only under
abc.com, for examplealice@abc.comandbob@abc.com. - Use mail aliases so that
user@abc.netanduser@xyz.comboth deliver touser@abc.com. For this to work smoothly, Mailu must allow sending withFrom: user@abc.netandFrom: user@xyz.comwhen you authenticate asuser@abc.com. With aliases or alternative domains (see below), this is exactly what you get: these addresses become valid local recipients and also permitted sender addresses.- Your DNS (SPF, DKIM, DMARC) should be set so that
abc.netandxyz.comhave SPF records that authorise the same Mailu server. Each domain should have DKIM keys configured in Mailu, and DMARC policies should not be stricter than what your setup can realistically support. - From KMail’s point of view this is simply one account with several
Fromaddress identities, which it supports natively.
- Your DNS (SPF, DKIM, DMARC) should be set so that
- For special brand only addresses that should not exist on
abc.com(if you have any), use explicit mailboxes on the corresponding brand domain.
Conceptually, abc.com becomes your internal canonical domain where users live, and abc.net or xyz.com are additional entrances to the same user base.
This pattern is common in organisations that have one legal entity but use different domains for marketing or projects.
It keeps your user database simple while allowing a flexible address layout towards the outside world.
DNS, hostnames, and rDNS: In this recommended setup you can keep the DNS and IP side very simple:
- Pick a canonical mail host, for example
mail.abc.com. - Configure:
mail.abc.com A→ your Mailu IPabc.com MX 10 mail.abc.comabc.net MX 10 mail.abc.comxyz.com MX 10 mail.abc.com
- Use your VPS web admin console to set the PTR (rDNS) of that IP address to
mail.abc.com. - In Mailu’s
HOSTNAMESsetting include at leastmail.abc.com. If you want users to be able to connect withmail.abc.netormail.xyz.comand still get a valid HTTPS or TLS certificate, add these hostnames too and point them to the same IP address.
This is entirely acceptable from a spam and deliverability perspective:
- Many domains sharing one IP address, one PTR, and one
EHLOhostname that matches the PTR and A record is a normal pattern. - Per domain reputation is handled mostly by SPF, DKIM, DMARC and by your actual sending behaviour, not by trying to have a separate rDNS entry for each domain.
Most large providers send mail for many different domains from a small pool of IPs. What matters is that the technical details are consistent: the IP has a valid PTR, the
EHLOname resolves back to that IP, TLS is correctly configured, and the domain aligns with SPF and DKIM. As long as you follow these rules, using one IP for several domains is perfectly fine.
PGP and WKD: For OpenPGP and Web Key Directory, the “one user, many brands” model also gives you a nice simplification.
- Create one OpenPGP key per person.
- Add three user IDs (UIDs) to that key. Most key management tools make adding extra e mail UIDs very easy:
user@abc.comuser@abc.netuser@xyz.com
- For WKD on each domain, publish the same public key at the WKD path for each address.
Internally you can use symlinks or copy the file.
WKD does not care how you store the file; it only cares which key is served for a given
user@domain.
This keeps key management simple and aligned with how clients and WKD expect things to look.
A single key with several e mail UIDs is the typical OpenPGP pattern. When a contact looks up
user@xyz.comvia WKD, they receive the same key they would get foruser@abc.com, but from the perspective of the protocol and the client everything still looks clean and per address. Later, if you need to rotate or revoke keys, you only have to do it once per person.
Mail client side configuration: On the client side the configuration is also straightforward:
- Configure one account per person, for example IMAP and SMTP as
user@abc.com. - Add identities for:
user@abc.comuser@abc.netuser@xyz.com
- Add server side or client side filters:
- If
To:contains@abc.net, move the message to the folderBrand/abc.net. - If
To:contains@xyz.com, move the message to the folderBrand/xyz.com.- BCC’d messages, mailing lists, and some forwards may not have the original address in the
To:header. - On the server side (Sieve) you’ll often get better results by matching on the envelope recipient or on
X-Original-To/ equivalent, if your MTA adds it. - For simple personal setups, matching on the
To:header is usually good enough. If you later find cases where that fails (e.g. BCC or mailing lists), you can refine the rules to match onX-Original-Toor the SMTP envelope recipient in your Sieve filters.
- BCC’d messages, mailing lists, and some forwards may not have the original address in the
- If
KMail and many other mail clients can configure more than one identity for a given account. In the identity settings you can associate the same PGP key with all identities, because you added all three e mail UIDs to that key.
In KMail you can bind an identity to a specific folder: right‑click the folder → Properties… → General tab, uncheck Use default identity and select the desired identity. When you reply from that folder, KMail will use that identity automatically.
For this to work smoothly, Mailu must accept sending with From: user@abc.net or From: user@xyz.com while you authenticate as user@abc.com.
With aliases or alternative domains (see below), this is exactly what happens: these addresses are both valid local recipients and valid sender addresses for that user.
This way it becomes visually obvious where a message was originally addressed, and users get a strong hint which identity to use when replying.
Pros: This model has several advantages.
From an administration point of view:
- You have one mailbox per person.
- You have one key per person.
- You only maintain one main mail host and one IP address.
From a branding point of view:
- Users can send and receive mail as
@abc.com,@abc.net, and@xyz.com. - Identities in the client plus folder based filtering make it clear which domain a message belongs to.
From a technical point of view:
- WKD behaves as expected, because there is a clear mapping from address to key.
- DMARC and SPF are straightforward, as each domain has its own DNS records but shares the same MX host.
- Deliverability matches how many multi domain MTAs work in practice on the public internet.
Cons: The downside is that addresses across domains are strongly coupled:
- If
user@abc.comexists, thenuser@abc.netanduser@xyz.comnormally also resolve to that same user, especially if you use alternative domains.
You are explicitly accepting that these three domains are different front doors for the same people and the same organisation, not independent cryptographic personas. If you need strong separation between identities, you should choose the fully separated model with independent mailboxes and keys.
Extra angles worth keeping in mind
Backups and restores. This suggested setup makes backups and restores much simpler. You have fewer mailboxes and fewer keys to back up, and you reduce the risk of forgetting one of them during a restore.
Future domain changes. If in five years you decide to drop xyz.com, you simply remove the Mailu domain or alternative domain entry, clean up the DNS records, and stop publishing the xyz.com UID via WKD (or mark it as revoked). Your core abc.com identity and mailbox remain untouched.
Multi tenant behaviour. If you ever start using this Mailu instance for several truly distinct organisations, you will probably want more separation. In that case you should avoid using alternative domains for everything, consider different domains with separate user lists, and possibly introduce additional IP addresses for stricter isolation.
A word about alternative domains
Mailu provides a feature called "alternative domains", which you see as the * symbol under the "Manage" column in the admin GUI.
Up to now, the examples in this appendix have assumed separate mail domains plus aliases. Mailu also offers a different mechanism called alternative domains, which you would use instead of adding
abc.netandxyz.comas full domains. Don’t combine both patterns for the same domain name.
From Mailu’s documentation, an alternative domain “acts as a copy of a given domain. Everything sent to an alternative domain is actually received in the domain the alternative is created for.”
In practical terms this means:
- You have one real domain in Mailu, for example
abc.com. - You add
abc.netas an alternative domain ofabc.com. - When Mailu receives mail for
localpart@abc.net, it internally treats that message as if it had been sent tolocalpart@abc.comand then:- looks up users and aliases on
abc.com, - delivers the message according to what it finds there.
- looks up users and aliases on
So there is no separate abc.net user or alias list. There is a single canonical domain, abc.com, and the alternative domain is just another front door that maps one to one by local part.
You can still use aliases on the canonical domain. For example, if you create an alias
support@abc.com→alice@abc.com, thensupport@abc.netwill automatically behave the same way whenabc.netis an alternative domain ofabc.com. This can be very convenient when you want all address logic in one place and simply mirror it to more domains.
The trade-off is that you cannot make support@abc.net point to a different user than support@abc.com.
For more complex multi tenant setups, or when two domains should have different internal structures, it is usually better to configure them as separate real domains instead of alternatives.
If you decide to use alternative domains instead of setting up separate mail domains in the Mailu admin GUI, you lose some flexibility but gain a lot of automatic behaviour and a simpler configuration. You should decide for yourself whether that trade-off makes sense for your installation and for how independent your domains should appear.
Using Mailgun for a free custom-domain e-mail address
The blog post Using Mailgun for a Free Custom Domain Email Address
explains how to use Mailgun together with Gmail so that your custom-domain e-mails are forwarded to your Gmail account and you can send replies from that custom address through Gmail.
In other words, you keep using the Gmail interface, but your contacts see your own domain in the From field.
Mailgun’s pricing and free‑tier limitations have changed several times. The blog I link to warns that the method may no longer be viable on the free plan; when I tried it, it still worked for my account. You should always check Mailgun’s current pricing and free‑tier features before relying on this approach, especially around inbound routing and daily send limits.
As of 2025 their free plan does still offer:
- 100 messages/day
- 1 inbound route
- 1 custom domain
So the underlying technical pattern (Mailgun forwarding to Gmail + SMTP send‑through) is still viable, just heavily constrained by rate limits and subject to frequent pricing tweaks.
This Mailgun plus Gmail approach is very attractive if you want a quick way to put a custom domain in front of an existing Gmail inbox without running your own mail server. It avoids managing DNS for MX and SPF in depth, caring about SMTP ports from your home network, or operating a full Mailu stack.
The downside is that it gives Mailgun and Google access to your messages and metadata, which is a very different privacy model from hosting Mailu on your own hardware. In the context of this article, I see the Mailgun solution more as a convenient shortcut or migration step, while the Mailu plus Traefik setup is the option for maximum control over your e-mail and long-term digital autonomy.
Mailu, Nextcloud, and Kontact as a Personal Information Management (PIM) Stack
Once your Mailu instance is up and running, you can go beyond “just mail” and turn it into the backbone of a small personal groupware stack.
In this setup:
- Mailu handles email accounts, identities, aliases, and spam filtering.
- Nextcloud manages calendars, contacts, files, sharing, and mobile sync.
- Kontact (KMail, KOrganizer, KAddressBook) acts as the desktop PIM client that sits on top of both Mailu and Nextcloud.
The core design idea is:
Mailu is the single source of truth for user credentials.
Nextcloud and your desktop or mobile clients log in with the same username and password that you already use for email.
The next sections describe one practical way to connect these pieces and then show how you can later add two factor authentication (2FA) and passkeys using Authelia together with Mailu’s AUTH_REQUIRE_TOKENS mechanism.
High Level Architecture
At a high level the stack looks like this:
- Mailu on your home server
- Handles IMAP and SMTP, spam filtering, webmail, and the admin GUI.
- Hosts the user database with email addresses and passwords.
- Nextcloud (on the same home server or another host reachable over your WireGuard mesh)
- Uses Mailu’s IMAP server as an external user backend for login.
- Provides CalDAV and CardDAV endpoints at paths such as
/remote.php/davfor calendars and contacts.
- Kontact on your desktop (KMail, KOrganizer, KAddressBook)
- KMail talks to Mailu using IMAP and SMTP as already described in the main part of the article.
- KOrganizer and KAddressBook talk to Nextcloud using DAV (CalDAV and CardDAV).
All three layers share the same identity, for example user@example.com with the Mailu password.
This gives you:
- One login per person.
- Central email on Mailu.
- Calendars and contacts on Nextcloud.
- A unified desktop PIM view via Kontact.
In effect you get a small version of a “groupware suite” similar to what large organizations use, but built from standard open source tools that speak IMAP, CalDAV, and CardDAV. Because these are open protocols, you are not locked into a single vendor’s clients or mobile apps.
Wiring Mailu and Nextcloud Together (IMAP External Auth)
Nextcloud has an app called “External user backends” (user_external) which can authenticate users against an IMAP server. The Mailu documentation explains how to use this with Mailu for Nextcloud 15 and newer.
The basic idea is:
- Enable IMAP external authentication in Nextcloud
- In Nextcloud, enable the “External user backends” app (
user_external) fromApps → Disabled apps. - In
config/config.phpadd something like the following (adapted and simplified from the Mailu FAQ):'user_backends' => [ [ 'class' => 'OC_User_IMAP', 'arguments' => [ '127.0.0.1', // or internal IP/hostname where Mailu's IMAP is reachable 993, // IMAPS port 'ssl', // connection security 'example.com', // optional: limit to this domain true, // strip domain part for internal username false, // do not use STARTTLS ], ], ], - This tells Nextcloud: when a user logs in with
user@example.comand passwordP, try to log in to the IMAP server with the same credentials. If that IMAP login works, accept the Nextcloud login and create a Nextcloud account on the fly.
⚠️ Version caveat: theuser_externalapp is community maintained and sometimes runs behind recent Nextcloud releases, for example there were reports around version 28. Before you commit to this architecture, check whetheruser_externalsupports your current Nextcloud version and keep an eye on its maintenance status.
Ifuser_externalbreaks after a future Nextcloud upgrade, users may suddenly be unable to log in. It is therefore a good idea to test new Nextcloud versions on a staging instance first or at least keep a backup of your working configuration so that you can roll back quickly.
- In Nextcloud, enable the “External user backends” app (
- Resulting login behaviour
- Users log in to Nextcloud with their Mailu email address and password.
- Nextcloud does not store the password itself. It only uses IMAP to verify the credentials.
- User provisioning becomes dynamic. As soon as a Mailu user logs in to Nextcloud once, a matching Nextcloud account is created.
- What Mailu remains responsible for
- You create users and reset passwords in the Mailu admin GUI.
- Nextcloud treats Mailu as its “authentication oracle” that knows which users and passwords are valid.
If example.com is your main Mailu domain, you get a simple mental model:
“If you can read email at
user@example.com, you can also log in to Nextcloud and access your calendar and contacts.”
How Kontact Fits on Top
Once Mailu and Nextcloud are connected, you can place Kontact on top as your desktop PIM client.
KMail and Mailu
Configure KMail exactly as already shown in the main article:
- IMAP and SMTP host:
mail.example.com - Username: full email address such as
user@example.com - Password: the Mailu password
- Add multiple identities if you use several branded addresses. The appendix section “One user, many brands” explains this pattern.
KOrganizer, KAddressBook, and Nextcloud
Nextcloud offers a unified WebDAV endpoint, typically at https://cloud.example.com/remote.php/dav/.
CalDAV (calendar) and CardDAV (contacts) live under that path and are often discovered via /.well-known/caldav and /.well-known/carddav redirects.
CalDAV and CardDAV are standard protocols that extend WebDAV for calendar and address book data. Most modern calendar and contacts clients know how to talk to them, including many Android and iOS apps if you use an additional DAV sync app.
To connect Kontact:
- Open KOrganizer.
- In the calendar list at the bottom left, right click and choose “Add Calendar…”.
- Select “DAV groupware resource”.
- Fill in the fields as follows.
- Server URL:
https://cloud.example.com/remote.php/dav/ - Username:
user@example.com(the same as for Mailu) - Password: the same Mailu password, because Nextcloud uses IMAP authentication against Mailu.
- Server URL:
- KOrganizer will probe the server, discover your calendars, and offer them as DAV resources. Select the ones you want.
Repeat a similar process in KAddressBook, again using a DAV groupware resource, to sync contacts from Nextcloud.
Once this is done:
- KMail shows your Mailu inbox.
- KOrganizer shows your Nextcloud calendars.
- KAddressBook shows your Nextcloud address books.
- All of these appear together inside Kontact as one integrated PIM environment.
Calendar Invites: from Mailu to Nextcloud via KMail and KOrganizer
With this wiring, a calendar invite travels through your system in a predictable way.
Receiving an invite
- Someone sends an invite to
user@example.com. Their calendar server generates an iCalendar (.ics) attachment with atext/calendarMIME type, also called an iTIP event. - Mailu receives the message and delivers it into your mailbox.
- KMail fetches the mail via IMAP. When you open the message, KMail recognizes the
.icsattachment as a calendar invitation. - KMail shows buttons such as “Accept”, “Decline”, and “Tentative”. When you click “Accept”, KMail delegates the action to KOrganizer:
- KOrganizer creates or updates an event in the calendar you have selected for invites.
- Because that calendar is a CalDAV resource pointing at Nextcloud, the event is written back to Nextcloud on the next sync.
- Your phone, laptop, and any other DAV clients that sync the same Nextcloud calendar see the event appear or update.
This process is compatible with most other calendar systems, including Google Calendar and Microsoft 365, as long as they send standard iCalendar invites. On their side it just looks like they are inviting an email address. On your side, the mail client and CalDAV stack do the glue work.
Sending an invite
- In KOrganizer, you create a new event in a Nextcloud backed calendar and add attendees by entering their email addresses.
- KOrganizer stores the event into the Nextcloud calendar via CalDAV.
- When you save the event, KOrganizer and KMail generate iTIP invitations:
- KMail sends the
.icsinvites as regular email via Mailu’s SMTP submission port. - Recipients receive the invitations in their own mailboxes and can accept or decline them in their clients.
- KMail sends the
- Their replies arrive as
.icsupdates in your mailbox. KMail again hands those updates to KOrganizer, which updates the corresponding event in the Nextcloud calendar.
From the user’s point of view:
- They do not need to think about Mailu and Nextcloud as separate services.
- “Mail” is KMail talking to Mailu.
- “Calendar” is KOrganizer talking to Nextcloud.
- Invites “just work” as long as KOrganizer is connected to a Nextcloud calendar and KMail is configured as the mail transport.
Security Limitations of the Basic Integration
In this Mailu as authentication provider setup:
- Mailu knows the real password for each user, for IMAP, SMTP, and webmail.
- Nextcloud does not store the password, but still relies on simple username and password over IMAP for login.
- Kontact stores the Mailu or Nextcloud password in its credential store (KWallet).
By default:
- There is no second factor (2FA) on the IMAP and SMTP flows.
- Passkeys (FIDO2 and WebAuthn) are not used.
- Nextcloud does support its own 2FA providers such as TOTP and WebAuthn, but IMAP external authentication makes this harder to use and the
user_externalapp has had compatibility issues with some newer Nextcloud versions.
So the basic design is:
Very simple, one password everywhere, but only single factor and therefore only as strong as that password and the overall hygiene of your devices and network.
If you want stronger protection against phishing and device compromise, you need to add another layer on top.
Hardening with Authelia and Mailu AUTH_REQUIRE_TOKENS
The good news is that you can add modern 2FA or passkeys for web logins without throwing away your existing Mailu setup. The trick is to combine three ideas:
- Put an authentication layer such as Authelia in front of your web user interfaces (Mailu admin and webmail, Nextcloud).
- Use Mailu application tokens and the
AUTH_REQUIRE_TOKENSflag for IMAP and SMTP. - Optionally move Nextcloud away from IMAP authentication later and let it authenticate via Authelia using OpenID Connect (OIDC), if you are ready to relax the rule that “Mailu is the only credential store”.
What Authelia Brings
Authelia is an open source single sign on (SSO) proxy that sits in front of web applications and adds:
- First factor authentication with username and password, backed by a file or LDAP backend.
- Second factor authentication, for example:
- TOTP with authenticator apps.
- WebAuthn, security keys, and passkeys.
- Other methods via plugins.
You typically deploy Authelia next to Traefik:
- Traefik terminates incoming HTTPS connections.
- Traefik forwards protected paths, such as
/admin,/webmail, and/nextcloud, to Authelia first using ForwardAuth. - If Authelia says “OK”, Traefik passes the request to the backend service.
Authelia does not speak IMAP, so it cannot use Mailu directly as a password backend. It expects either:
- A small file backend with a YAML file containing users and hashed passwords.
- An LDAP backend such as OpenLDAP, FreeIPA, or Samba AD.
For a small home setup, a practical compromise is:
- Keep Mailu as your mail credential store.
- Use a file backend in Authelia, with the same usernames such as
user@example.comand the same passwords as in Mailu, and keep them in sync manually or with a small script. - Let Authelia add 2FA or passkeys on top of those credentials for web access.
From the user’s perspective it still feels like logging in with the Mailu password, but with a second factor on top.
If you ever move to a real LDAP server later, you can point both Authelia and Mailu at LDAP. In that case LDAP becomes your true primary user database, and Mailu and Authelia are both clients of it. This is closer to how enterprise setups work, but it is more complex to manage on day one.
Using Mailu Header Authentication for Webmail and Admin
Mailu 2024.06 introduced header authentication. A trusted reverse proxy can send the email address of the already authenticated user in an HTTP header (by default X-Auth-Email), and Mailu will log the user in without asking for the password again.
In mailu.env you configure:
PROXY_AUTH_WHITELISTto specify which IP addresses are allowed to perform header authentication, for example the IP address of your Authelia or Traefik instance.PROXY_AUTH_HEADERto specify which HTTP header contains the user’s email address.PROXY_AUTH_CREATEto control whether Mailu should create accounts automatically if the user does not exist yet.PROXY_AUTH_LOGOUT_URLto specify where to send the user after logging out of Mailu.
Once this is configured:
- Traefik and Authelia protect
/adminand/webmail. - After Authelia 2FA or passkey authentication succeeds, Traefik forwards the request to Mailu and adds
X-Auth-Email: user@example.com. - Mailu sees the header from a whitelisted IP address and logs the user into the admin GUI or webmail without another password prompt.
In effect:
For web access to Mailu, your second factor such as TOTP or WebAuthn is enforced by Authelia in front of Mailu.
Your IMAP and SMTP connections still use classic username and password or tokens directly against Mailu. This brings us to the next part.
Mailu Application Tokens and AUTH_REQUIRE_TOKENS
Mailu offers authentication tokens, sometimes also called “application passwords”. You manage them in the admin GUI. They are long, random, per application secrets that users can generate and revoke without changing their main account password.
According to the Mailu documentation:
- Token based authentication is exempt from Mailu’s rate limits and therefore does not trigger the usual slowdowns from brute force protection.
- Verifying tokens is less resource intensive than tracking rate limits on real passwords.
The configuration flag AUTH_REQUIRE_TOKENS in mailu.env takes this idea one step further:
- When
AUTH_REQUIRE_TOKENS=false(the default), users can log in to IMAP, SMTP, and POP3 with either the account password or any application token. - When
AUTH_REQUIRE_TOKENS=true, database backed users must use an application token for IMAP, SMTP, and POP3 and cannot use the main account password at all. Internal service accounts can be configured separately if needed.
This is important in a world with 2FA and passkeys:
- Your Authelia SSO with 2FA or passkeys protects web logins for Mailu admin and webmail and maybe Nextcloud.
- IMAP and SMTP cannot use WebAuthn or similar second factors. They can only use “something you know”.
- If you disable direct password logins and require tokens:
- The real account password is never stored in KMail, on phones, or in other mail apps.
- Each client gets a long random token that you generate via the Mailu web admin, which is itself protected by 2FA.
- If a device is lost or compromised, you revoke that one token without forcing the user to change their master password everywhere.
The hardened model looks like this:
- Web flows for Mailu and possibly Nextcloud use Authelia with a file or LDAP backend and 2FA or passkeys. Mailu trusts Authelia via header authentication.
- Mail protocols such as IMAP, SMTP, POP3, and Sieve use
AUTH_REQUIRE_TOKENS=true, so only long, per device tokens are valid.
For users this leads to three categories of secrets:
- Authelia credentials plus second factor, used only in the browser to access Mailu and Nextcloud.
- Mailu application tokens, used in KMail, mobile mail clients, and similar tools.
- Optional Nextcloud app passwords, if you later move Nextcloud away from IMAP authentication and enable its own 2FA, so DAV clients use app specific passwords.
In a small setup you can keep Authelia’s file backend, Mailu users, and (if you stay with IMAP authentication) Nextcloud in sync by:
- Using the same usernames such as
user@example.com. - Keeping one main password in Mailu and copying it into Authelia.
- Letting
AUTH_REQUIRE_TOKENSenforce that even if this base password leaks, it still cannot be used directly with IMAP or SMTP.
This model is similar to how large providers like Google handle app passwords. Human logins use strong 2FA, and non interactive protocols use long, random tokens that can be revoked individually. You are essentially recreating that pattern on your own infrastructure.
Summary: When Is This Worth It?
If you mainly want email and a simple calendar and contacts view, the basic integration is already a big improvement:
- Mailu with Nextcloud using IMAP external authentication.
- Kontact as a desktop PIM client.
- One password in Mailu, reused across all services.
If you want to move closer to “serious” self hosted security, you can go further:
- Put Authelia with header authentication in front of Mailu’s web interfaces.
- Enable
AUTH_REQUIRE_TOKENS=truein Mailu and switch all mail clients to use application tokens. - Optionally move Nextcloud away from IMAP authentication and let it also use Authelia via OIDC, with its own app passwords for DAV clients.
You then have:
- Web logins guarded by 2FA or passkeys through Authelia.
- Protocol logins guarded by revocable, per device tokens such as Mailu tokens and Nextcloud app passwords.
- A familiar PIM experience in Kontact built on top of a modern, privacy friendly, self hosted stack.
Footnotes
In a future blog post I might introduce Uncloud as another option for how to set up a WireGuard Hub-and-Spoke (Star) topology. ↩︎
See also How to connect Docker containers across multiple hosts with WireGuard and Direct routing to containers in bridge networks. ↩︎